Objectives
• understand the main factors that contribute to the deterioration of paper;
• be able to identify damage and deterioration of paper;
• understand how paper should be stored to minimise damage;
• understand how flat paper items should be displayed;
• have the necessary knowledge and practical skills to mount and frame paper items; and
• know how to make simple, protective enclosures for flat paper items.
Introduction
Paper is found in all collections. Its use is virtually universal. While not all paper is of equal importance, you will almost certainly have some items that need to be looked after.
For example:
• valuable and significant items, such as works of art on paper and manuscripts;
• associated material, such as the provenance documentation for other items in your collection; and
• material of particular importance to your organisation, such as documents relating to the setting up of your museum, gallery or library.
Of all the materials in your collections, flat paper items are perhaps the most vulnerable to damage and deterioration. Some flat paper materials have extremely fragile surfaces—such as pastel and charcoal drawings—and others are inherently unstable. And of course, all paper can be damaged by poor handling and lack of proper care.
This section provides information on how to protect your paper items. As the saying goes: prevention is better than cure; and nowhere is this truer than in the care of collections of flat paper items. Correct handling, storage and display are the linchpins of preventive care. The condition and lifespan of all flat paper items can be substantially improved if they are stored and displayed appropriately.
Paper in collections
Paper is used to make a wide range of objects, including:
- prints;
- maps;
- letters;
- documents;
- watercolours;
- drawings;
- technical drawings;
- posters;
- books;
- photographs
- architectural plans
- magazines
- stamps
- newspapers
- archival records
- posters
This section deals with the care of flat paper items—items made of single sheets of paper.
For more information :
Books and photographs have specific needs. For information on the care of books and photographs, please see the chapters on Books and Photographs.
What is paper?
Paper is made from cellulose fibres. Cellulose consists of long ribbon-like molecules held together in tightly-packed layers to form microfibrils. The microfibrils group themselves in bundles and numerous of these bundles go to form the paper fibre.
The fibres are suspended in water in the proportions of approximately 5% cellulose fibres to 95% water. The fibres are picked up on a mould, in the case of handmade paper, or on the web, in the case of paper-making machines. The mould and web are sieve-like in structure and allow the water to drain away, leaving a felted sheet of paper.
This fundamental process of paper-making has not changed since the first sheet of paper was produced in China around 200 BC.
Early European papers were made from the cellulose fibres from old rags. Later, fibres were extracted specifically to be used in paper-making. Paper fibres come from a range of plants, including:
- flax—also used to make linen;
- hemp—also used to make rope and military uniforms;
- cotton—also used to make fabrics;
- paper mulberry, daphne—Japanese paper- making fibres; and
- trees.
Ingredients and properties of paper
The type of plant fibres and the method of manufacture determine, to a large degree, the final characteristics of the paper. The most permanent papers are those made from plant fibres which are high in cellulose, such as cotton. A large percentage of the paper produced today is made from ground wood. This paper is not intended to last and is used for ephemera, such as newspapers. Different quality wood-based paper products are available; and high-quality, long-lasting papers can be produced from wood pulp.
Besides fibres and water, paper usually contains products that are added during manufacture to give it certain properties. These include:
- fillers or loadings that produce a smoother surface and a whiter, more opaque paper. Kaolin or China clay, talc, calcium carbonate and titanium dioxide have been used as fillers and loadings;
- coatings that are added to the surface of the paper to alter its characteristics. Minerals and other materials such as starch have been used as coatings; and
- sizes to reduce the absorbency of paper. Historically, gelatine was used as a size in European paper-making.
Most papers also contain impurities and unwanted chemicals—acids that limit their lifespan. These acids are a major cause of deterioration and impermanence in paper. They can migrate from one paper to another, plus paper will pick up acids from other materials it touches. To overcome the problem with acids, there are now papers and paper-based products being produced that are free of acids and other impurities. These archival- quality products are made from various fibres, including cotton and specially-treated wood pulp. Many archival papers and boards also contain an alkaline buffer to help protect them from acidity. Whenever possible, use archival papers to store and display other paper items.
What are the most common types of damage?
Paper is vulnerable to physical damage and to the damage caused by chemical deterioration.
Physical damage includes problems such as:
- tears;
- paper losses;
- dog-eared corners;
- dents and punctures;
- creases and folds—paper can split along creases and folds if the paper is brittle or if it is folded and unfolded repeatedly;
- insect attack—paper, sizes and glues are good food sources for some insects. Mice and rats will also eat paper;
- abrasion and general wear and tear from excessive or ongoing use; and
- distortions caused by fluctuations and extremes of relative humidity and temperature in storage and display
- environments


Damage from chemical deterioration includes:
- faded colours and discoloured paper—from exposure to ultra-violet (UV) radiation and high lighting levels;
- faded colours and discoloured paper—from age of the item itself or the items with which it comes in contact;
- mould attack—mould digests the materials it grows on;
- brittle paper—from the acids produced by the paper or the items with which it comes in
- contact; and
- damage from pollutants.
For more information:
For more information about adverse environmental effects, please see Damage and Decay.
Recognising the problems
Some of the common forms of damage and deterioration in flat paper items are listed below. If the damage or deterioration is severe, isolate the item and get advice from a conservator.
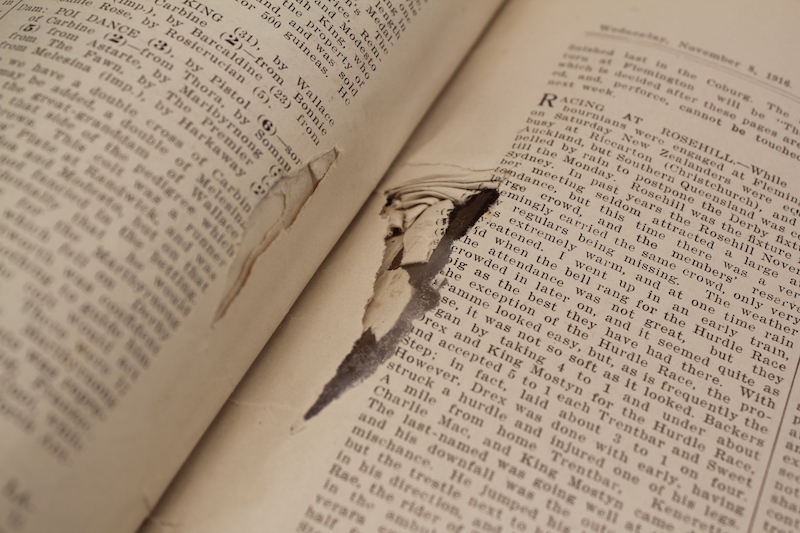
Physical damage such as tears and losses can occur easily when items are handled roughly or stored in crowded conditions. Physical damage can also include abrasion, chipped corners, dents, and punctures. Paper with mechanical damage should be handled carefully to avoid making the damage worse.
Creases and folds can disfigure and weaken paper. Old or brittle material is especially vulnerable because it can split and tear easily.
Foxing is the name given to the small, brown spots that appear in a specific area of the paper or over an entire surface. Foxing is usually caused by mould attack, brought on by a combination of high humidity, temperature and acidity. Other brown spots in the paper can be caused by inherent impurities such as tiny metal particles.
Given optimum conditions (high relative humidity, temperature and low air flow) mould will colonise paper artefacts. Mould can attack and digest the paper, sizes and additives within the paper as well as the media on the surface. Such attack weakens the paper and often leaving it badly stained.
Soiling and staining can cause considerable damage to paper through:
- dirt particles, which are often acidic. These can be caught between the paper fibres, weakening and discolouring the paper, and creating a foothold for insects or mould; and
- self-adhesive sticky tapes, rusting clips and staples, and poor-quality adhesives. They can stain, cause severe damage through chemical interactions and be extremely difficult to remove.
Discolouration, usually brown or yellow distributed evenly or unevenly throughout the paper, is a sign of deterioration that is generally caused by acidity and/or light damage to the paper. On works of art on paper, the discolouration often appears worse in the margins or on the reverse side, where the paper has been in direct contact with an acidic mount or other poor-quality materials. This discolouration is often referred to as ‘mat burn’.
Paper made from poor-quality or impermanent materials such as newspapers , will deteriorate rapidly when exposed to light for lengthy periods and/or left in contact with other acidic material. It becomes very brittle and may appear orange or brown. Such paper can be extremely fragile and may disintegrate with unsupported movement or handling.
Common causes of damage
All the most common types of damage are caused by:
- poor handling;
- poor storage methods;
- inappropriate display methods;
- wear and tear from repeated use;
- chemical changes in the paper;
- chemical changes caused by chemicals that are present in the materials in contact with the paper or that are present as pollutants in the atmosphere; and
- combinations of any or all of the above.
A great deal of damage to paper can be prevented by care and pre-planning your handling, appropriate storage and display of flat paper items. The following sections will outline practical steps you can take to minimise this type of damage.
The do\'s and don\'ts of handling flat paper
When handling paper, care and commonsense can help to prevent damage.
As a result, you should handle paper items with care, and as little as possible. It is also important to examine each sheet of paper for damage before handling.
Furthermore, all paper is fragile—even paper in good condition—so support it throughout use and handling.
The following techniques will help you to handle paper sensitively:
Make sure your hands are clean. You should wear gloves for added protection. Cotton gloves are often recommended, but they are not always appropriate because they can make it harder to pick up individual pieces of paper. Clean, close- fitting surgical gloves are a good alternative to cotton gloves.
If you must pick up a piece of paper to examine it closely, place it on a rigid support, such as a piece of archival board, and lift the board. Holding a sheet of paper in your hand may cause it to curl and increase the risk of damage.
If you must carry pieces of paper over a distance, place them horizontally and supported on a rigid support, such as archival mat board. It is even better to place the item between rigid supports, because this prevents the paper lifting as you walk.
If paper is already mounted on cardboard, do not simply tuck it under your arm to be carried. It should be supported as described above. This is because many old pieces of paper have been mounted on boards which have become brittle with time. If these boards break, the attached pieces of paper will also break.
If you must lift a flat paper item without a support, hold the sheet of paper with both hands, at opposite edges or at diagonal corners. Lift the sheet, allowing it to droop in the centre with an even curve, but no buckles or kinks.
For extra protection, you can carry paper in folders, Mylar pockets, Copysafe sleeves or polyethylene bags.
Your storage and work areas should have adequate space for laying out works. Before placing items on a work table, it is best to line the surface with sheets of clean paper.
Use pencil when working near paper items. Pencil can be removed from paper, whereas ink can be quite difficult and, in some cases, impossible to remove.
Make copies of paper items that are accessed regularly or that are to be displayed in poor conditions or for a long time. Originals should then be safely stored and accessed only in special circumstances. You can photocopy stable material such as printed documents, but copy the original only once—make any further copies from the photocopy. You should also make photocopies of faxes that are to be kept, then keep the copies on file. Ideally, these photocopies should be made on archival, acid-free paper.
CAUTION:
Fragile material, and items which are extremely light-sensitive, for example early photographs, should not be photocopied in this way. Light-sensitive material or items that are damaged or deteriorated, such as brittle wood-pulp paper items or material with faded inks, can be reproduced, but the work should be done by professionals. Even newspapers and maps can be copied onto better-quality paper using large-format photocopiers. State galleries and museums can suggest places that offer archival reproducing services.
Do\'s and dont\'s of repair and labelling
Inappropriate labelling and repair methods can damage paper. The following guidelines can help to prevent such damage.
Biros, other ink pens and markers should not be used to label paper items. Many of these inks, particularly felt-tip pen inks, can spread and cause unsightly staining.
If you must label a paper item, write in soft pencil—a B pencil is good—on the edge of the back of the paper. Don’t press down when writing because you might leave grooves in the paper.
Paper clips, even plastic ones, can damage and distort paper. They should not be used for attaching labels, even temporary ones. If you need to place a temporary label on a paper item, write on a piece of paper that is large enough to fold around the whole item.
Never mend pieces of paper with self-adhesive sticky tapes; these cause problems as they deteriorate. At first, the adhesive will become sticky and be easily absorbed into the paper. As the adhesive changes chemically, it begins to yellow and eventually turns a dark orange. At this stage, the adhesive is almost totally insoluble and any stains cannot be removed.
If you have a damaged piece of paper, place it in a protective sleeve or wrapper. This can prevent further damage until you can get advice from a conservator.
Guidelines for storing and displaying flat paper
In an ideal world, the areas used for the storage and display of flat paper, and indeed the entire building housing a collection, would be environmentally controlled. Air-conditioning would be maintained constantly and monitored, the temperature and relative humidity would be maintained at optimum levels, the air would be filtered, light levels would be controlled and there would be ample space and funding for every item to be appropriately framed or housed.
Unfortunately, few of us are lucky enough to live in such a world. But it is important to be aware of the optimum storage and display conditions for paper; and to work towards achieving them using the resources available, a lot of ingenuity and a little compromise.
Ideal conditions for storing and displaying paper
The following conditions will help to protect your collections of paper.
Keep the temperature constant and moderate. The optimum temperature is 18–22°C. This range accommodates people’s comfort, as well as the need for a low storage and display temperature.
Keep the relative humidity as constant as possible—in the range 45-55%. Do not hang or store paper items on outer walls, on walls outside bathrooms or in areas where there might be steam from a kettle or urn.
Keep light to the minimum necessary for the activity. Ideally, paper should be stored in the dark. Light levels in display areas should be as low as possible, and display periods should be limited.
- Museum and gallery standards recommended lighting level for display of paper items is 50 lux or less.
- The UV content of the light should be no greater than 75μW/lm and preferably below 30μW/lm.
- All light sources in working and display areas should be filtered for UV radiation.
- Avoid using heat-producing lights and spotlights.
Generally speaking, do not display works on paper on a permanent basis. Keep the light levels as low as possible and reduce ultra-violet light exposure through the use of filtered Perspex in frames and showcases.
Items need to be fully supported.
Areas should be kept clean and well-ventilated. Dust and other pollutants should be kept to a minimum.
Steps should be taken to protect collections against insect and mould attack.
Good housekeeping procedures should be enforced with regular monitoring of storage and display areas.
General storage guidelines
Wherever possible, the storage site should be in a central area of the building where the effects of climatic fluctuations and extremes will be minimal. That is, away from external walls and not in the basement or the attic.
The storage site should not have any water, drainage or steam pipes, particularly at ceiling level. Leaking pipes can cause a lot of damage.
The storage system used should be reasonably easy to use and should allow easy access. Ease of use and ease of access usually means things will get less damaged during handling. Frustration with a difficult system often leads to damage.
Wherever possible, flat paper items should be stored horizontally in boxes.
Dividers should be placed within storage boxes or filing cabinets. Dividers reduce the movement of items with the storage system and provide additional support to the stored items.
Layers of storage should be provided. This approach gives maximum protection from:
- fluctuations in relative humidity and temperature. This is especially important in areas where the ideal levels of relative humidity and temperature cannot be achieved: the multiple layers of storage act as a buffer zone between the paper items and extreme or fluctuating conditions;
- dust, pollutants and insects; and
- the damaging effects of light.
Wherever possible, each paper item should have its own protective wrapper or enclosure to protect it.
Further layers of protection should be provided. Individually wrapped paper items should be boxed.
Storage and housing systems should be labelled on the outside so items can be located easily without having to search through and inspect every similar item.
For more information:
More information on making protective enclosures and storage boxes is given later in this chapter.
CAUTION:
Cleaning materials containing chlorine bleaches or ammonia should not be used near collections of paper.
Naphthalene (moth balls), insecticides and fungicides are active chemicals which can damage paper and people, especially in an enclosed storage environment.
Care should also be taken to not stack too many storage boxes on top of each other. This can make access difficult and can result in damage to the collections and in injury.
Materials suitable for the storage and display of paper
Materials which are to be in direct contact with items for any length of time should be free of acids and other impurities which might damage paper. These products are usually marketed as archival, museum quality, acid-free or permanent materials. They will be referred to as ‘archival’ materials in this chapter.
Paper, card and board:
Archival paper, card and board should:
- have a pH of 7 or above;
- be made from fully bleached, alpha cellulose pulp and sized with an alkaline size;
- be free of lignin, ground wood, metal particles, plasticisers, sulphur, oxidising chemicals and other potentially harmful products; and
- meet stringent strength and permanency specifications.
The highest quality paper products are 100% cotton. They are often referred to as 100% rag.
CAUTION:
Alkaline-buffered products should not be used with some photographic material or with silk-based material.
Plastics
Inert plastics should be free of plasticisers, surface coatings and other harmful chemicals. Polyester films, known as Mylar D or Melinex, polypropylene and polyethylene, are all suitable. Polyester is the superior archival plastic.
Adhesives
Adhesives are used to hinge paper items to their mounts/mats, as well as in the construction of storage enclosures. Adhesives which are water- based, chemically inert and fully reversible can be used in direct contact with paper; for sticking hinges to paper for example. Home-made wheat starch paste and methylcellulose are recommended. Some archival, acid-free gummed paper tapes can also be used.
Adhesives to use if you are making enclosures, photo corners, boxes etc. are:
- ‘acid-free’ double-sided tape—3M double- sided tape; and
- Ethylene-vinyl acetate (EVA), archival quality PVA used to be adhere boxes.
These products should never be used directly on your paper item because they are difficult to remove, especially PVA.
Safe exhibition/display fit out for works on paper
Sealed frames or cases with preservation-quality components assist to control of light, temperature, and relative humidity (RH) in the exhibit area.
Contact with poor quality materials in the exhibition/display space can damage paper. Many materials for example Woods, wood sealants, paints, adhesives, gasketing materials, and display fabrics give out active chemicals, which can contribute to the deterioration of paper items. The following list of good and bad materials can help you in selecting storage and display furniture, or the materials to use when making them yourself.
Stainless steel, anodised aluminium or metal coated with baked enamel are preferred for storage furniture however are expensive. If wood must be used, choose a type that is comparatively low in harmful emissions. Certain softwoods, notably poplar and basswood, are recommended. Strong and economical wooden products like plywood and other wood composites are frequently used for case construction. In deciding to use these products, be aware that due to their fabrication with adhesives overtime they omit formic acids. To reduce the risk, cut a barrier Mylar™ or archival paper support to sit between the work on paper and the wooden case. Also consider sealing the wood to reduce gaseous emissions. The coatings recommended by conservators are moisture-borne polyurethanes and two-part epoxy sealants. Not all water-based polyurethanes are safe, however, and formulas may change. Review relevant literature to obtain the most current information.
Good | Bad |
enamelled metal | chipboard, Customwood, unsealed woods, especially hardwoods |
glass | PVA glue |
ceramic | uncured paint |
inorganic pigments | protein-based glues, |
polystyrene | wool |
polyester film | felt |
cotton | cellulose nitrate |
linen | polyurethanes |
acrylic paints and varnishes | PVC |
Preparing flat paper for storage
Before you put flat paper items into storage, it is important that you complete the following steps.
Examine them and document their condition. This will help you determine which storage method is most appropriate for the item and whether the item should be displayed. For example, items with a friable medium such as charcoal, or with a fragile paint layer, might need deep window mounts to protect the image surface.
Sort them according to their condition. It is important to separate items which are very acidic, to prevent the migration of acids and impurities into sound paper items.
Check them for mould and/or insect infestation.
For more information
For more information on methods for examining items and assessing their condition, please refer to the chapter on Collection Surveys and Condition Reporting in Managing Collections.
Gently brush them with a soft brush to remove surface dust where necessary, but only if the item is stable.
CAUTION:
Do not brush the surface of items with friable or fragile media. Pastel and charcoal drawings, for example, could be badly smudged if brushed.
Unfold creased corners and open out folded items.
Check for material which may damage the item, such as acidic paper or plastic wrappers, rusty paper clips and timber backboards.
Document, label and retain any associated material which may be of importance.
Interleave items with archival tissue or paper where possible.
If you have damaged items, document them, separate them from the collection and seek advice from a conservator.
Housing flat paper
Proper housing is essential to preventive conservation. As already noted, providing an individual item with its own protective enclosure is a very effective way of minimising damage. This serves as a buffer against the environment, as well as offering protection from physical damage and direct handling.
How a collection or individual items from a collection are housed will depend on:
- the type of items;
- the number of items;
- whether they will be heavily used;
- whether they will be displayed or used for research;
- how much money you have to spend;
- how much storage and display space you have; and
- what skills and time you have to do the work.
Flat paper items can be stored in a variety of ways. They can be:
- mounted/matted and framed;
- mounted/matted and placed in Solander boxes;
- encapsulated and placed in a box;
- placed in boxes, drawers and folders, with or without interleaving;
- placed in albums;
- placed in envelopes; and
- slipped into transparent archival sleeves and housed in a binder; or hinged into archival scrapbooks.
Mounting/hinging flat paper
Mounts/mats serve to:
- protect your flat paper items from physical damage;
- discourage direct handling;
- give structural support;
- allow the paper to respond naturally to fluctuations in environmental conditions;
- enhance the appearance of your paper items, and so are widely used to display paper items; and
- buffer against acidity if you use acid-free, alkaline buffered mount board.
The structure of a mount
Standard mounts consist of:
- a window mount with a bevelled window. The bevelled edge prevents shadows falling on the paper item when mounted works are lit for display; and
- a backboard to support the flat paper item.
To give adequate support, especially to heavier papers, both the window and the backboard should be cut from board that is at least four ply.
Acid-free archival boards give the best protection to paper items. Acidic boards are much cheaper; but they will cause damage and will need to be replaced sooner, because they can deteriorate quite rapidly.
The window mount is hinged to the backing board, either down the left side or along the top edge with a continuous strip of gummed, linen tape. The window mount and the backboard should not be stuck together in such a way that makes the item inaccessible.
Cutting and assembling the window and the backboard
To begin, you cut two pieces of board of equal size. The size of the mount is determined by:
- the size of the item;
- the size of the frame or box you are putting the mounted item into; and
- the width of the margins you want around the window in the window mount section.
Windows are usually cut with the width of the top and side margins equal. The bottom margin is usually slightly weighted visually; that is, it is usually slightly larger than the others. This visually centres the mounted item.
Once cut, the backing board can be put aside while you cut the bevelled-edge window.
Windows are basically quite easy to cut; but you usually won’t find mount-cutting easy at your first attempt. Practice, a steady hand and the right equipment are essential for a good result.
Mount-cutting equipment ranges from simple hand- held tools such as mount-cutting knives and the Dexter which are run along a straight edge, to expensive table or wall-mounted machines. Wall- mounted machines should really be considered only if you need to cut lots of mounts over a long period of time.
If you do not frequently cut mounts, it may be more cost effective to get a framer to cut them for you. Also, when large quantities or complicated mounts are required, it may be more efficient to have mounts cut by a framer; but make sure that you specify archival-quality board if that is what you want. Some framers don’t use archival-quality board unless they are asked to.
Instructions for cutting the window are not given here because they vary according to the equipment you have. For more information, consult a conservator.
Once the window and the backboard have been cut, they can be hinged.
- Lay them down flat, side by side. The inside face of each should be facing upwards. Their longest edges, either the top or the left-hand edge of the completed mount, should abut each other.
- Cut a strip of gummed linen tape, just a little shorter than the longest edge. Wet the gum and put the linen tape in place as a hinge. Don’t use too much water.
Close the mount and align the backboard and the window, and lightly weight it while it is drying.
Once dry, the mount/mat is complete. It is now ready for the paper item.
When large quantities or complicated mounts are required, it may be more efficient to have mounts cut by a framer; but make sure that you specify archival-quality board if that is what you want. Very few framers use archival-quality board unless they are asked to.
Mounts can be modified in various ways to suit an item. For instance, a sink mount with a deep window would be suitable for an item lined on thick board and a double-sided mount with windows front and back for an item with images on both surfaces.
Hinging and mounting, especially of fragile items, is often better left to conservators or conservation framers, who can be relied on to use archival techniques and who will have and understanding of the media involved and the requirements for the individual items.
Hinges
It is recommended you attach your flat paper items to their mounts by hinging them to the backboard. The item should not be attached to the reverse side of the window mount, or stuck with adhesives or self-adhesive tapes directly to the backing board. These methods of attachment can be very damaging and very expensive to reverse.
Hinges are made from high quality archival papers—usually conservation-grade Japanese papers, which are:
- durable, lightweight, long-fibred and extremely strong; and
- available in a range of weights from art supply stores.
The most common types of hinges are the T-hinge or drop hinge for clamp-mounted items, and the V- hinge or fold-under hinge for float-mounted items.
Making hinges
Japanese paper can be water-cut to produce hinges with soft, feathered edges: thus avoiding ridges showing on the upper side of the paper item.
To water-cut Japanese paper, place a ruler on the paper parallel with the grain and run a brush dipped in water along the ruler edge. Keep the ruler on the paper and tear the paper along the wet lines to make hinges of the desired size.
The size of the hinges depends on the size of the item; but for small items an oblong hinge of approximately 30 x 15mm is appropriate.
When hinging an item which is to be clamp- mounted, adhere small hinges along the top edge of the paper.
The number of hinges used depends on the size of the item, but one hinge at either end is sufficient for smaller items. More hinges are recommended for larger items and for thick papers. Additional hinges can be required at the bottom of the item, if it is being float-mounted.
Attaching T-hinges to a window mounted paper artwork. One hinge is weighted as it dries, while the other is stuck to the backing board.
Attaching Hinges
- Place the item face-down on a clean surface.
- Brush adhesive onto half the lengthwise side of each hinge. Allow it to almost dry. Place the pasted part of the hinge on the reverse side of the item. The unpasted part of the hinge should extend beyond the edge of the item.
- Cover the hinge with a piece of release paper and rub a bone folder lightly over the area, then press the hinged area under the release paper and a blotter with a small weight until it is dry.
- The item should then be positioned on the backboard in relation to the window, and weighted.
- The other half of the hinge is then brushed with adhesive, allowed to almost dry and then attached to the backing board.
- A second, slightly larger piece of Japanese paper is often stuck over the upper half of the hinge to provide strength, forming a T shape. The hinge is then bone-folded and pressed.
- The adhesive used for hinging and other work on paper items should be water-based and reversible; starch paste or methyl cellulose paste are recommended.
- Flat paper items in study collections are often hinged to sheets of heavy-weight archival paper, which are in turn hinged into mounts to facilitate handling.
Making Starch Paste
Starch paste is the adhesive most widely used by paper conservators. Starch paste from various sources—for example, from wheat and rice—has been used for centuries to stick paper to paper and textiles to paper. It is recommended for use with flat paper because of its strength, durability and purity. Aged starch paste does not discolour and remains reversible.
Many commercially available adhesives are starch- based but may also contain preservatives, plasticisers, fillers and other unwanted additives which can damage the paper item. Starch paste does not keep well in its wet state. It should be made fresh and can be covered and stored for two weeks in the refrigerator.
You will need:
- 10 grams or 3.5 level teaspoons of Silver Star laundry starch, which is available from most supermarkets;
- 100ml of water, preferably distilled or deionised;
- a stainless steel double boiler, or Pyrex beaker in a saucepan;
- a stove or hot plate; and
- a wooden spoon.
Method:
- Add about 10ml of the water to the starch and mix to a smooth slurry.
- Add more water if required to produce a smooth paste and leave to soak for about half an hour.
- Heat the remainder of the water in the double boiler.
- Add the starch slurry and cook for 20–30 minutes, stirring constantly.
- Leave to cool.
- If the paste is lumpy, press through a Nylon sieve or some fine cloth for example, terylene.
- The paste can be thinned by adding water and blending.
Alternatives to hinges
A fast but less desirable alternative to Japanese paper hinges and starch paste or methylcellulose are tabs of archival paper tape with a gum adhesive. This is known as archival hinging tape.
Photocorners are an excellent method of attaching paper items to mounts without applying adhesives directly to your item. They can be used:
- if the item is appropriately rigid and stable;
- if there is an adequate margin to hide the corners behind the window mount or if there are no concerns about the photocorners being visible
- as long as they do not damage the medium; for example, abrade the paint; and
- for holding encapsulated material in mounts or on board for display purposes.
Photocorners should be made from polyester film, for example Mylar. Photocorners are available from conservation suppliers.
If you prefer to make your own, you will need:
- strips of polyester, 100 or 125 micron Mylar or Melinex, cut to whatever size is required: for example, for smaller items, a strip measuring 15 x 45mm is appropriate;
- acid-free, double-sided tape 6 mm wide—
3M double-sided tape #415 is commonly used; - scissors; and
- a bone folder.
- fold in each end of the strip as shown on the diagram to form a point in the top centre edge of the strip. Make sure the ends butt up to each other;
- use a bone folder to form sharp creases. To avoid scratching the polyester, place a piece of release paper; for example, Glad Bake paper or Reemay, over the photo corner when bone- folding; and
- apply a strip of double-sided tape across the protruding ends of the photo corner.
- backing paper
- photocorner paper item
In this way, the photocorner can be stuck down to the backing paper and no adhesive touches the items being mounted.
When using photocorners to attach items to mounts, the item is weighted in place on the backing board and its position checked by closing the window mount. The photocorners are then slipped onto the corners of the item, and the corners attached to the backing board using acid- free, double-sided tape.
Protective enclosures for flat paper
Loose flat paper items benefit substantially from being stored and handled in simple, protective archival enclosures.
There is a large variety of archival enclosures available commercially. They come in a range of standard sizes and include folders, envelopes and sleeves made from archival card, paper and plastics.
If you need only a small number of enclosures, you can make them cheaply and quickly from readily available materials. If you are doubtful about the archival quality of a ready-made product, you can make the enclosures yourself from archival materials you buy for the purpose.
Making a protective enclosure/folder
To make a simple folder for a single-sheet flat paper item, you will need:
- a large sheet of medium-weight archival paper, such as 160gsm archive cartridge or lightweight card;
- a cutting mat, preferably with a gridded surface;
- a sharp cutting knife;
- a metal ruler;
- a bone folder; and
- a sharp pencil and an eraser.
To construct the folder:
- use the diagram provided to rule up and cut out the folder plan onto the paper or card. The dimensions of x—shown on the diagram—should equal the dimensions of the item to be housed plus about 3mm on each side;
- run the bone folder down the fold lines against the ruler edge, then fold the paper or card. Use the bone folder to make smooth, sharp folds;
- erase the pencil marks and construct the folder;
- determine the correct location of the slit for the closing tab and make the incision; and
- label the folder in pencil.
Some useful hints:
- use a piece of release paper—Glad Bake paper or Reemay—when bone-folding to avoid leaving a shine on the card or scratching the polyester; and
- for extra support, the base of the protective enclosure could be fitted with a piece of acid- free board. If you do this, you will need to make allowance for the thickness of the board at the folds.
Encapsulating flat paper
An encapsulation is a transparent envelope that is sealed around an item on all sides, leaving a small opening at each corner for ventilation. Encapsulation is widely used as an easily reversible method of protecting flat paper items for storage, display and general handling. It is a way of holding torn items together without repair. Encapsulation is most often used for archive material and maps.
The transparent material used for encapsulation is Mylar or Melinex, an inert, durable polyester film. Encapsulation involves sandwiching the paper item between two sheets of the polyester film. The paper item is held in place by the electrostatic charges between the film sheets. The margins of the film are then sealed either with acid-free double-sided tape, or by using a special polyester welding machine. The encapsulation can be sealed on all four sides, or be left open on one or two sides. Partial encapsulation is a good alternative when regular and easy access is needed.
Materials that are unsuitable for encapsulation include:
- items that crumble easily such as pastel, chalk, charcoal, pencil and gouache. The electrostatic charge on the polyester can pull the material away from the paper; and
- mouldy or insect-infested items, and some severely acidic or damaged material. The encapsulation can seal in harmful substances creating a poor microclimate.
If an item needs to be seen only from one side and is weak or acidic, a sheet of acid-free, alkaline-buffered paper or card can be enclosed behind the item. For stronger support of single- sided material, substitute the lower polyester sheet with acid-free board.
Encapsulated material can be mounted, boxed or placed in folders or drawers.
If you are planning to encapsulate a paper item, it is important to ensure that the item is suitable for encapsulation. Ask a conservator if you are unsure of the suitability of an item for encapsulation.
CAUTION:
Do not allow polyester to come into direct contact with fragile materials or with materials which crumble easily, such as charcoal and pastel.
To encapsulate an item you will need:
- polyester film, Mylar or Melinex. The thickness of the film will depend on the size of the item to be encapsulated; 75 micron or 100 micron is generally used, and sometimes a heavier gauge for large material;
- a cutting mat, preferably with a gridded surface, or use some graph paper on top of the cutting surface;
- double-sided tape, acid-free 6mm wide—3M double-sided tape #415 is commonly used;
- a sharp cutting knife and small scissors;
small weights; - a metal ruler;
- tweezers; and
- an anti-static cloth or soft cloth;
- clean work surfaces and clean hands.
To encapsulate paper:
- remove any surface dirt with a soft brush. Remove pins or staples and unfold bent corners;
- cut two pieces of polyester film at least 2cm larger than the item on all sides. For example, if the item is 300 x 210mm, cut the polyester to measure 340 x 250mm;
- place one sheet of polyester on the cutting mat and wipe away any dust. Centre the item on the polyester, lining it up using the grid on the mat. Secure the item with one or two small weights;
- carefully stick the double-sided tape to the polyester film down each side of the item, leaving a 3–5mm space between the tape and the item. Use tweezers to hold the tape and align it by using the object and the grid as a guide. Cut the tape with scissors, leaving a small space at each corner;
- remove the weight and place the second piece of polyester on top of the item, checking for dust first. Re-weight the whole package;
- lifting the top polyester sheet at one edge, peel the cover paper from one strip of tape at a time, smoothing down the polyester with your hand or a soft cloth to get rid of distortions and to ensure a good seal; and using the ruler and the knife, trim the edges of the encapsulation about 3mm outside the tape lines. The sharp corners of the polyester can be rounded using scissors.
Some useful hints for encapsulating paper
Keep the double-sided tape in a plastic bag when you are not using it, to avoid dust collecting on the edges of the tape. This happens very easily and the dirt is visible in the encapsulation. Bagged tape can be stored well in a domestic refrigerator.
A soft cloth or lens tissue very slightly dampened with water can be used as an anti-static cloth for cleaning the polyester.
If the item needs to be seen only from one side and is weak or acidic, a sheet of acid-free, alkaline-buffered paper or card can be enclosed behind the item. For stronger support of single- sided material, substitute the lower polyester sheet with acid-free board.
Don’t wear fluffy jumpers when you are encapsulating!
To laminate or not?
Encapsulation is not the same as lamination. Lamination adheres the paper item to an adhesive film and a plastic layer on both sides.
Lamination is sometimes promoted as a way to preserve your paper items. But once a paper item is laminated, it is virtually impossible to remove the lamination material without damage to the item and without the use of quite strong chemicals.
Lamination is great for high-use disposable items such as menus in fast food restaurants and in cafes. It is not appropriate for works of art, archives, documents and other valued flat paper items.
A reversible alternative is to place it in a Mylar sleeve.
Storage boxes for flat paper
Boxes allow paper items to be stored flat, while also providing effective protection against mechanical damage, light, dust, and extremes and rapid changes in temperature and relative humidity. For the best protection, the boxes should be made from archival materials.
Boxes are important if you are providing layers of storage for your collections. Layers of storage mean layers of protection.
Loose paper items can be interleaved with archival tissue or paper and stored directly in archival boxes. Items that have been encapsulated or placed in enclosures can also be boxed. Ideally, when storing collections of items they should be placed in uniform-sized mounts and enclosures that fit neatly into boxes. This limits movement within the box and minimises damage.
The Solander box is the highest quality box which is commonly used for storing flat paper. It is very sturdy and has a shallow clam-shell design with a hinged lid that opens out flat and closes firmly.
Cardboard and polypropylene boxes in various sizes and designs are available commercially. Boxes can be ordered to special sizes, but this may be costly for a small order. Simple, medium-strength boxes can be custom-made for storing flat paper items.
Making a storage box
To make a strong, inexpensive box with a double thickness of board on the base and a triple thickness on the top, you will need:
- a sheet of archival, single-wall, corrugated, box-making board such as Archivart Multi-use board;
- a cutting mat preferably with a gridded surface;
- a sharp cutting knife;
- PVA adhesive, preferably acid-free;
- boards for weights;
- a large metal ruler;
- a bone folder;
- a pencil and eraser; and
- a fastening device of some kind. Ty-tite file fasteners, consisting of a cord which wraps around a piece of cardboard and which are attached with rivets are especially effective.
Putting the box together
Use the diagram provided to rule up and cut out the first piece. The measurements should allow for:
- the base, which is the same height and width as the items to be boxed plus 3mm;
- the sides of the box, which should be equal to the depth of the items to be stored, stacked one on top of the other plus 3mm; and the top of the box—in two pieces, each half the height of the base.
Run the bone folder down the fold lines against a ruler edge to start the creases, then fold the board up against the ruler edge. The two outer flaps should meet over the centre of the item to make an open-sided wrap.
Cut out the strip for the second part of the box, allowing a little extra in the overall width, which can be trimmed later. The height of the strip will be the same as for the base; but the width of each panel will differ, to allow for the thickness of the walls.
Align the folded first piece on the far-left side of the second strip, and mark the first fold line in pencil on the second strip. Make the fold line as above. Work across the second strip from left to right, gradually wrapping the first piece inside the second, marking and folding the board as you go, to ensure a snug fit. Trim off any excess in the width of the second piece when you have completed the box.
Erase any pencil marks. Stick the centre panel of the first piece inside the centre panel of the second piece with acid-free PVA. Open out flat, weight down and allow it to dry.
The completed box can be secured in a variety of ways including Ty-tite file fasteners, cotton tape or straps joined with Velcro tabs.
Displaying flat paper
Framing is used to display works of art on paper and many other types of flat paper items.
Unframed materials can be displayed in a number of ways including:
- in display cases;
- in their mounts. If the mounted items are not in display cases, their surface can be protected by placing slip-sheets of polyester under the window mount;
- in their encapsulations;
- on mount board. The items can be held firmly in place on the board, with photocorners or with strips of Mylar across each corner;
- on mount board and covered completely with Mylar. The Mylar can be attached to the board with double-side tape, either on the front or on the back of the mount board; and
- mounted and/or enclosed material can be held vertically onto display boards using acrylic clips or strips of Mylar across each corner. Never pin through an item or its housing.
CAUTION:
Items that are particularly vulnerable to light need to be protected. They can be covered by black-out cloths when not being viewed.
Framing flat paper items
- Conservation framing provides excellent protection for flat paper items against mechanical damage, dust, acids and the atmosphere. The frame forms a closed but not air-tight housing, allowing a slow interchange of air to take place but at the same time buffering the framed material against rapid atmospheric changes.
Framing is a very effective way of both displaying and storing flat paper items. But archival-quality framing is not cheap, and framed material takes up space; so paper items are often framed for exhibition, then unframed and returned to storage boxes.
Apart from the more valuable or popular items in the collection and works with their own frames, the items which benefit most from permanent framing are those which would suffer most from being left unframed—fragile or deteriorated items, works with friable media, and oversize works.
For more information:
For more information on oversize works, please see Paper Items with Special Needs later in this chapter.
Poor-quality framing can do immense damage to paper items so it is important to ensure that items are framed to conservation standards.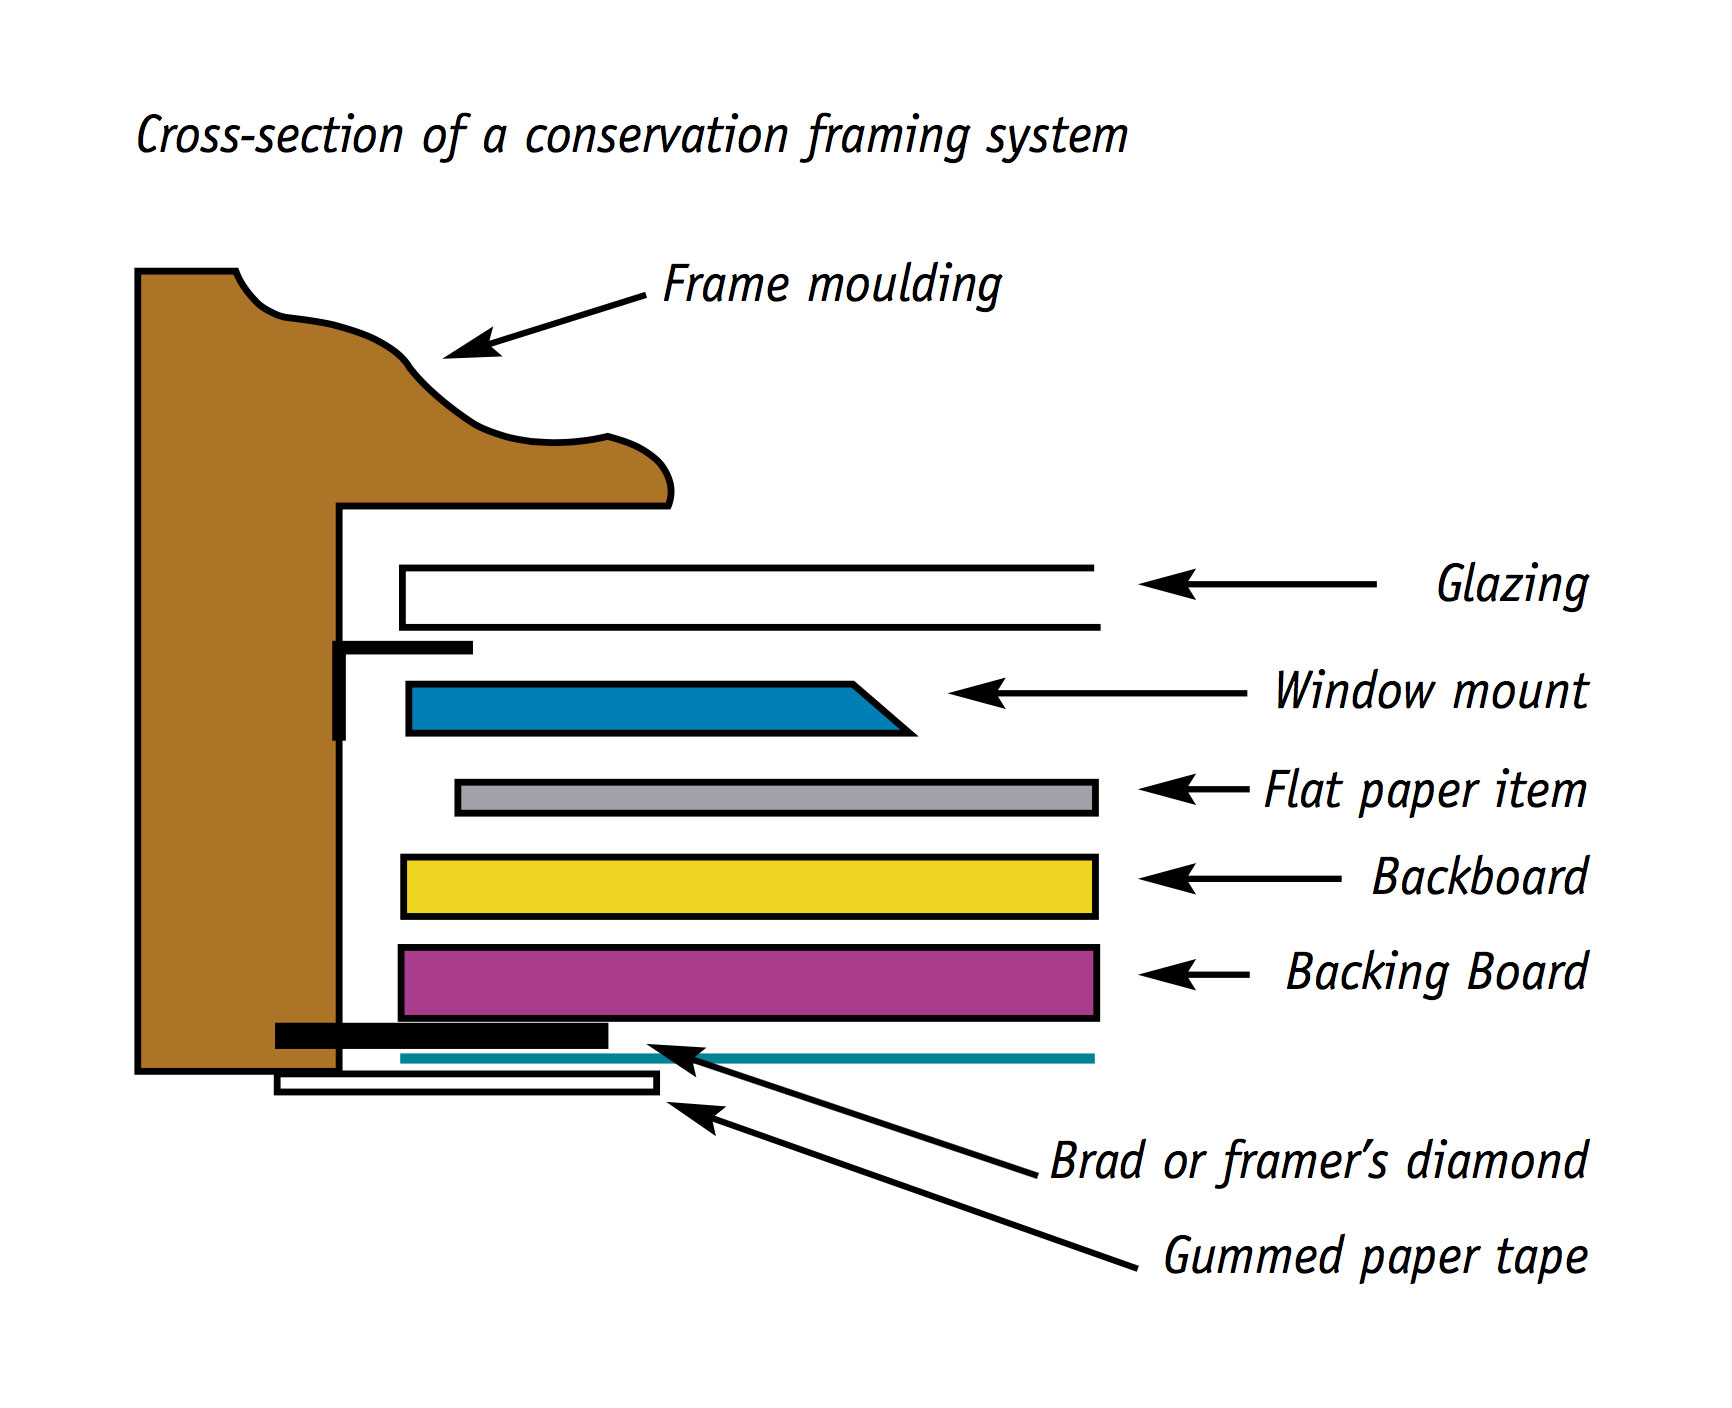
The major requirements for the correct framing of flat paper items are:
- the frame should be sturdy and its rebate should be deep enough to completely house the glass or acrylic glazing, the mounted item and a backing board. The rebate is the groove at the back of the frame;
- the item should always be separated from contact with the glazing by a window mount or by spacers;
- as far as possible, all materials used in the framing package should be archival. If you have to retain original material which is not archival, for example, mounts and backing boards you should insert a barrier of polyester or heavy-weight archival paper between the non-archival material and the item;
- because of the electrostatic charges that build up on acrylic sheet, glass should be used when framing any items which crumble easily. For example, pastel, charcoal, chalk or cracked paint, which is common with gouache; and
- the hanging devices should be sturdy. D-rings hung from screws or hooks on the wall are suitable
- the frame should hang from two points on the wall, rather than hanging by a wire from one single point.. This way if one fails, the other should prevent the frame from falling.
In special cases, the frame can be sealed to further isolate the item. Air-tight framing, or creating a sealed package within the frame, is sometimes used for travelling exhibitions or special items in a collection. This method reduces the flow of air, thereby reducing the effect of rapid environmental changes on the item. But it can also cause problems by creating an undesirable microclimate in the frame. Air-tight framing should only be undertaken by, or in collaboration with, a conservator.
If framed works are on extended display, they should be spaced away from the wall using small corks or plugs, to allow air circulation.
Glazing
When selecting glazing for a frame, it is important to note that:
- Acrylic sheet, Perspex, Plexiglas and polycarbonate sheet are light, unbreakable and can include UV absorbers. However, they cannot be used with fragile media susceptible to electrostatic charges; they are also easily scratched, and are more expensive than glass.
- Glass is more rigid. Glass treated to reduce reflected glare is available. If items are transported behind glass, the surface of the glazing should be gridded with masking tape: to reduce damage to the item should the glass break. Old picture frame glass can be more fragile than new glass, and it may be worth replacing it with acrylic sheet if the item is travelling.
The backing board
The backing board should be sturdy, reasonably lightweight and preferably archival. Archival corrugated boards made from paper or polypropylene, for example, Multi-Use Board, Corflute or Foam Cor Board are suitable.
If the backing board is not archival, for example, oil-tempered hardboard, MDF, an archival isolating layer should be used to separate it from the mount.
The backing board should be sealed with gummed paper or linen tape, to keep out dust and slow down insects looking for a feed.
Paper items with special needs
Oversize Flat Paper Material
Oversize flat paper items such as posters, maps, plans, wallpaper and large works of art can be difficult to store, handle and display. They are often neglected and are especially prone to mechanical damage when cared for inappropriately.
Wherever possible, oversize items should be kept flat.
Items should not overhang shelves or protrude into aisles.
Mounting and framing should utilise lightweight, archival materials. For example, Perspex instead of glass is ideal; but this is often impractical for space and cost reasons. Extra hinges may be needed to support the weight of the object and keep it flatter.
Avoid lining with cloth and dry-mounting oversize material.
Steel plan chests with large, shallow drawers are used most often for the storage of unframed, oversize items. Archival map-storage boxes can also be used.
Encapsulation or partial encapsulation is often a good alternative for oversize items with stable media.
Simple enclosures for oversize items can be made with a board support and a polyester upper. The items can be displayed and studied in these enclosures.
If possible, loose material in drawers or boxes should at least be interleaved or provided with support sheets of archival paper.
Oversize items should only be rolled as a last resort. The item should be rolled face-out around a large-diameter tube which is acid-free. For example, polypropylene or archival board, or isolated with polyester or heavy-weight archival paper. The whole package should then be wrapped in archival paper with an outer layer of a material such as Tyvek, labelled clearly and stored horizontally where it can be supported over its full length.
Newspapers
Newspapers create special problems in any collection. Large collections of newspapers are copied onto some other format, for example, microfilm, and the originals are often vacuum- wrapped and put away for long-term storage. Photocopying or scanning may be an option if there is not a large quantity of material. Store newspapers in a sound, acid-free environment, laid flat in polypropylene bags or archival boxes; restrict access. Find out where microfilmed versions are held and encourage people to use them rather than the original.
Papyrus and parchment
Papyrus and parchment
Papyrus and parchment are two non-paper supports which may appear in your collection.
Papyrus
Papyrus is made from the crushed stems of the papyrus plant. It is much closer in character to paper than parchment.
Because of the presence of lignin and other impurities, it is highly susceptible to deterioration. Papyrus is often extremely brittle and, therefore, vulnerable to mechanical damage.
Talk to a conservator about storing and displaying papyrus items.
Parchment
Parchment is made from the untanned skins of animals such as calves, sheep and goats. Vellum is an especially high grade of parchment. It has been used throughout the history of civilisation to create documents, illuminated manuscripts and works of art.
It is extremely sensitive to moisture and will distort if subjected to high humidity levels. An environment of 45-55% relative humidity is ideal. Parchment naturally has some degree of distortion, but severe distortions can cause damage.
Methods of keeping parchment flat, such as sandwiching between glass or adhering to a backboard, are inappropriate.
Parchment can be stored and exhibited in mounts in the same way as paper items; but deeper mounts are recommended: to allow for movement and to offer extra protection. Polyester strips or corners can be used to hold parchment to the backboard.
More complicated mounting procedures and any repair work should be left to a conservator.
Talk to a conservator about storing and displaying parchment items.
Vellum and parchment are also discussed in the section on Books and in the section on Leather in Cultural Material.
Some miscellaneous information
Copying flat paper material
Material which is accessed regularly, required for long-term display or displayed inappropriately, for example, in areas with high light levels, should be copied.
The originals can then remain safely in storage and need be accessed only in special circumstances.
Photocopying stable material such as printed documents is an option. But only one copy of the original should be taken; and any further copies should be made from the photocopy.
Photocopies and print-outs from scans should preferably be made on archival, acid-free paper.
Thermal paper faxes which need to be kept should be photocopied and the photocopies filed.
Fragile material and items which are extremely light-sensitive, for example, early pieces of paper, should not be copied or scanned in this way.
Material which is damaged or deteriorated, for example, brittle wood-pulp paper items, material with faded inks and light-sensitive material, can be reproduced; but this should be done by professionals.
Even newspapers and maps can be copied onto better-quality paper on large-format photocopiers. State libraries, galleries and museums can suggest places which offer archival copying services.
Historic evidence accompanying paper items
Many paper items may come into your collection in their original folder, in a frame or mounted on a card with inscriptions.
Often these materials accompanying the items are dirty, deteriorating and not of particularly good quality. However, they often provide you with valuable information about the items and so should not be discarded.
If these accompanying materials are in very poor condition, they should be lightly brushed clean, wrapped and clearly labelled, then stored separately from the items.
Summary of conditions for storage and display
Summary of conditions for storage and display | ||
Storage Display/Access | ||
Temperature and Relative Humidity | Research indicates that a cool, dry environment is best for the long term preservation of paper. This is not always achievable without and investment in expensive plant. Therefore store paper in the coolest and driest environment you can achieve and aim to keep fluctuations to a minimum | Access needs to human comfort into account. The recommended temperature range is 18-26oC with RH at 45-60%, depending on your local environment. The emphasis should be on stability. Rapid fluctuations should be avoided. |
Brightness of the light | For all paper, dark storage is preferred. If the items are being used by researchers, the light should be kept as low as possible but still reasonable for the task. Periods of exposure to light should be kept to a minimum. | For Display – it is dependent on light-sensitivity of the paper and the media – the most sensitive should be ideally be displayed at a low light level around 50 lux. This is not always achievable, so thought should be given to limiting the duration of display. For less sensitive items, higher light levels can be used but preferably not over 200 lux. Avoid direct sunlight. Access: If the items are being used by researchers, the light should be appropriate eot the task. Periods of exposure to light should be kept to a minimum. |
UV Content of Light
| Dark storage is preferred but if light is present, UV content should be no greater than 75 μW/lm, and preferably below 30 μW/lm. | No greater than 75μW/lm, preferably below 30μW/lm. Avoid direct sunlight
|
Paper in Australia\'s climatic zones
Paper in Australia’s Climatic Zones |
The climatic zones outlined below are broad categories—conditions may vary within these categories depending on the state of repair of your building and whether the building is air conditioned or not. |
Arid |
This climate is generally very dry, however, in arid areas, it is often very hot during the day and very cold at night. This wide fluctuation in temperature is matched by wide fluctuations in relative humidity, eg from 75%—20%RH in a day. When caring for paper items in arid areas, it is important to note that:
|
Temperate |
A temperate climate is considered a moderate climate, however, temperate climates tend to have a greater range of temperatures than tropical climates and may include extreme climatic variations. Bear in mind that:
|
Tropical |
These climates are characterised by heavy rainfall, high humidity and high temperatures. When caring for a paper items in high humidity, it is important to note that:
|
More about paper
Cellulose fibres and paper quality
Paper is made from cellulose fibres which are derived from plant sources. Alpha cellulose is very high-quality cellulose which contains no additives or impurities of any kind. It consists of long, ribbon-like molecules made up of smaller glucose units. The glucose units are formed from atoms of carbon, hydrogen and oxygen. These molecules are held together side-to-side by hydrogen bonding to form ‘sheets’, which in turn are stacked together in tightly packed layers to form ‘microfibrils’. The microfibrils group themselves in bundles; and groups of these bundles form the paper fibre.
All paper up until the 19th century was hand-made, primarily from cotton and linen
rags and hemp, which produced papers of great strength and permanence. As the need for paper developed and the demand for raw materials outstripped supply, ground wood was introduced as a paper-making fibre. This resulted in the mass-production of papers which were weaker and less permanent.
Industry has developed ways of refining wood- based paper to raise their quality and longevity by isolating the cellulose in the wood from the resinous substances which make the paper acidic, that is the lignins. Today, acid-free wood-based papers are available—these papers contain a high percentage of alpha cellulose and have a permanency which is equal to cotton-based papers.
Acidity and Alkalinity
Acids in paper contribute significantly to its deterioration. They attack and break apart the bonds which hold the cellulose chains, the microfibrils, and the fibres together.
Where do the acids come from?
Some acids in paper are by-products of the breakdown of impurities such as lignin, and of the cellulose fibres themselves.
Alum-rosin sizing is a major cause of acid deterioration in paper from the late 19th century. Rosin, or pine resin, is applied to paper to make it less absorbent, that is, to size it. Because rosin does not attach readily to paper, papermakers’ alum, also known as aluminium sulphate, is used to form a link between the paper and the rosin. Rosin breaks down to produce acids, and papermakers’ alum produces sulphuric acid.
Atmospheric gases and pollutants, such as sulphur dioxide which forms sulphuric acid, can attack paper.
Acids can migrate from adjacent acidic materials.
Acidity, alkalinity and pH
The strength of acidity or alkalinity of any substance is given as a measure of pH. The pH value is a measure of the availability of free hydrogen ions.
The pH scale runs from 0 to 14. pH 0 is very acidic and pH 14 is very alkaline or basic.
pH 7 is a neutral value: neither acid nor alkaline.
Papers which are buffered with an alkaline substance such as calcium carbonate usually have a pH measurement of about 8.
Paper and paper-based products suitable for use in storage and display of flat paper should be acid- free; but in order to be meaningful, the pH value of a paper must be used in conjunction with other selected specifications for archival papers.
A pH testing pen can be useful for spot-testing the acidity or alkalinity of storage materials but this is not a foolproof method.
CAUTION:
Do not use a pH testing pen to test items in your collection because it will leave a strong stain in the paper.
If you have a problem relating to the care of flat paper, contact a conservator. Conservators can offer advice and practical solutions.
For further reading
For further reading
CCI Notes, n.d. Canadian Conservation Institute, Ottawa, Canada. These notes are updated annually.
Clapp, A.F. 1987, Curatorial Care of Works of Art on Paper, 4th edn, Nick Lyons Books, New York.
Dolloff, F.W. & Perkinson, R.L. 1971, How to Care for Works of Art on Paper, Museum of Fine Arts, Boston.
Ellis, M.H. 1987, The Care of Prints and Drawings, The American Association for State and Local History (AASLH), Nashville.
Thompson, J.M.A. 1992, Manual of Curatorship: A Guide to Museum Practice, 2nd edn, Butterworth-Heinemann, London.
Self evaluation quiz
Self-evaluation quiz
Question 1.
Of the following, which is are central to the preventive care of flat paper?
a) correct restoration treatments;
b) restoration of frames;
c) correct storage and display.
Question 2.
A contributor to the deterioration of paper is:
a) acid-free;
b) high in cellulose and free from acids and impurities;
c) buffered to raise the pH.
Question 3.
Major factors which harm paper are:
a) low light levels;
b) migration of impurities from poor-quality storage and display materials;
c) housing items in unframed mounts.
Question 4.
What is meant by foxing in paper?
a) brown areas of discolouration caused by light;
b) invisible signs of weakness;
c) small brown spots usually caused by mould.
Question 5.
What is not a recommended environmental condition for paper?
a) cool, dry storage;
b) relative humidity of over 65 % RH;
c) illumination levels of 50 lux or less.
Question 6.
What material is not suitable for use in storage and display of paper?
a) inert plastics such as polyester and polypropylene;
b) masking tape;
c) wheat starch paste.
Question 7.
Before flat paper items are placed in storage they should be:
a) fumigated;
b) examined for damage and deterioration and documented if necessary;
c) restored.
Question 8.
When a paper item is correctly mounted it should be hinged to:
a) the backboard of the mount;
b) the reverse side of the window;
c) the backing board of the frame.
Question 9.
Encapsulations for flat paper are made using:
a) polyvinyl chloride;
b) polyester;
c) acid-free paper.
Question 10.
When framing flat paper items it is important to:
a) space them away from the glazing;
b) use acrylic sheet such as Perspex for pastel and charcoal drawings;
c) use tinted glass.
Answers to self evaluation quiz
Answers to self-evaluation quiz
Question 1.
c). Restoration treatments are interventive rather than preventive.
Question 2.
b). Paper and board can be acid-free or buffered and still contain impurities.
Question 3.
b). Low light levels are recommended for paper. Mounting is a suitable protective method, with or without a frame.
Question 4.
c). Foxing is a type of mould which develops due to a combination of high humidity and temperature coupled with acids or impurities.
Question 5.
b). When relative humidity is over 65 % RH, the conditions are more suitable for mould growth.
Question 6.
b). Masking tape is not an archival product. It can stain and weaken paper considerably and is very difficult to remove.
Question 7.
b). Items only require fumigation if there is evidence or a high possibility of mould or insect infestation. A conservator should be consulted. Restoration may not be required and conservation rather than restoration is preferred.
Question 8.
a). Paper items should never be hinged to the window mount, nor should the backing board double as a backboard.
Question 9.
b). Polyvinyl chloride is a low-grade plastic which discolours and degrades. Encapsulations are made of transparent material, so paper is not appropriate.
Question 10.
a). Paper should be spaced away, to avoid condensation and media-transfer occurring. Acrylic sheet should never be used to glaze items with friable or fragile media such as pastel and charcoal drawings. The term ‘tinted glass’ does not refer to UV-filtering glass.