Objectives
At the end of this chapter you should:
have a basic knowledge of the main problems encountered in collections of historic textiles;
have an understanding of correct handling techniques for historic textiles;
have an awareness of the range of different types of textiles and have practical knowledge of how to store them, so that damage can be minimised;
be able to display historic textiles in such a way as to ensure their preservation; and
have a basic knowledge of, and some practical skills in, labelling and cleaning textiles in the best and safest manner, in order to preserve them.
Introduction
Textiles are found in many collections in museums, galleries and libraries. They are valued for their historic interest, their aesthetic appeal and their cultural significance.
Because of their wide appeal, textiles—particularly historic costume—are often on permanent display in regional museums. They make striking exhibits and are very evocative of times gone by. But our great interest in them can be their greatest enemy.
Many textiles are very familiar, everyday items. For this reason, we don’t always realise just how fragile they are and so don’t always give them the care that they need. We display them, wash them, wear them, and feel them to enjoy the texture of the fabric; and in doing all of these things we expose the textiles to the risk of damage.
With a greater understanding of how to handle, display and store textiles safely, it is possible to take steps to improve the care of the textiles and to ensure ongoing access to the historic and cultural information and the aesthetic pleasure that they provide.
What do we mean by textiles?
Generally the term textile refers to woven fabrics. In heritage collections, however, the term has a broader meaning and covers materials which are produced by other means, including:
- the interlacing of yarns, such as knitting, lace making and netting;
- other needlework techniques worked through a woven base, such as embroidery and canvas work.
Some examples of textiles that you may find in your collections are:
- carpets and rugs;
- costume, uniforms;
- ecclesiastical textiles;
- patchwork and applique;
- millinery;
- flags and banners;
- quilts;
- teddy bears;
- needlework;
- dolls, parasols and fans;
- curtains, upholstery;
- ethnographic textiles;
- samplers;
- non-woven materials such as felt; and sometimes, fur.
What are the most common types of damage?
Textiles are vulnerable to physical damage, and to the damage caused by chemical deterioration of their components.
Physical damage is very obvious and includes problems such as:
inappropriate repair of damage;
insect attack;
damage caused by washing historic textiles in modern washing machines;
shrinkage;
tears;
splits in textiles where they have been folded or creased;
worn areas; and
damage resulting from lack of proper support while on display.
Damage due to chemical deterioration includes:
fading and discolouration because of exposure to UV radiation and high lighting levels;
This corset is noticeably faded on one half, most likely due to light and UV exposure on one half during display or storage. weakening of fibres because of chemical reactions initiated by light and UV radiation;
deterioration because of mould growth— mould digests the materials it grows on;
damage from pollutants in the storage and display environment; and
damage caused by perspiration, blood and other stains.
Common causes of damage
All the most common types of damage to textiles are caused by:
poor handling;
wearing historic costume;
poor storage methods;
inappropriate display methods;
chemical changes in the textiles themselves;
chemical changes caused by contact with other materials, such as perspiration and atmospheric pollutants; and
various combinations of any and all of these.
The following sections will outline practical steps you can take to minimise this type of damage.
The do\'s and don\'ts of handling textiles
Think about how you handle textiles. Handling them with care and commonsense goes a long way to preventing damage.
The most important rule for handling textiles is to keep handling to a minimum.
Whenever possible, wear white cotton gloves when handling textiles. They prevent the transfer of body oil and dirt to the textiles. This is not always practical, so as a compromise make sure your hands are clean: always wash them before handling a textile. This is particularly important with textiles incorporating metal thread, because acids from the skin tarnish metal.
Remove all jewellery such as rings, bracelets and necklaces, which could catch on the textiles and cause damage.
When you do handle textiles they should always be supported properly. Textiles which appear strong may, in fact, have areas of weakness which are not immediately visible. Regard all historic textiles as fragile.
When handling flat textiles:
never pick them up by one corner. Always support the weight of the textile evenly;
carry small textiles on a tray, in a box, or on a board;
larger textiles should be rolled and carried on the roller, using the part of the roller extending beyond the textile to grip; and
never try to move a textile by yourself if the size and weight of the textile indicates that you need two people. Carrying large textiles incorrectly can not only damage the textile, but can also put strain on the person carrying it.
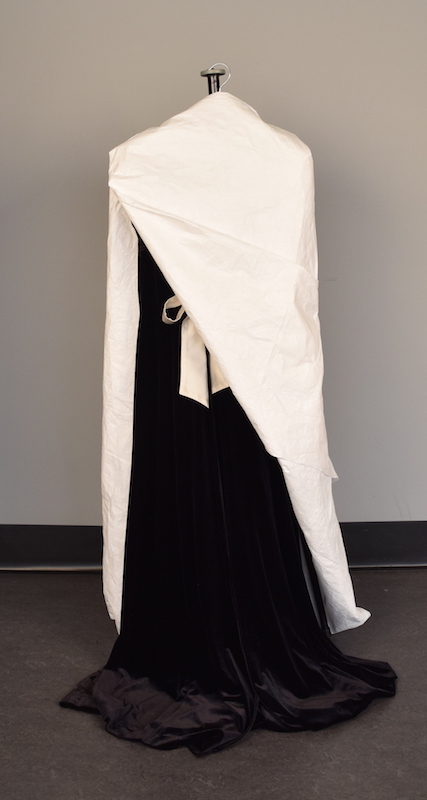
When handling a costume, remember that it should never be picked up by the shoulders—always slide your arms under the costume and then lift.
Ideally, costume should be moved in boxes or on a board.
Don’t carry items on a hanger without using your arms for additional support.
Remember, accessories should always be supported evenly. For example, do not pick up a bag by its handle: use two hands to support it. Accessories should be transported on boards or in boxes. But there are exceptions to this rule. Use your commonsense to decide the most appropriate way to handle them.
The do\'s and don\'ts of labelling textiles
It is often necessary to label individual textiles with an identification number, such as an accession number.
Wherever possible, the number should be written on cotton tape either in pencil or in permanent ink. A reliable brand of permanent ink pen to use is the Nikko Finepoint System Permanent Ink pen. These are available in a number of point sizes. The finer pens are best, such as 0.2mm.
Stitch the cotton tape to the textile with only one or two stitches at each end, using fine, white, cotton thread.
It is helpful to always stitch the number in the same place for each type of textile. This way, you will know exactly where to look for the label and you will avoid excessive handling while searching for the number. For example:
- for flat textiles, always stitch the label on the bottom left-hand corner at the back of the textile; and
- for costume, always stitch the label at the back of the collar on the inside of the garment.
It may not be possible to stitch a label to all items, for example, fans, shoes or hats. Label these items with acid-free cardboard tags with string attached.
Never place adhesive labels directly on textiles— the adhesive will stain the fibres and make them brittle.
Once the items are labelled, store them appropriately. It is very useful to label clearly the outside of all storage boxes and rollers. This allows you to see what item is in each package without having to handle the textile. A small photograph of the textile attached to the outside of the storage system makes identification easy.
A good way to keep your storage area tidy and the collection accessible is to have a shelf list or plan. This shows exactly where each item is stored. If it is kept in the storage areas, it can be used to ensure that items are always returned to the correct place in the store after use.
Historical costumes - why they should not be worn
It is often very tempting to wear an historic costume for festive occasions, especially when celebrating historic events. Some people feel that garments can’t be fully appreciated unless they are worn. This is understandable; but the preservation of historic costume demands that the temptation to wear the costume be resisted.
A fabric may appear strong; but when it is strained, even slightly, it can tear or the seam stitching can break. This damage is increased when the garment isn’t a good fit on the person wearing it—or if the person does not have the correct undergarments to support the costume. Remember, body shapes have changed and modern undergarments do not necessarily give the right body shape for historical costumes.
The actions of dressing and undressing can cause a lot of damage to fragile items.
Sitting down or raising your arms in a fragile costume could result in irreparable damage.
Body oils can transfer from the skin to the garment. This can cause disfiguring stains, and the soiling can attract insects.
Food and drink could be spilt on the garment, resulting in unsightly staining. The chemicals in food and drink could also react adversely with the textile itself, or with the dyes in the textile.
The way women move has changed. For example, some dresses were designed so that women could not raise their arms without damaging the dress.
The stress and strain caused by wearing a garment can be immediate and dramatic, or it can contribute to the gradual weakening of the item. Even seemingly minor damage can ruin an historic costume. So it is best to avoid wearing historic costumes from your collection.
Storing textiles
Adverse storage conditions affect all items in a collection. The effects are not always dramatically obvious. Changes occur gradually over a long period of time. However, once the changes have occurred they are often irreversible, or require complex and costly treatment to deal with them.
A good storage environment prevents physical damage and helps to slow down chemical deterioration, greatly increasing the life of your textile items.
Ideal storage conditions for textiles
Textiles are considered to be sensitive materials; that is, they are extremely vulnerable to damage when stored or displayed in inappropriate environmental conditions.
Ideally, textiles should be stored in an environment where the temperature is constant and moderate: in the range 18–22oC.
Relative humidity should be constant and in the range of 45–55%. This can be very difficult in extreme climates. If it is not possible to keep the relative humidity within these limits, it is important to avoid rapid fluctuations in relative humidity.
Light should be kept to a minimum. Light is required only when the textiles have to be viewed, for example, when they are being accessioned, treated, or used for research. Information about appropriate lighting levels is given in the section Ideal Conditions for Displaying Textiles.
Protect textiles from pollutants, dust and insects.
Airborne chemicals that most commonly affect textiles include smoke, oil and acids. Smoke causes staining and discolouration, which are extremely difficult to remove. Textiles displayed in a room with a fireplace or where smoking is permitted should be housed in smoke-proof containers such as sealed frames or sealable boxes.
Acids are also given off in small quantities by pest strips and some types of plastic. Consequently, pest strips normally should not be used inside enclosed storage areas.
Practical hints for storing flat textiles
Small flat textiles can be stored flat, either in a box or on covered shelves. Dust covers should be provided for textiles on open shelves.
Always interleave textiles with acid-free tissue, if a number of them are stored one on top of the other.
Take care to not stack too many items on top of each other and place heavier items on the bottom of the stack.
If a textile needs to be folded, the fold needs to be padded—either with crumpled tissue or with a covered Dacron sausage. This is made from a tube of white or unbleached cotton filled with Dacron. Padding is an important precaution because textiles will eventually split along the line of sharp folds or creases.
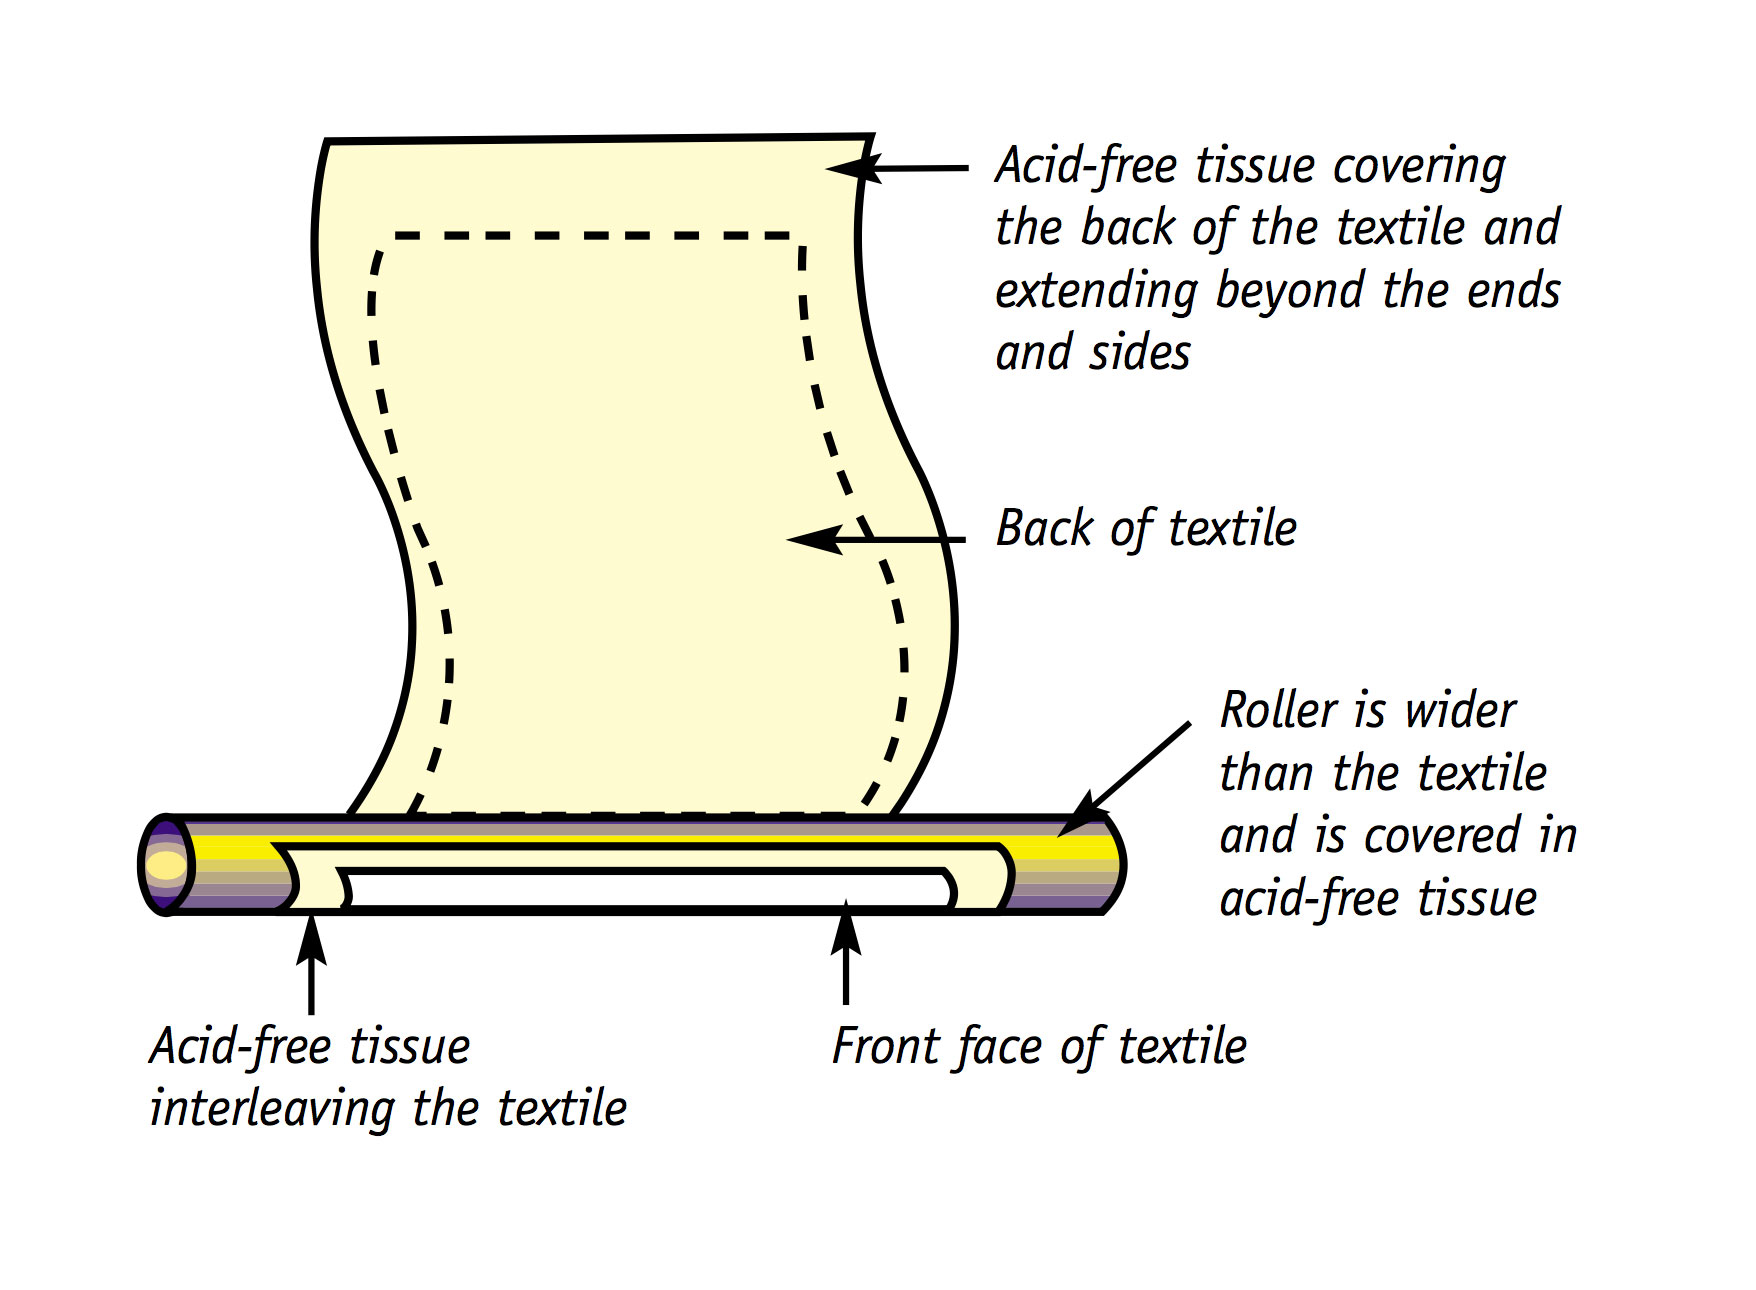
Ideally, larger flat textiles should be rolled. When choosing a roller on which to store a flat textile, there are several things to consider.
The diameter of the roller should be as large as possible—to minimise the curvature of the textile when it is on the roll.
The roller should be longer than the textile’s width, so that when rolled, the ends of the roll are exposed and the edges of the textile are protected by the projecting ends of the roller.
The roller should be covered with an acid-free material such as acid-free tissue, acid-free paper or Tyvek. This protects the textile from impurities and other damaging chemicals which might be contained in the roller. The tissue also provides a soft surface on which to roll the textile.
It is important that the textile is clean and dry.
A dirty or damp textile is likely to deteriorate in storage; and this may go unnoticed for a long time.
When a textile is rolled, the front side of the textile should face away from the roller.
If the textile has a pile—like velvet—it should be rolled in the direction of the pile, with the pile facing out.
Fringes or tassels should be kept straight in the rolling process. You can do this by sandwiching the fringe or tassels between acid-free tissue before you start rolling.
To prepare the textile for rolling:
- lay the textile out, face-down onto a clean, flat surface. Make sure that the weave of the textile is straight, and check that the weave of the fabric is not warped;
- cover the textile with a layer of acid-free tissue paper. Check that there are no creases in the tissue: these can cause corresponding creases in the textile, and damage it;
- if the textile has areas of padded decoration or the weave is distorted in any way, it will interfere with the rolling process. A piece of Dacron polyester wadding wrapped in acid-free tissue should be placed over the acid-free tissue in the location of the decoration or distortion. The Dacron must be covered, to prevent any of its fibres transferring to the textile or catching on any surface decoration; and
- if you leave approximately 100mm of tissue protruding beyond your textile, you can use this to start the rolling procedure.
When you have finished preparing the textile:
- place the covered roller on the protruding end of the tissue and start rolling. Use a firm pressure so that, as the textile is rolled onto the roller, it remains straight and firm.
- the weave should be kept straight while the textile is being rolled;
- once the textile is fully rolled, cover it with another layer of acid-free tissue and/or Tyvek. Secure the cover by tying the ends with cotton tape. It is important to not tie the tape too tightly, because it can distort the edges of the rolled textile;
- very large textiles should also be tied with cotton tape in the centre, to prevent sagging. Again, do not tie the tape too tightly, it might damage the textile; and
- label the textile clearly to identify it in storage.
Preparing historic garments for storage
It is important to ensure that garments are as clean and dry as possible before they are packed away. If the costume is not cleaned, colourless stains may darken with age, and insects such as the clothes moth and carpet beetles will be attracted to organic stains from perspiration and food.
If the garment is strong, it is advisable to have it dry-cleaned.
There are some steps you can take to minimise the risks associated with dry-cleaning historic costume:
Always use a drycleaner who is a member of a professional drycleaner's association.
Be sure to ask for special care if the item is fragile or complex.
Prepare your garments carefully for dry-cleaning, by either covering buttons and hooks with Dacron or by removing them from the garment.
Request that the garment be cleaned on its own.
Ask the drycleaner to place the costume in a bag in the dry-cleaning machine. This gives it support and prevents it rubbing against other items if it is not on its own.
It is better to clean historic costume in fresh solvent—so ask the drycleaners when they are next changing their solvents and schedule your work for that time.
Remember, it is better to leave a garment stained than to damage it greatly during cleaning; so leave fragile items until you have had a chance to seek advice.
CAUTION:
Remember that dry-cleaning machines have a vigorous, mechanical action similar to a tumble drier, and so can damage fragile textiles and costumes. Check with a textiles conservator if you are unsure whether the items you are dry-cleaning are strong enough.
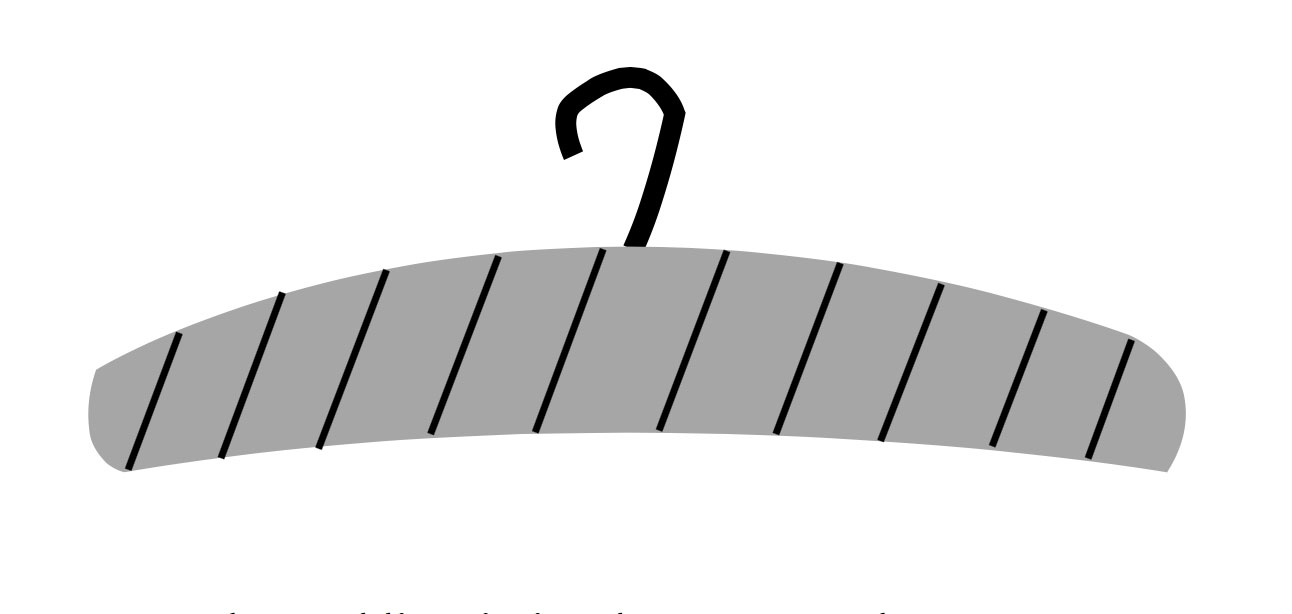
An easy, do-it-yourself padded hanger for costumes
Apart from very heavy or fragile items, many garments can be stored on padded hangers. Padded hangers are used for hanging costume such as shirts, bodices and dresses. Other items such as trousers or skirts need additional support. It is important to remember that by ensuring an even distribution of weight on the hanger, you will be giving the item maximum support while it is hanging in storage.
- Padded coat-hangers are quite simple to make— just follow these steps. You will need:
- a coat-hanger—it should be strong and made of either wood or plastic. Wire hangers are not suitable. Make sure that the size of the coat-hanger is appropriate for the garment to be hung. For example, don’t use a large coat- hanger for a child's garment. The hanger can be cut down to the appropriate size if necessary;
- fabric—all fabrics used to cover the hanger must be washed before use. White or unbleached fabrics are preferred. Unbleached calico or white/cream, stretch-cotton fabrics are ideal;
- Dacron;
- a needle; and
- thread;
- scissors.
Place layers of Dacron polyester wadding over the hanger, padding it to the same width as the shoulders of the garment. The hanger should be padded to suit the shape of the garment; for example, if the garment has sloping shoulders make the padding to match. The Dacron may need to be hand-stitched to hold it in place.
Once the padding is in place, cover the Dacron with fabric to provide a smooth surface on which to rest the garment. A stretch fabric is generally easier to fit and sew into place.
For additional support, for example, for a dress with a heavy skirt, sew white, cotton tapes to the inside of the waistband, then tie these over the coat-hanger to take the weight of the skirt. Sew at least four tapes onto strong areas of the waistband. If four tapes are not enough to fully support the weight of the skirt, use more. Use a fine needle for sewing and sew through all layers of the waistband.
CAUTION:
Sew tapes only to strong areas of the costume. Make sure weight is distributed evenly. Tapes stitched in inappropriate positions can damage the garment.
Finally, make covers for each garment to protect them from dust. The best materials for making covers for hanging garments are clean, washed cotton, for example, old cotton sheets or calico, and Tyvek.
CAUTION:
Do not use plastics and synthetic fabrics as covers. A garment stored in this type of cover can’t breathe and may rot. The exception to this rule is Tyvek, which is a specially made polyethylene fabric which can be used because it allows textiles to breathe.
Storing garments in costume boxes
Sometimes hanging storage is not appropriate— either because the garments are too heavy or too fragile to safely carry their own weight, or because you don’t have an appropriate storage space.
If hanging storage is not appropriate, the items should be well padded and packed in boxes.
Acid-free costume boxes can be bought from conservation suppliers; or you can make your own following the directions below.
If acid-free boxes are not available, normal boxes or drawers can be lined with Tyvek and used for storage. The Tyvek will act as a barrier between the box material and your textiles.
When packing garments in boxes, it is advisable to pad the garments. Crushed, acid-free tissue can be used along all of the folds in the garment and on the side seams, shoulders and sleeves so you will also need enough acid-free tissue paper to pad one average-size garment.
Remember, creases and folds should be well padded, to minimise stress on the fabric. With time, creases develop into splits if not padded adequately.
Take care to not put too many textiles in one box, because the weight may crease the lower textiles. Always put the heaviest costume on the bottom.
Wherever possible, keep all of the parts of one costume together.
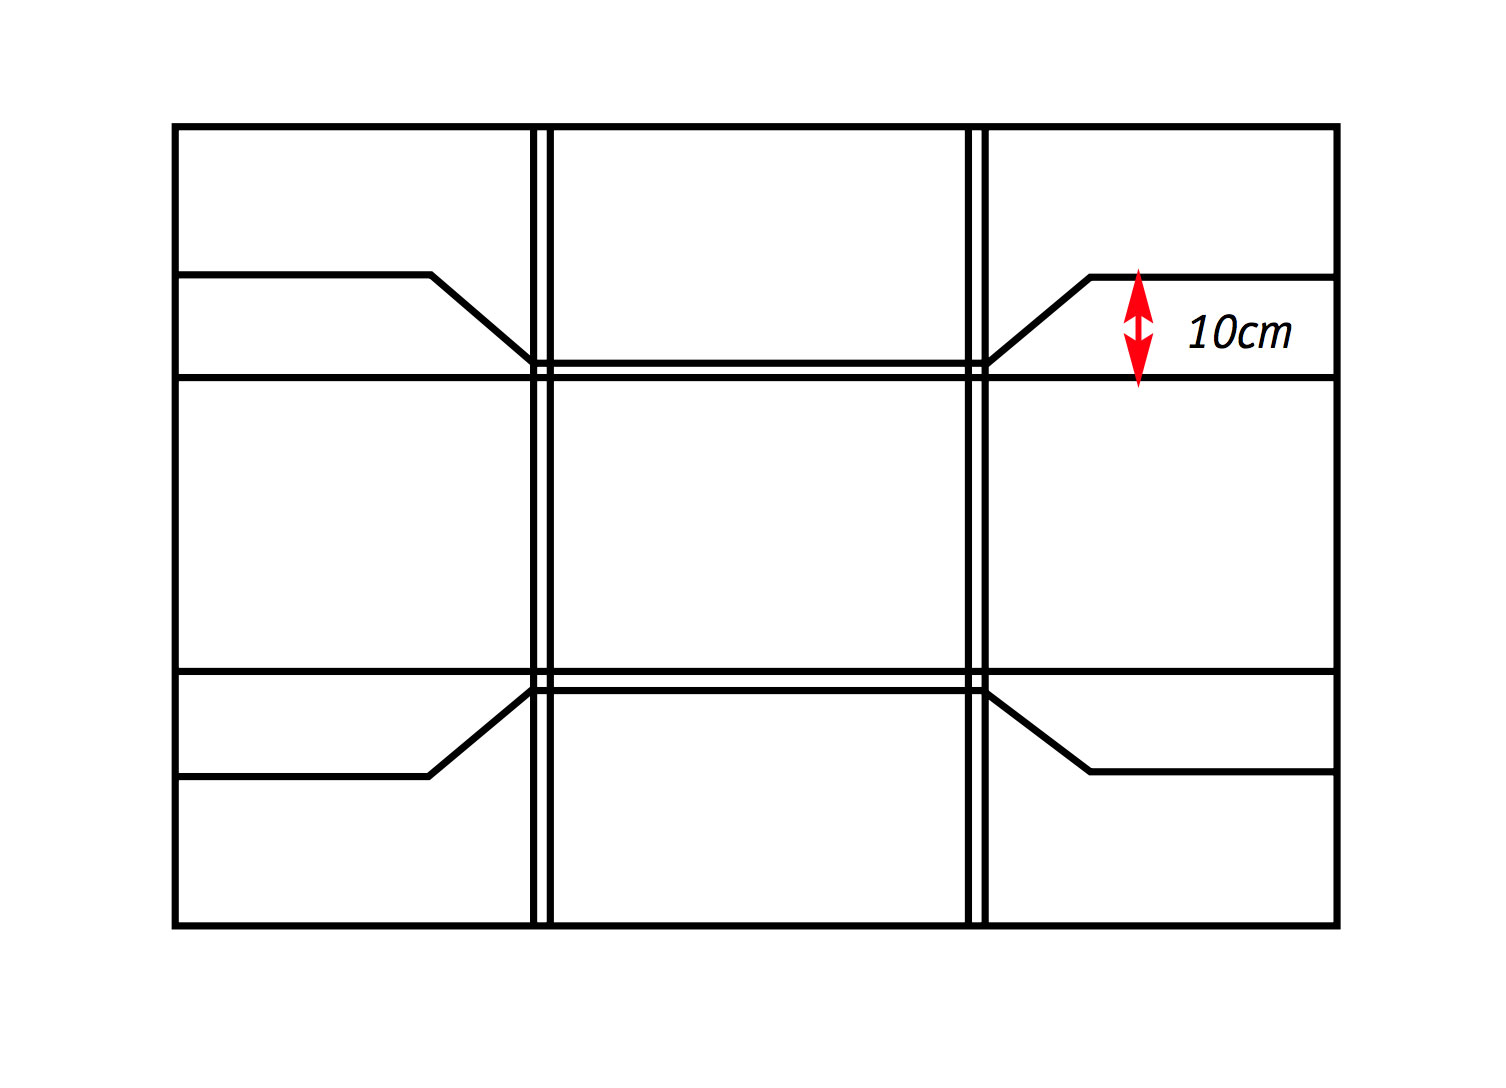
An easy, do-it-yourself costume box
This box is made from 6mm-thick acid-free Foam Cardboard.
Cut the board into a square or rectangle. Once you have decided on the dimensions of the base, the dimensions of the box can be worked out as shown on the diagram below.
The base of the box should be a little bit larger than the costume, while the height should be sufficient to accommodate the costume and padding.
On the interior surface, draw lines in pencil: 1, 2, 3 and 4 as shown on the diagram.
The next step is to draw in additional construction lines, shown in the next diagram.
With a utility knife or Stanley knife, cut completely through the Foam Cor board on the dotted lines indicated in the diagram below.
The cut Foam Cor is now ready to be assembled into a box.
Along the dotted lines shown in the diagram below, cut through the upper two layers of the Foam Cor board, being very careful not to cut the bottom layer.
In the stippled areas indicated in the box diagram above, peel off the upper two layers, being careful not to damage the bottom layer. The cross-section of the board will look like this when you have finished:
It is worth practising this with the discarded corner pieces of Foam Cor.
Score the four edges of the base of the box with a Stanley knife between the double lines drawn in pencil on the board; cut half the thickness of the board out between these lines. The board should look like this:
This will allow for a smooth edge when the sides are folded up.
To assemble the box:
fold the four walls along the scored lines;
the wall corners should overlap as show in the diagram below;
fold the flaps, which were left after you peeled away the top two layers of board, over the adjacent wall and stick them down with acrylic or polyvinyl acetate—PVA—adhesive. The flaps should be stuck securely; make sure that you completely cover the inside of the flap with adhesive and press it onto the wall;
It is wise to stick each flap individually, and weight it while it dries.
The corners and edges of the box can be strengthened by covering them with cotton adhesive tape.
The lid is made in exactly the same way as the box. The lid sits over the top of the box walls, extending down 50mm. The interior dimensions of the lid should be slightly larger than the exterior dimensions of the top of the box. The lid should fit snugly, but not tightly; it should lift off easily without jerking the box.
Storing accessories
It is best to store umbrellas and parasols slightly opened, and gently padded inside with rolled acid- free tissue or Dacron covered in calico or acid-free tissue. Where possible, they should be hung and wrapped in individual calico or cotton covers. If padded umbrellas and parasols are packed in boxes, they should be padded and wrapped individually before storage.
Store flat accessories, such as scarves and ties either flat or rolled around cardboard tubes. Cover the cardboard tube with a layer of acid-free material before using it to store accessories. Place acid-free material over the textile before rolling it. Once the accessory has been rolled onto the tube for storage, wrap it in another layer of acid-free material, and fasten each end with a length of cotton tape.
Where possible, roll items with fringes or thick edges with the fringe or edge on the outside.
Remember that textiles should be rolled firmly but gently around tubes—to avoid creasing.
The best materials for storing and displaying textiles
Textiles can be adversely affected by other materials in their immediate environment. For example, acids can be a problem for textiles stored in some wooden cabinets. Unsealed wood gives out acidic vapours that build to sufficient concentrations in an enclosed space to cause damage. Sealed wood or metal cabinets are better, because they are less likely to contribute to damage.
Only plastics which are safe and stable, such as polyester and polypropylene, should be used as storage materials. Polyvinyl chloride—PVC—is a commonly available plastic, but avoid using it.
The following list of good and bad materials—from a preservation viewpoint—can help you in selecting your storage and display furniture, or the materials to use when making them yourself.
GOOD | BAD |
enamelled metal | chipboard, Custom wood |
acid-free board | uncured PVA glue |
acid-free paper and tissue | uncured paint |
polypropylene | protein based glues,for example, animal glue |
polyester film and felt | cellulose nitrate |
Cotton | polyurethanes |
linen | unsealed wood, especially hardwoods |
acrylic paints and varnishes | PVC |
sealed wood | wool, if metal is also present |
Displaying textiles
When textiles are on display they are perhaps more vulnerable to damage than when they are in storage, particularly from light and UV radiation.
How does light affect textiles?
Light and UV radiation are the greatest enemies of textiles. They cause photochemical deterioration: the colours fade and fabrics become fragile and split readily.
Exposure to light can multiply the adverse affects of poor environmental conditions, and damage caused by light is often accelerated by high relative humidity and temperature.
Textiles produced in the late 19th century need particular care. The aniline dyes which were first manufactured and became popular around this time were very susceptible to fading—especially purples, blues and greens. This is particularly important for many regional museums, because it is often textiles from this period that are on display.
Ideal conditions for displaying textiles
Display textiles in similar conditions to those outlined for storage; however, as light is essential in a display environment there are some differences that must be taken into account.
Textiles are considered sensitive to light, so lighting levels must be set so that they do not damage the collection. The brightness of the light should be less than 50 lux; and the UV content of light should be preferably below 30 μW/lm and no greater than 75 μW/lm.
CAUTION:
It is important to remember that all damage caused by photochemical reactions is cumulative and irreversible.
The temperature should be constant and kept in the range of 18–22oC.
Relative humidity should be in the moderate range of 45–55%.
Controlling relative humidity in a display area may be more difficult than in a storage area. Fluctuations are much more likely, because of the varying numbers of people visiting when the display is open followed by no people at times when the display is closed.
Protect textiles from pollutants, dust and insects.
It is also necessary to provide adequate support for costume and textiles while they are on display.
For more information
For more information about adverse environmental effects, please see Damage and Decay.
Mounting flat textiles
The following method of mounting a flat textile involves a number of steps, but it is quite simple if the instructions are followed closely. You will need:
- white cotton flannelette. This layer acts as an environmental buffer and as padding for the textile. It is advisable to wash the flannelette in hot water before you use it, so that it shrinks. Shrinkage after you use it on the mount board causes distortion of the board;
- a background, support fabric which has a suitable colour, weave and fibre to harmonise with the textile to be mounted. A general rule for selecting backing fabrics is that they should be made of the same fibre as that being mounted. For example, a silk textile should be mounted on a silk fabric. If you can’t use the same fabric, a chemically inert
- polyester fabric should be used. Wool and silk are chemically compatible and can be used together;
- acid-free board, such as acid-free Foam Cor, for the base of the mount;
- a Stanley knife or utility knife and metal rule for cutting out the board;
- PVA glue—acid-free PVA is available and should be used if possible;
- a fine needle—a slightly bent needle or a curved needle will be easier to use;
- thread; pins; and
- scissors.
Cut the acid-free board to the required size— usually the size of the textile to be mounted plus a border. Borders generally have the same dimensions at the top and sides, with a slightly larger allowance at the bottom edge. The extra allowance at the bottom edge makes the item being mounted look centred on the mount. If this allowance is not made, the item will look as though it is too low on the mount. This is called optical centring.
Cover the board with white, cotton flannelette. The fabric should be cut larger than the board, so that it can be folded to the back of the board to be attached firmly.
Pull the flannelette tightly over the board and pin it to the sides of the board. Cut the corners away to allow a flat fold-over.
Check that the grain of the fabric is straight in both directions before fixing it in place.
To fix it in place, glue the fold-overs of fabric to the back of the board using a polyvinyl acetate— PVA—adhesive. Pin the fold-overs in place, to hold them while the glue dries. PVA can be used as long as it dries fully and cures before the mounted textile is framed.
Cut the background support fabric and attach it to the board in the same way as you did with the flannelette. Remember to cut the fabric larger than the board, because it has to overlap on the back of the board.
Once the glue attaching the background fabric has dried, glue another piece of this fabric in place onto the back of the board over the fold-overs. This gives the back of the board a finished appearance and hides the cut edges of the fold- overs.
Once the prepared board is completely dry, lay the textile on the front fabric and stitch it into place. Don’t apply tension to the textile when you are stitching it.
Before stitching, ensure that the grain of the textile is aligned with the grain of the backing fabric, otherwise it can look lopsided.
Use herringbone stitches on frayed edges—this will help prevent further fraying. A running stitch can be used on hemmed edges or selvages.
All edges of the textile should be sewn. It ensures that the weight of the textile is distributed evenly.
For larger pieces, grid lines of stitching may be required through the middle of the textiles, to provide extra support. Generally a line of stitching is needed every 200mm.
For more information
For information about the selection of support fabrics and for information about stitches, please find it later in this chapter.
Conservation framing
Having mounted your textile in such a way as to protect it and reduce the stresses placed on it, it is important to frame it correctly. Conservation framing is designed to protect against harmful environmental effects such as light, dust and insect attack.
Framing your textile using the wrong techniques and materials can cause irreparable damage. Conservation materials and techniques may be more expensive than general framing, but it is really worth the investment. The following notes outline the main points to be considered when framing textiles.
It is strongly recommended that frames containing textiles be glazed to provide added protection. Glazing provides a barrier at the front of the frame. The barrier buffers the textile against fluctuations in relative humidity and temperature. It keeps insects, dust and pollutant gases away from the textile, and provides some protection against the harmful effects of light and UV radiation.
The selection of glazing materials is important. Glass can be used, but it does have disadvantages:
- if the glass breaks, it can very easily cut your textile; and
- glass provides only a little protection against the harmful effects of UV radiation.
Plexiglas 231, an acrylic UV-filtering glazing, is much better than glass. It does not break and it gives added protection against UV radiation.
The glazing material should not be in direct contact with the textile because:
- this can flatten the texture of the textile through pressure; and
- mould can grow on the item, if environmental changes result in condensation forming on the inside of the glazing.
A slip, spacer or window mount should be used to separate the glazing from the mounted item.
The covered, acid-free board on which the textile is mounted should fit into the frame with a couple of millimetres gap in each direction: so that if the board expands, it will not distort.
An acid-free board should be placed on the back of the frame, to seal the frame from dust and insects. It should be attached firmly to the frame and sealed with tape.
The correct mounting and framing of textiles not only protects and prolongs their lives, but can also greatly enhance their appearance.
Open hanging methods for flat textiles
It is best for textiles to be fully supported and protected with mounts and frames. But there are types of textiles that are better suited to open display, for example, large flat textiles.
The following open display methods are quite easy and give your textiles adequate support while on display.
Hanging textiles using Velcro
Velcro hook and loop tape can be used very successfully to hang textiles for display. But Velcro can be used to display only some types of textiles. The textiles need to be strong and in good condition.
This method is best suited to fairly thick types of textiles such as tapestries and quilts. It is not suited to fine fabrics like sheer silks or lace.
First, machine sew the soft side of the Velcro to herringbone cotton tape; this makes the Velcro easier to hand-sew to the textile and avoids the Velcro being attached directly to items.
Position the Velcro and herringbone tape straight across the top of the textile and hand-sew it to the textile. It is important that the stitching goes through all layers of the textile. If the stitching does not go right through all layers, some layers will bear all the weight and others will eventually sag. The top edge will be damaged and distorted.
CAUTION:
Do not machine sew Velcro to your valued textiles because machine-sewing creates perforations, which can be a line of weakness.
Tack or staple the hard side of the Velcro to a wooden bar of sufficient size and strength to bear the weight of the textile. Make sure there are enough tacks or staples to bear the weight of the item which is to be hung for display. Once this is done, the bar can be hung in position.
Then attach the textile to the bar by aligning the two halves of the Velcro system.
If the textile does not hang straight or flat at first, the Velcro enables you to adjust the top edge and alter the hang of the textile.
Heading cloth
Another method for hanging textiles is to use a heading cloth. This method is suitable only for textiles in very good condition, and is more suited to lightweight fabrics.
Using running stitch, attach a strip of fabric to the underside of the textile you wish to display. The strip of fabric should extend well under the textile to ensure adequate support, and extend beyond the top of the fabric by at least 500mm.
Use herringbone stitch to attach the heading cloth to the top and sides of the textile if it has frayed edges.
To hang the textile for display, attach it to a round, wooden batten, which must first be sealed with acrylic paint to prevent damaging acids transferring to the textile.
Once the paint is fully dry and cured, the heading cloth is rolled around the batten until the top of the textile is level with the batten. The heading cloth is stapled to the batten using stainless steel staples. See diagram.
The batten can then be attached to the wall with fittings such as threaded eyelets screwed into the ends of the batten.
The back of a textile can be protected using a loose lining. This is particularly important if the wall the textile hangs against is very rough or dusty. A lining is made slightly smaller than the textile, and hangs between it and the wall. It can be attached to the dowel or bar used for hanging the textile.
For more information
For information about stitches, please find it later in this chapter.
Displaying historic costume
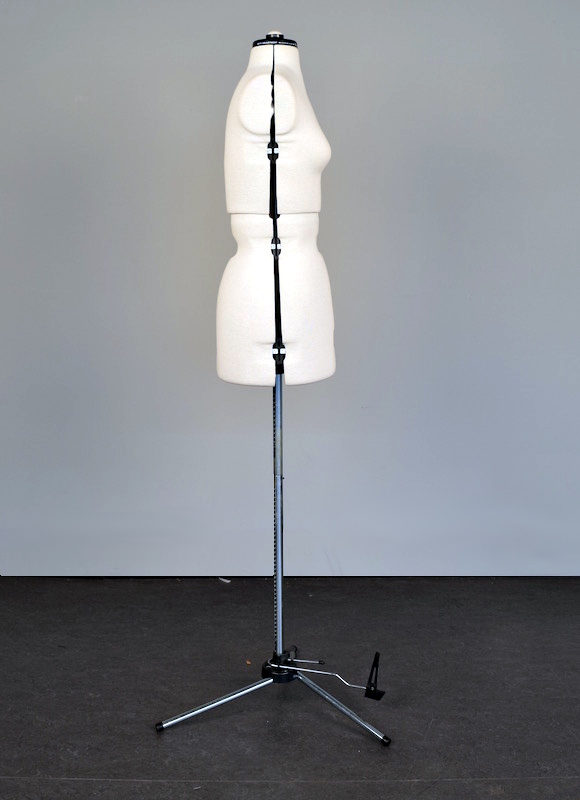
If you do not have a mannequin of the correct size and shape, it is relatively easy to:
- modify a mannequin to suit a particular garment; and
- provide the correct undergarments for the period.
- cover the body of the mannequin with knitted cotton stockinet. Pull the tube of stockinet over the mannequin and attach it to the hip section. Then put Dacron in place to soften the surface of the wire and pad the mannequin to the appropriate shape; and
- stitch the top of the stockinet in place.
Cleaning textiles
Textiles can hold a lot of dirt and dust, which can mar the appearance of the items and be damaging as well. You can clean your textiles if they are reasonably robust, but if the textiles appear to be fragile it is advisable to consult a conservator before starting to clean.
The best way to remove dirt and dust from textiles is to use a vacuum brushing technique. This involves lifting dust and grit off the surface with a brush, and vacuuming them away so that they cannot resettle on the surface.
It is important to make sure that the vacuum cleaner has low suction, so that you minimise the risk of damage to the item being cleaned.
There are a number of methods you can use to modify your vacuum cleaner to make it suitable for conservation use.
A product which will attach to any vacuum cleaner is now available commercially. The Micro Vacuum Attachment Kit, made by Schneider Industries Inc., Honolulu, Hawaii 96814, is ideal for conservation use. Another product is a Vacuum Accessory Kit made by Marbig. A variety of micro and mini vacuum attachments suitable for cleaning some fabrics are on the market. They are designed for cleaning computers.
When vacuuming very fragile objects, it is useful to put a piece of Nylon net over the end of the hose. First attach a rigid pipe to the end of the hose. A piece of net 200mm square can be folded into quarters and attached over the pipe using a rubber band. This prevents fragile materials being sucked into the vacuum cleaner. The rigid pipe makes it easier to control where the hose is placed. The suction of the cleaner can be modified by using extra layers of more closely woven fabric.
There are two methods of surface cleaning with vacuum suction.
Hold the vacuum cleaner hose at least 20mm from the surface of the textile, and use a soft brush to lift the dirt from the surface of the textile. The suction will then pick up the dirt.
Place a piece of net in a round embroidery frame and lay this on the textile. It can then be vacuumed through the net while preventing the suction lifting fibres from the surface.
While surface cleaning, always look out for insect frass—it is often an indication of insect attack— and fragments which have come away from the textile. These fragments should be retrieved and placed in specimen bags, and labelled with the title and accession number of the object, then given to whoever is responsible for the item.
If there is any soiling that cannot be removed from the object with light brushing, do not attempt to remove it because this will damage the surface of the object. Only a trained conservator should attempt removal.
CAUTION:
Washing a textile is an irreversible process. If the dyes bleed, the fabric shrinks or disintegrates this cannot be reversed.
It is essential that an appropriate washing solution and an appropriate cleaning method are used to prevent damage to the textile. If you plan to wash or dry-clean textiles, particularly dyed textiles, you should first consult a textiles conservator.
Summary of conditions for storage and display
Summary of conditions for storage and display | ||
Storage | Display | |
Temperature | 18oC–22oC | 18oC–22oC |
Relative Humidity | 45–55% | 45–55% |
Brightness of the Light | Dark storage preferred. | Less than 50 lux. |
UV Content of Light | nil | Less than 30μW/lm, no more than 75μW/lm |
Textiles in Australia\'s climatic zones
The climatic zones outlined below are broad categories—conditions may vary within these categories, depending on the state of repair of your building and whether the building is air conditioned or not. |
Arid |
This climate is generally very dry, however, in arid areas it is often very hot during the day and very cold at night. This wide fluctuation in temperature is matched by wide fluctuations in relative humidity, for example from 75%–20% in a day. When caring for textiles in arid areas it its important to note that:
|
Temperate |
A temperate climate is considered a moderate climate, however, temperate climates tend to have a greater range of temperatures than tropical climates and may include extreme climatic variations. It is probably easier to achieve the recommended ideal conditions for the storage of textiles in a temperate climate, however, it is unlikely that you will be able to maintain an even environment without the help of sophisticated air conditioning equipment. The system of layers of storage—acid-free material sandwiching the textiles, boxes, boxes and rollers within cupboards—will be very useful in helping to buffer against the extreme conditions that can occur in a temperate environment. As for all climatic areas, regular inspections of storage and display areas are important so that developing problems do not go unnoticed. Note: If your textiles collections have been stored in a temperate environment for a considerable period and they are stable—do not try to alter the environment to meet the recommended ideal conditions. This could do more harm than good. The emphasis should be on long term stability. |
Tropical |
These climates are characterised by heavy rainfall, high humidity and high temperatures. When caring for textiles in high humidity conditions it is important to note that:
|
A note on the use of Tyvek
Tyvek is a very useful storage material for textiles. It will protect your textile from dust and water while allowing air circulation. However, it must be used the right way up. Tyvek is water- resistant from one direction but is penetrable from the other side. This is how it allows the textile to breathe. The smooth side of the Tyvek should be placed in contact with the textile at all times. Tyvek is available in white or with one coloured side. It may be easier to use coloured Tyvek to ensure that you always use it the right way up. Tyvek is available in a range of weights. The weight commonly used in conservation is Type 1443R.
Tyvek can be machine-sewn into storage bags or covers. It can also be machine-washed.
Selecting fabrics, threads and stitches for textile conservation
When preparing to mount or hang a textile for display, there are some important principles to remember:
The work you do should be reversible.
You should use only the minimum amount of stitching required to stabilise the textile.
Use the correct techniques and materials to ensure the long-term preservation of your textiles.
As a general rule, always use like with like. For example, a silk textile should be mounted on a silk fabric and stitched with silk thread. If you cannot use the same fibre, always use an inert synthetic fibre such as polyester. Using incompatible materials, such as using silk with cotton, accelerates the degradation of your textile.
Silk and wool are both protein fibres and are therefore compatible. Cotton, linen and other plant fibres are cellulose fibres and are compatible with each other.
Support fabrics
A support fabric is the fabric on which a textile is mounted before framing. As a general rule, always use like with like; that is, a wool fabric should be mounted on wool.
This fabric is often exposed, either forming a border around the textile or showing through areas of damage in the textile. Therefore, it is important that the support fabric is similar in colour and weave to the original textile.
If you cannot buy a fabric of the correct colour, weave and fibre type, you can have fabric dyed by textile conservators experienced in colour matching or by commercial dyers.
Threads
When selecting threads remember to always use like with like, for example, silk with silk or polyester, or cotton with cotton.
As a general rule, the finer the thread the better; but you will have to judge by the appearance of the fabric what denier of thread will be the most appropriate. For example, fine silk will require a fine silk or polyester thread. A woollen tapestry will require a coarser woollen thread.
Stitches
Before stitching your historic textiles, remember:
to make sure that the needle passes in between the threads in the weave, not through them. If the needle passes through weakened fibres it can cause considerable damage;
to keep the tension of the stitches fairly loose, so as not to damage the fabric; and
do not use knots. Start your thread by leaving a tail at the back of your textile and stitch three small stitches in one position to anchor your thread.
The next section describes the main stitches used in textile conservation.
Laid and couched stitching
This is one of the main stitches used in conservation. It is used because it provides maximum support for the fabric with a minimal amount of stitching passing through the textile.
Couching is used to stitch worn areas of the textile to a support fabric underneath it. The textile should never be under tension when being stitched.
Running stitch
Running stitch is used to join two pieces of fabric together. It is used around the edge of a textile, and is also used when stitching a lining onto a textile in a grid pattern.
It is a good idea to do a back stitch approximately every 50mm: to lock the stitching in place so the textile does not slip along the stitching and so strain.
Stab stitch
Stab stitch is worked in the same way as running stitch, except the stitch on the surface of the textile is smaller than those underneath.
Herringbone stitch
Herringbone stitch is generally used to stitch textiles with frayed edges. This stitch prevents further fraying of the textile. It is a useful stitch because it spreads the load of the stitching over a greater area of the textile.
The size and spacing of the stitch depends on the type of textile and the extent of the damage.
If you have a problem relating to the storage or display of textiles, contact a conservator. Conservators can offer advice and practical solutions.
For further reading
Arnold, Janet, 1977, Patterns of Fashion 1. Englishwomen's Dresses and Their Construction— c. 1660–1860, Macmillan London Ltd, London.
Arnold, Janet, 1978, Patterns of Fashion 2. Englishwomen's Dresses and Their Construction c.1860–1940, Macmillan London Ltd, London.
Arnold, Janet, 1973, A Handbook of Costume. Macmillan London Ltd, London.
Bradfield, Nancy, 1981, Costume in Detail 1730–1930, Harrap Ltd, London.
Burnham, Dorothy K., 1980, Warp and Weft:
A Textile Terminology, Royal Ontario Museum, Toronto, Canada.
Canadian Conservation Institute, 1983, ‘Rolled Storage for Textiles’, CCI Notes 13/3, Canada.
de Dillmont, T., 1912, Encyclopedia of Needlework, DMC Library, Mulhouse, France.
Earnshaw, P. 1986, The Identification of Lace, Shire Publications Ltd, Aylesbury, U.K.
Earnshaw, P. 1982, Dictionary of Lace, Shire Publications Ltd, Aylesbury, U.K.
Fletcher, Marion1984, Costume in Australia 1788–1901, Oxford University Press, Oxford and Melbourne
Landi, Sheila 1985, The Textile Conservator's Manual, Zndedn, Butterworth-Heinernann Ltd, Oxford, U.K.
Leene, J. 1972, Textile Conservation, Smithsonian Institution Press, Washington D.C. U.S.A.
Maynard, Margaret 1994, Fashioned from Penury: Dress as Cultural Practice in Colonial Australia, Cambridge University Press, Cambridge, U.K.
Norton, R. 1984, Storage and Display of Textiles— for Museums in South East Asia, UNESCO.
Sandwith, H. & Stainton, S., 1991 Rev. edn., The National Trust Manual of Housekeeping, Viking in Association with The National Trust, London.
Tebbs, L. 1978, The Art of Bobbin Lace, Paul P.B. Minet, London.
Waugh, Norah 1968, The Cut of Women's Clothes 1600–1930, Faber and Faber, London.
Self-evaluation quiz
Question 1.
Textiles can be damaged by:
a) being creased—this can lead to splitting of the textiles;
b) light and UV radiation, causing fading and setting off chemical reactions which weaken the textiles;
c) mould, insects and pollutants
d) perspiration;
e) all of the above.
Question 2.
When handling textiles:
a) try to touch as little of them as you can— always pick them up by one part only;
b) fold them as neatly and as small as possible to make handling easier;
c) never pick them up by one corner and always support the weight of the textile evenly;
d) have clean hands.
Question 3.
To label a textile:
a) write in permanent ink on the corner of the textile, or on the collar of the costume;
b) write in permanent ink on a sticky label and stick this to the textile;
c) machine-sew a label to the textile;
d) write the label onto cotton tape and attach this to the textile with one or two hand- stiches.
Question 4.
Which of the following statements are true?
a) Historic costume should not be worn if you wish to preserve it.
b) Body oils and perspiration will not damage textiles.
c) The stress and strain of wearing a garment can cause a great deal of damage.
d) Historic costume should be worn on festive occasions especially those involving food and drink.
Question 5.
Small flat textiles:
a) should be stored in Dacron sausages;
b) should be stacked one on top of the other;
c) should always be rolled;
d) can simply be stored flat, with interleaving if items are to be stacked.
Question 6.
When rolling a large textile for storage:
a) choose a roller that is longer than the item is wide;
b) cover the roller with acid-free material to protect the textile;
c) select a roller with a small diameter so that it does not take up too much space;
d) fringes and tassels should be kept straight.
Question 7.
When displaying textiles:
a) be aware that light and UV radiation are the greatest enemies of textiles;
b) use acid-free materials in the display systems;
c) ensure that your textiles are well supported;
d) protect your textiles from fluctuations in relative humidity and temperature, dust, insects and pollutants;
e) all of the above.
Question 8.
Historic costume can be:
a) stored on wire coat-hangers;
b) displayed safely on mannequins if measures are taken to modify the mannequin to the appropriate shape;
c) worn regularly with the right undergarments;
d) protected in storage by hanging them on padded hangers and covering them to keep off dust.
Question 9.
To clean textiles:
a) proceed with caution and use a vacuum brushing technique;
b) wash them in washing machines;
c) use the full suction of your vacuum cleaner to ensure you remove all the dirt;
d) use a carpet beater.
Answers to self-evaluation quiz
Question 1.
Answer: e).
Question 2.
Answer: c) and d).
Question 3.
Answer: d).
Question 4.
Answer: a) and c) are true. b) and d) are false.
Question 5.
Answer: d).
Question 6.
Answer: a), b) and d). c) is not correct: the roller should be as large as possible to maximise the curvature of the textile.
Question 7.
Answer: e).
Question 8.
Answer: b) and d). Wire coat-hangers are not suitable for hanging historic costume. Historic costume should not be worn.
Question 9.
Answer: a).