Objectives
At the end of this chapter you should be able to:
conduct a hazard assessment for your own collection;
decide on the appropriate materials required to assemble a disaster bin, and implement preventive procedures;
prepare a counter-disaster plan for your organisation;
understand the need to assess the extent of a disaster, and quickly assemble the resources you need to deal with it;
produce a recovery plan for a disaster;
implement safe practices for the reaction phase;
prevent mould outbreaks and cope with them if they occur;
understand the need for efficient and effective disaster recovery;
appreciate the need for training, so that response and recovery teams can work effectively;
select and identify items and formats that need specific attention, should a disaster occur; and
implement drying procedures.
Introduction
Everyone is familiar with the damage that can result from fire, flood and earthquake. Every year, collections all over the world are affected by such disasters and, more commonly, by water from leaking roofs, burst pipes and overflowing gutters. No institution is immune.
In addition to the well-known natural disasters or acts of God such as cyclones, earthquakes, volcanoes and floods, there are those caused by accident or by criminal acts, including vandalism, arson and bomb attack. Some are caused by carelessness—such as smoking in the building, leaving doors or windows open, leaving taps on in washrooms, kitchens and laboratories—and, finally, there are those related to building maintenance or extensions. In addition to leaking roofs, burst pipes, and overflowing gutters and downpipes, these include blocked drains, air-conditioning failure, faulty sprinklers and faulty wiring.
Despite this long list of potential hazards, many custodians and collection managers remain unaware of the role they can play in disaster prevention and preparedness.
Counter-disaster management
Counter disaster management is about:
Trying to prevent disasters by being aware of the risks to collections and acting to minimise them.
Being prepared for the possibility of a disaster by maintaining:
- current contact numbers and addresses for emergency services;
- lists of people you can call on in an emergency;
- supplies of materials and equipment; and
- lists of suppliers for equipment and materials.
Knowing how to react to a disaster and knowing how to recover from a disaster as soon as possible.
Advanced planning for potential disaster can prevent damage to collections and make the difference between temporary loss of service and catastrophe. A written counter-disaster plan is the key to fast recovery because it provides the organisation with an immediate response mechanism. With proper planning, damaged materials can be salvaged and treated successfully, losses are dramatically reduced and service is resumed in a timely matter.
Being prepared and implementing preventive practices is an integral part of preservation.
Summary of important points
Advanced planning for potential disasters involves:
hazard assessment;
implementing preventive practices;
developing and documenting a counter- disaster plan; and
being familiar with reaction and recovery procedures.
Careful preparation will prevent or minimise damage occurring or, if unavoidable, it will enable damaged materials to be salvaged and treated successfully, dramatically reducing losses and getting services back into operation promptly.
The following points are worth remembering.
Disasters do happen. Many are predictable, and therefore avoidable.
Some 95% of disasters result in water damage.
Fire will result in water damage from sprinklers or fire hoses.
The most common causes of water damage are burst or leaking pipes, leaking air-conditioning systems, and blocked drains or gutters.
Disasters can be prevented by identifying hazards and taking appropriate action.
The extent of a disaster can be minimised by planning, regular rehearsals and the presence of well-equipped counter-disaster bins.
The success of recovery rests on the preparation of a recovery plan, and the organisation of the recovery team.
The extent of damage should be documented, both in writing and photographically.
Freezing prevents mould from growing; but not all materials can be frozen safely.
It is important to stabilise the affected area before returning dried books and objects to shelves.
Prevention
Prevention begins with a hazard assessment. It involves listing all potential hazards in the building itself and in the local environment, and assessing whether the risk is high or low. When you know what potential hazards and risks exist, you can take steps to minimise the risks where possible, and to protect your collections in the event of a disaster.
As risks are identified, problem areas should be marked on a map of the building; and where possible, action should be taken to improve the situation. The following list may help in hazard reduction;
- effective building security;
- protective storage of flammable materials;
- selection of fire-resistant furnishings and fixtures;
- storing items in boxes and containers;
- cleanliness and tidiness;
- smoking restrictions;
- installation of smoke and heat detectors; • installation of sprinkler systems;
- regular servicing of electrical and air- conditioning systems;
- liaison with the fire brigade;
- sensible work practices;
- unplugging electrical equipment when it is not in use;
- training and awareness programs for staff, volunteers and the local community;
- examining incoming collection materials for mould or insect activity; and
- storing collection items at least 100mm off the floor.
Once you have assessed the potential hazards, the next step is to prepare.
Preparedness
While you can take action to minimise potential hazards, it is practically impossible to prevent disasters happening. So it is important to be prepared—to minimise the extent of the damage.
Preparedness involves:
preparation of a counter-disaster plan;
purchase of materials and equipment for dealing with the first stages of reaction and recovery;
establishing a team of people prepared to be called on in an emergency; and
training them so that they are familiar with procedures for responding to a disaster.
Counter-disaster plan
The counter-disaster plan incorporates all the information you may need if a disaster occurs, including:
day and night emergency contact numbers;
names, addresses and contact numbers of people available to help;
addresses and contact numbers of suppliers of equipment, materials and services that may be needed;
an inventory of holdings, including a list of priorities for recovery;
details of insurance policies;
floor plans;
initial response procedures;
documentation procedures; and
recovery procedures.
Materials and equipment
Once the counter-disaster plan is in place, the next step is to purchase equipment and supplies for use in disaster recovery. While a cupboard is a suitable storage space, mobile disaster kits or bins are commonly used. The purpose is to have ready access to resources for dealing with minor water damage.
Disaster stores are also commonly found in larger organisations. These are usually rooms dedicated
to holding more extensive supplies for disaster recovery, including stock to replenish the disaster bins. The choice between bin or store, location and number will vary according to your needs.
A practised team
The third step in preparedness is getting some practice before the event, so that the procedures you have developed become second nature.
All staff should be trained in the use of fire extinguishers. All people likely to be available in the event of a disaster should also be trained in handling and treating different types of wet material. Running a simulated disaster is an effective way of checking how well prepared your organisation is.
It is advisable to form a disaster response team: to respond when a disaster is reported, to assess the situation and plan the recovery phase. Many tasks must be undertaken before and during the recovery, so it will be important to assign team members specific responsibilities.
In the event of damage to the collection, you need to form recovery teams as well. These are often made up of volunteers, led by a member of the disaster response team. They undertake the recovery procedures.
If you have only a few people to call on, or if budgets for materials are very tight, regional networks should be established with similar organisations— so that you can pool scarce resources. Networks should also be established with services to help in the event of a disaster. These include the local fire brigade, regional emergency services and companies with freezing facilities, such as butchers or ice works. You need to explain to them the emergency procedures outlined in your counter-disaster plan.
Reaction
When a disaster occurs, a number of steps must be taken. In all circumstances, the safety of people has priority over the collection.
CAUTION:
If you are unsure about whether it is safe to enter the disaster site or not, evacuate all people and ensure that no-one can enter until the local fire brigade or emergency services centre gives the clearance to enter.
A simple document outlining initial response procedures should be included at the front of your counter-disaster plan, and copies kept near your phone. The following is one example of initial response procedures when water is threatening or has affected the collections:
Before entering the area
Contact the person responsible for security— include—contact names and numbers.
Assess the situation by asking these questions:
Is it safe to enter the affected area?
Can the water be stopped or diverted?
Can the collection be protected where it is?
Can the collection be moved to a dry location? and,
Can a start be made on drying and cleaning up the wet areas?
If the collection has been affected, contact a recovery coordinator or a recovery specialist.
Documentation
It is essential to document all action taken before, during, and after the recovery phase. Documenting a disaster means having a written and photographic record of the disaster. This is essential for:
insurance records and claims;
assisting in the recovery phase;
evaluating the success and shortcomings of the counter-disaster plan; and
keeping track of the locations of the objects.
Documentation should include written details and photographs of the:
- cause of the disaster;
- number and value of items damaged;
- number and value of items replaced;
- number and value of items repaired;
- cost of maintenance of the affected area;
- amount of staff time expended in the recovery operation; and
- cost of disaster supplies.
Recovery plan
Before commencing the recovery phase, produce a recovery plan. This documents the order in which you are going to recover damaged items, and how you propose to treat them. Options may vary from simply moving items into a drying area, to packing them for freezing. Unlike the counter-disaster plan, the recovery plan cannot be prepared ahead of time. It will vary, depending on the situation.
Having documented the recovery plan, it is time to assemble the recovery work-teams and brief them on the tasks to be done. In addition to clarifying your expectations of them, it is important to cover safety issues.
Recovery
Recovery includes:
sorting: grouping materials by type after the disaster. Materials are stored by the type of damage, for example, water, fire; by the extent of damage, for example, wet, damp; and by the type of material, for example, photographic, textiles;
documenting: maintaining a written record of the original location of items, where they are moved, and what treatment they are to undergo. The aim is to allow prompt retrieval of an item, should it be requested, and to keep a record for insurance purposes of all materials disposed of;
drying: air-drying wet material by removing visible water, and placing items in an area which has a good supply of clean, cold, moving air. Fans are often used to stimulate air movement;
cleaning: removing mud, dust or dirt from the surface of an item;
rehousing: replacing damaged boxes and folders;
repairing: the application of treatments to make a damaged item structurally sound; and
relabelling damaged items: replacing damaged or missing labels. Labels are often detached during a disaster, and/or the inks run and become difficult to read.
The recovery operation must be planned to suit the needs of the particular situation and of the damaged materials. The recovery operation is not complete until all items are back in the storage area and available for use.
Ideally, the recovery operation begins after the disaster has been contained. However, where particularly vulnerable items are damaged, or at risk, it may be necessary to begin the recovery operation before this point. Consider the following situation. A water pipe has burst and water is spraying over the part of the storage area in which costumes are held. As the costumes are likely to have soluble dyes, you may decide to move the costumes which are in the vicinity of the water before turning off the water. It depends on how easy it is to turn off the water supply.
Recovery follows the preparation of a recovery plan. Usually there is more than one type of salvage procedure that can be employed, depending on the nature and extent of the disaster. Recovery may take a few days, or even months, before it is complete, depending on the extent of the disaster. In examples like the Florence floods of 1966, in which vast numbers of rare and irreplaceable books and manuscripts were affected, the recovery phase has still not been completed. It is advisable to seek advice from a recovery specialist when recovering from a disaster.
Recovery priorities
Ensure that the disaster area is cordoned off to prevent sightseers from getting underfoot, and to
secure the area from pilfering. Security must not be overlooked, because there can be many people other than staff in the building. It is very easy for some unscrupulous person to walk out with items from the collection. Make sure that a register is set up to record the name and associated company of every person who enters the building, and secure unaffected areas so that people cannot wander through them.
After preparing the work areas for sorting, packing and drying, the different materials should be treated in order of the priority lists set out in your recovery plan, and depending on the extent of damage and their sensitivity to water.
It is usual to consider the wettest material first, and to look for items which may have water-soluble media or which may suffer structural damage from swelling—as is the case for canvas paintings and furniture. With mixed collections such as those often found in historical societies, it is important to identify the items most sensitive to water. Seek assistance from a recovery specialist on this matter, because they will vary with each collection.
Recovery procedures for different materials
It should be noted that 95% of all disasters result in water-damaged materials, and mould will develop within two to three days in a warm, humid environment. Fire will result in water damage from sprinklers or fire hoses; earthquakes and tremors often cause water pipes to crack and/or burst.
So the emphasis in this chapter is on recovery procedures for water-damaged items. Tips on the treatment of items affected by fire and smoke are also included. The typical types of damage vary, depending on the materials.
You should also note that water is usually not clean, so there may be accompanying staining. Water from sprinklers is usually rusty; and flood- water may contain mud, oil and sewage.
Different types of materials have different drying requirements. The recovery procedures for electronic media, microforms, colour photographic materials, black and white photographic materials, glass plate negatives, and historical photographic materials differ quite dramatically from those for paper-based items such as documents, books, maps, plans and posters. See Procedures for the recovery of particular types of materials later in this chapter.
Disasters in Australia\'s Climatic Zones
Arid |
This climate is generally very dry, however, in arid areas, it is often very hot during the day and very cold at night. This wide fluctuation in temperature is matched by wide fluctuations in relative humidity. It is important to note that:
Suppliers of humidifiers should be included in the counter-disaster plan under emergency contacts and suppliers. |
Temperate |
A temperate climate is considered a moderate climate, however, temperate climates tend to have a greater range of temperatures than tropical climates and may include extreme climatic variations. When preparing for disasters in temperate zones it is important to note that routine building maintenance, including clearing drains and gutters is necessary to prevent water entering the building when it rains heavily. Remember mould grows in temperate climates. If the collection does suffer water damage, the climatic conditions will need to be considered. If the temperature is high, the collection will be at risk from mould growth. If the relative humidity is high, the drying process will be slower, increasing the likelihood of mould growth. |
Tropical |
These climates are characterised by heavy rainfall, high humidity and high temperatures. Heavy rainfall will put more strain on gutters and drainage so it is essential to ensure that they are checked and cleaned regularly. If the collection suffers water damage in tropical regions it is important to note that:
Suppliers of dehumidifiers, fans and desiccants should be recorded in the counter disaster plan under emergency contacts and suppliers. Freezing can be used to control mould growth if large quantities of paper or textiles have been affected by water. Note: Do not freeze photographic materials. |
Hazard assessment
Hazard assessment involves a survey of potential hazards, to identify possible risks or threats to the building and its collections. It includes identifying hazardous materials such as the chemicals stored in cleaners’ storerooms and in photographic laboratories.
Hazard assessment model
Models like the following can be useful in hazard assessment:
the first step is to identify all potential hazards;
the next step is to assess the probability of each hazard on the vertical scale, then chart the possible effects to the organisation on the horizontal scale; and
the final step is to bring this information together, and plot it on a grid;
The example below illustrates this process for a small country museum in Australia. The most likely hazards in this example are bushfires and vandalism.
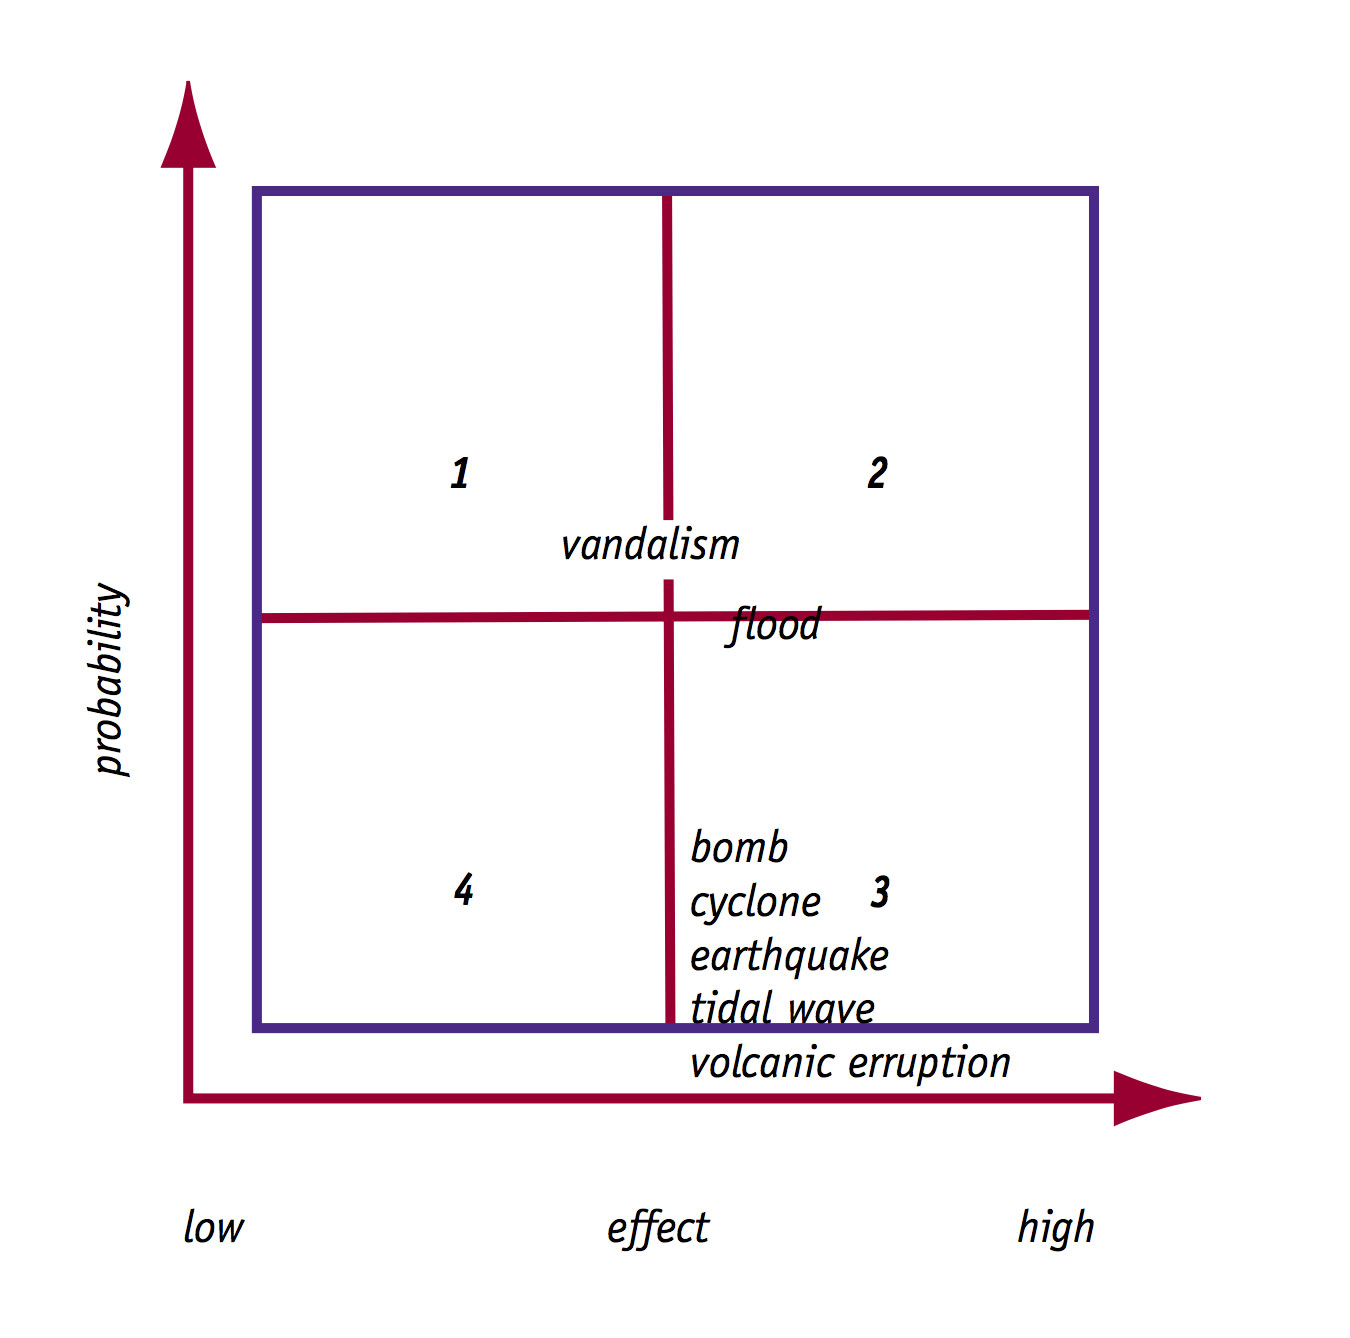
Bushfires could wipe out both the collection and the building, while vandalism could result in breakage or in fire, so it could fall into either category.
In this case, the building is on a hill in an area not known to flood; but the box guttering is known to block up and cause leaks in heavy rain, if not cleared out regularly. So the probability of flood from the overflowing gutters is quite high and, if not detected quickly, could result in extensive damage to the collection.
Bombs, cyclones, tidal waves, earthquakes and volcanic eruptions are not likely in this area; but the effects of any of these would cause considerable damage to the building and collection, if not total loss.
These hazards are charted according to their probability and the effect they will have on the collection or the building.
Bushfires and vandalism are of most concern; but it must be remembered that risks don’t remain static—they vary as conditions change. For example, the risk of fire is much greater when building modifications are taking place, than during normal operations.
Hazard analyses will produce different patterns for different organisations. Factors such as geographic location, building construction, the political environment, the number of staff, the existence of overcrowding and use patterns will all have a bearing on the results of the analysis.
Using the hazard analysis, preventive measures can be put in place to minimise the likelihood of some disasters, or at least the probable effects. In the example discussed above, knowing that the box gutters are likely to cause a flood in the museum could result in the following procedures:
replacing the gutters with a more appropriate style of guttering; or
alternatively, cleaning out the gutters regularly, perhaps even monthly, and checking the building and the collection after every heavy rainfall;
Some causes of damage in a disaster
The following lists of possible hazards may help you in identifying hazards in your museum, gallery or library.
Possible hazards
Water is a common cause of damage to collections and may arise from:
- rain;
- hail
- leaks
- rising damp
- burst pipes
- open streams and rivers nearby
- damaged fire hoses
- sprinkler malfunctions
- underground streams beneath the building(s); and
- overflowing sinks in kitchens and washrooms
Mould growth is evidence that water has entered the area or that humidity has been high. In addition to checking for potential sources of water, look for places where water may enter, including:
- access points to roofs and basements;
- windows;
- skylights;
- basements;
- gutters;
- down pipes;
- drains; and
- roofs.
Fire is also a major threat. Fires can be caused by:
- electrical wiring and equipment
- chemicals - for cleaning and photography
- fuel spillage
- gas leak
- arson
- lightning; and
- air-conditioning systems.
Any spark may cause a fire. Most collections contain highly flammable materials such as paper, cotton and wood.
Other hazards are:
- dust, which may be transmitted through air- conditioning and from any building work;
- air-conditioning malfunction;
- structural damage caused by earthquake, earth tremor, accident or inherent defect;
- building alterations or maintenance—the time when buildings are most vulnerable and special care should be taken;
- insects and rodents;
- bombs;
- vandalism;
- demonstrations or other disturbances;
- alternative building uses—such as leasing out facilities for functions—which are potentially damaging; and
- restaurant, exhibition and other specialist functions.
Water
Flood, fire, leaking roofs and burst pipes are all common causes of water damage. In many cases the water will be dirty, so that recovery involves cleaning as well as drying. Floodwater usually contains mud, oil and other impurities. Sprinkler water can be black, and water from pipes is often rusty.
In addition to wetting and soiling, water damage introduces the risk of mould. The only materials not at great risk from mould are glass and metal. Because mould can grow within 48–72 hours under warm, damp conditions, drying should begin within the first 48 hours after the objects become wet.
Other forms of damage associated with water are staining, warping, splitting, rusting, and items sticking together or falling apart because glues have been reactivated by the moisture.
Stains can be caused by water-soluble inks and dyes that might be part of the item or an adjacent item.
Water causes paper, canvas, textiles and wood to swell. This contributes to the warping of book covers, detachment of spines and covers, and the splitting of wooden furniture.
Canvas and panel paintings will also swell if wet, which puts stress on the paint layers. They must be dried under controlled conditions to prevent the wood panels from splitting and the paint from cracking and flaking.
Coated and glossy papers and photographs will stick together if not separated during drying; and photographic emulsions may actually separate from prints and negatives if they are left wet longer than 48 hours.
Metals may begin to corrode or rust, if left wet or left in a humid environment for too long.
Mould
Mould damage can result from exposure to water in a disaster, or from high humidity levels—greater than 65%RH—in the storage environment. Wet material will begin to grow mould within 48–72 hours, perhaps earlier if the temperature is above 22oC.
In addition to the visible damage in the form of permanent stains on paper, cloth and leather, mould will cause physical damage to the structure of these materials. The affected area becomes powdery, and will disintegrate if handled.
To prevent or minimise further mould growth, first control the environment. The temperature and relative humidity in the disaster area should be stabilised; ideally, the area should be kept at 20°C and 50%RH. You may need to install dehumidifiers and fans—cold cycle only—to help circulate the air. Recovery specialists should be contacted for further advice.
Mould-damaged items should be removed from the storage area as soon as they are identified. Every effort must be made to minimise the chance of other items becoming affected. There are several options for the treatment of mould-affected material.
Mould-damaged materials have traditionally been fumigated to kill the mould. But most fumigation chemicals used in the past are either extremely toxic or ineffective, and are no longer recommended for use. Check with a recovery specialist about the suitability of using specific fumigants, because some can cause harm to certain materials. It is critically important to prevent mould from growing.
Freezing will not kill mould, but will prevent further growth, giving you extra time to seek further advice.
An alternative is simply to vacuum the material, stabilise the humidity in the storage area and continue to monitor it for further outbreaks.
Remember that mould growth is retarded by reducing the humidity to 60%RH or less, and by ensuring good air circulation.
Regardless of which option you choose, mould- affected material must be cleaned before returning it to storage. Ensure that you protect yourself by wearing a dust mask, gloves and protective clothing. Work in an open area, and brush the mould and dirt into a vacuum cleaner. The storage area should also be thoroughly cleaned and disinfected before materials are rehoused.
Your plan needs to set out clearly how you will deal with mould, and should list fumigation companies to contact in an emergency.
For more information
For a comprehensive guide to dealing with mould, see Mold, by Lois Olcott Price.
For more information about moulds, please see Biological Pests in Damage and Decay.
Fire- and smoke-damaged materials
Treatment of fire-damaged material
When moving fire-damaged materials, wear cotton gloves, and be careful not to allow ash to mark materials any more than it has already.
Wrap or interleave items as you remove them from the shelves—they may be brittle and need support.
Place materials on a trolley and move to the designated disaster-recovery work area.
Charred material
Little can be done for badly burnt materials.
They should be handled very gently, because they are very fragile.
Cotton gloves must be worn at all times when handling charred materials. They prevent soot being permanently absorbed by paper, leather and textiles.
Charred items should be placed in boxes or between sheets of cardboard, and wrapped in any clean, unprinted paper for protection.
If they are suffering from the effects of only smoke and ash, restoration treatment could just include soft brushing.
It is important to note that sooty residue can be difficult to remove.
Before attempting any other treatment, contact a recovery specialist for advice.
Smoke-damaged materials
Should be placed in an area where there is a lot of rapidly moving air. This will dispel most lingering odours.
Placing small quantities of items in a refrigerator will also reduce the odour.
Large quantities of paper materials affected by smoke have also been successfully treated in ozone chambers. Despite reports that this treatment is effective at removing odours, there are concerns that it may be damaging to materials.
The counter-disaster plan
It is essential that every collecting organisation has a comprehensive, well-documented counter- disaster plan detailing procedures to be followed in case a disaster occurs.
The counter-disaster plan might include:
- a list of hazards;
- an initial response procedures;
- disaster kits—list of contents and locations;
- the location and description of smoke detection and fire-fighting equipment;
- day and night emergency contacts for staff and specialists;
- the names and addresses of suppliers of emergency equipment and materials, including day and night telephone numbers;
- the emergency funding procedures;
- insurance details;
- the emergency contact for computer problems;
- the contact numbers for the disaster response team, together with notes on their roles and responsibilities;
- an assessment checklist;
- a list of known leaks and problem areas;
- recovery procedures for types of damage— wet/burnt and different formats;
- freezing facilities;
- procedures for dealing with mould;
- priority lists for recovery;
- documentation procedures;
- emergency evacuation procedures; and
- disaster reaction procedures.
Disaster kits
Disaster kits should contain the equipment and materials you are likely to need to cope with minor disasters. Disaster kits can be mobile or static. Institutions around Australia have developed a range of models, adapting wheelie bins, ordinary bins, metal trunks and cupboards to suit their needs. Some organisations also have disaster stores.
When putting together a disaster kit, you should ask:
- what is the kit needed?
- what is the best kind of kit for the organisation?
- what size should it be?
- what should go in it?
- how many are required? and,
- where should they be located?
Advantages of disaster kits in wheelie bins:
- easy to move into affected areas;
- fit between shelves;
- can be used for removing items from the disaster site; and
- can be easily identified.
Disadvantages of disaster kits in wheelie bins:
- they can be heavy;
- they are difficult to get up stairs, so you need one on each floor unless you have lifts. The lifts may not be operating after a disaster;
- people still think of them as rubbish bins; and
- it can be difficult to reach the contents at the bottom of the bin.
Other alternatives:
- trolleys to remove large flat items and artefacts; and
- vegetable trolleys.
Location of the disaster kit
- they must be accessible to all staff members—but not to the public, and must be able to be moved quickly and safely; and
- disaster kits should have the minimum necessary material, to make them less attractive to pilferers.
Contents of the disaster kit
The disaster kit might include:
- perforated paper towelling;
- clear polythene storage bags;
- pre-cut plastic sheeting;
- chalk
- gloves - cotton and rubber;
- string
- pen, paper, clipboards;
- foam sponges
- masking tape;
- blue garbage bags for collecting objects;
- scissors
- black garbage bag for wet rubbish;
- a bucket; and
- twist ties.
The following should also be included in the kit:
- a checklist of procedures or emergency information sheets; and
- a list of emergency contacts.
Disaster kits need to contain only enough resources to cope with minor water-damage. More extensive supplies are kept in a disaster store.
Disaster stores
An in-house store—centrally located or at a location known to staff and the disaster response team—is useful. The locations of the keys to the store and of the contact people should be recorded.
It is also helpful to liaise with other local institutions and local government bodies, to find out whether they have equipment and supplies which could be useful and, if so, to record after- hours contact numbers.
Counter-disaster networks can be set up where individual resources are minimal. By setting up regular meetings, the group can pool resources and information.
The following is a sample list of possible supplies. You may not need all of these items.
Contents of the disaster store
Protection
- plastic sheeting;
- Stanley knife;
- adhesive waterproof tape;
- pins;
- staple gun;
- scissors;
- ties (gardening twine); and
- sandbags.
Removal
- cardboard boxes;
- milk and bread crates;
- trolleys;
- bins;
- blotting paper;
- plastic, Mylar; and
- plastic bags—2 colours.
Recovery
- clothes lines;
- safe storage;
- trestle tables;
- clean newsprint, blotter;
- paper towels—perforated, non-coloured;
- spray bottles/misters;
- distilled water; and
- Nylon net for shaping three-dimensional objects such as garments and costumes during drying.
Humidity control equipment
- thermohygrographs or other monitoring equipment;
- dehumidifiers; and
- fans
Communications
- radio;
- mobile telephones;
- whistles;
- chalk;
- loud hailers;
- large sheets of paper;
- walkie-talkies; and
- thick waterproof pens. Plant and safety equipment
- torches, batteries, globes;
- first aid kits;
- emergency lighting;
- pumps; and
- generators. Protective clothing
- rubber boots;
- gloves, rubber and cotton;
- plastic macintoshs or Tyvetc overalls
- hard hats;
- dust masks;
- respirators;
- aprons;
- sleeve protectors; and
- overalls
Clean Up
- sponge-type mopes;
- brooms;
- buckets; and
- sponges.
Documentation
- paper, pens, chalk;
- disaster lists;
- tags;
- clipboards; and
- disposable camera.
Disaster response team
The role of the disaster response team is to:
- respond when a disaster is reported;
- assess the situation; and
- plan the recovery phase.
The recovery procedures are then implemented by the recovery team(s).
While a number of tasks need to be assigned to people on the disaster response team, the critical points are:
- there should be an overall Team Leader, responsible for coordinating the recovery operation;
- someone needs to be assigned responsibility for maintaining records of damaged materials and what happens to them, for example, whether they have been sent off-site for freezing, discarded, or set aside for further treatment; and
- you need someone to assemble supplies and equipment and obtain food and drinks for work breaks.
Record who is to be assigned the following responsibilities:
- ensuring that administrative procedures are followed;
- allocation of funds;
- public relations, for example, media releases and handling reporters;
- damage assessment;
- training and supervision of recovery teams; and
- photographing the extent of the damage.
In a small organisation, the disaster response team and the recovery team may be one and the same.
All members of the disaster response team should be trained in the use of fire extinguishers; and some should have training in first aid.
Networks
Counter-disaster planning and disaster recovery are both labour-intensive and potentially stressful exercises. Performed in isolation, they are a trial. If shared, they can be challenging and rewarding. Involve people from the community with relevant expertise: the fire brigade and regional emergency services, for example. It is important that they know what you intend to do in the event of a disaster, and that you have emergency and counter-disaster procedures in place.
In the event of a fire or structural damage, you will want to get into the building as quickly as possible, to inspect the damage to the collection and plan the recovery phase. Access will be restricted by the fire brigade or emergency services. Building a relationship with these organisations beforehand can save vital time in implementing the recovery phase.
There are other services you can contact in advance, to make sure that they can help in an emergency. Companies which have large freezers may be willing to let books and documents be frozen until assistance arrives. Check with butchers, ice works and chicken processors.
Drying areas may also be needed. What about the town hall, school auditorium or any unused warehouse? Call them and explain that you are preparing a counter-disaster plan and need to list some options for recovery areas. They may also be prepared to lend a hand in an emergency, in exchange for your assistance if they have problems.
Safety during a disaster
People will be under pressure to retrieve material. Make sure that you take time to ensure that this is done efficiently and with the least likelihood of danger of injury to yourself and your staff. If the building is structurally unsound you will not be allowed to enter it, often the case if the building has been affected by fire, even if the fire was in an adjacent building. Use this time to plan the recovery phase in as much detail as possible.
Assess the situation
Assess the level of risk. Note wet floors, poor lighting, items on the floor and collapsed shelves.
Will mechanical aids like trolleys and steps be useful?
Will materials need to be carried up and down stairs, and if so, how can this be done safely?
Ensure that equipment and supplies are placed in a convenient location.
Safe handling methods
Avoid excessive bending of the back.
Keep loads close to the body and use leg muscles to lift.
Avoid twisting or side bending when lifting.
Use kick-stools or step ladders to remove materials from the top shelves.
Vary the work, so that different muscles are used. Don’t perform work using the same muscles for longer than 30 minutes.
Ensure that assistants take regular breaks.
During the recovery and post-recovery phases, it is important to remember that people will react to the situation in different ways. Disasters are stressful events: some will cope well, others will fall to pieces. Under such circumstances, people who would normally work efficiently without supervision may need special care and attention. They need clear instructions, and may need supervision.
Recovery plan
The recovery plan sets out exactly what you are going to do, and in what order.
It starts with an assessment of the extent of damage, which covers the quantity of material affected and the categories of damage. For example, some items may be very wet, some damp, and others dry.
Start with wet organic material such as paper, wood and textiles—these will be more prone to mould growth than inorganic material such as metal, glass or ceramic.
CAUTION
Dried botanic specimens may germinate, so they should be placed high on the recovery priority list.
Use the priority lists from your counter-disaster plan to document which items need immediate attention, and which can wait.
Using this information, decide how many people will be needed to assist in the recovery phase, where the recovery will be undertaken, and what resources are needed.
You may also need to decide which method to use in order to recover damaged materials, or whether to get a recovery specialist to assist. The choice of recovery method will depend on the nature of the materials themselves, and what resources are available.
Consider the:
- rarity of material;
value of material;
use of material;
significance; and
condition of the material.
The options for recovery after a disaster may include:
discarding replaceable damaged items—for instance, a publication in print;
copying damaged items;
restoration; and
accepting items in their damaged state, and providing them with physical protection.
A major decision is whether to freeze water- damaged materials. Remember that freezing only buys time. Frozen materials must be dried out later. Regardless of the drying technique chosen, this will be a time-consuming and costly process.
It is advisable to include an assessment checklist to prompt these actions.
Assessment checklist
This list includes questions to prompt information for both the recovery plan and the documentation for insurance and administrative purposes.
What caused the damage?
fire?
water?
insects?
rodents?
vandals?
dust?
structural failure?
other?
What is the impact of the damage?
Fire may cause smoke staining and charring, and water damage which results from fighting the fire.
Water damage may be caused by clean or contaminated water; mud or ash may be involved; water may need to be extracted; dust particles may be in the air.
- Is it safe to enter? What hazards are in the area?
- What has been damaged, for example, equipment or fixtures?
- What kinds of materials are affected?
- Will they be replaced or salvaged? Replacement may be cheaper than conservation or repair; but it may not be possible. If decisions can be made about items to be discarded, they should be made before salvage operations begin. Then effort is not wasted on items that are not worthwhile.
- What materials should be given priority? Materials to be given priority for salvage may be the same as those given priority for freezing.
- How much material or equipment is affected? Assess this in terms of metres of shelving, or numbers of items.
- Will the tasks of salvaging mean closing the building or office, or will business be able to operate as usual, with salvage operations going on behind the scenes?
- What areas can be used for sorting, cleaning, packing and drying? Are they on-site or off- site?
- What kind of special equipment and materials are needed for the salvage operation?
- Will transport or freezing facilities be required?
- How many people will be needed?
Recovery teams
Before starting the recovery phase, spend some time documenting a recovery plan—so that the recovery proceeds smoothly and efficiently.
The next step is to assemble recovery teams to undertake the many aspects of recovery, including packing, sorting, moving, cleaning, drying, rehousing and relabelling. These activities often involve volunteers led by a member of the disaster response team.
Teams of four to five people are recommended. Many people will turn up to help, even for a minor disaster. The key to a successful recovery is to organise these assistants so that the recovery progresses in an orderly fashion. They will need to be trained in safe handling methods, and be given clear tasks and responsibilities. Include demonstrations of their tasks—don’t rely on verbal instructions alone.
Contacting disaster recovery specialists, or calling for volunteers from the staff of other local institutions who have disaster-recovery training, should also be considered.
CAUTION
Asthmatics and people with other respiratory conditions should not be exposed to mould or heavy dust.
When teams have been formed and allocated specific responsibilities, they must be briefed. The following aspects should be covered:
clearly identify the team leader, and explain his or her role and responsibilities;
explain the responsibilities of each team, and demonstrate safe handling techniques and the tasks to be performed;
introduce members of the team, if they don’t know each other;
explain where the following facilities are:
— toilets
— first aid kit
— exits and entrances
— telephones
— areas allocated for specific tasks
— refreshment area;
explain job rotation and breaks—these should happen every hour. Refreshments and food should be provided for the volunteers by the host organisation; and
- establish communication channels and safety signals for emergency evacuation, if necessary.
For more information
For further information about occupational safety issues, please see the chapter on Health and Safety in Managing People.
Recovery specialists
These are people and organisations who offer expertise in particular recovery procedures. Some offer overall cleaning and drying of office and storage areas; others offer cleaning, drying and repair of specific items, such as books, paintings or furniture. This last group includes conservators.
It is usual for conservators to be specialists in the treatment of one type of material, such as paintings. This is the way conservators are trained. This point should be well understood, because a variety of conservators may be needed if the collection contains many different types of items. Your counter-disaster plan should contain a list of people to contact for advice and assistance.
The following list is a starting point only. Contact your State museum, library or art gallery for a list of their contacts, or your State division of the Australian Institute for the Conservation of Cultural Material, Inc. (AICCM). You can locate your State division of AICCM by phoning the National Secretary on (02) 6254 8695 or by writing to:
AICCM Secretariat
GPO Box 1638
CANBERRA ACT 2601
Recovery consultants and services: planning, prevention, cleaning, drying, repair and restoration
Artlab Australia
70 Kintore Avenue
Adelaide SA 5000
Phone: (08) 8207 7520
Fax: (08) 8207 7259
Australasian Recovery Services Pty Ltd
Suite 4, 14 York Street
South Melbourne
VIC 3205
Phone: (03) 9690 1373
Conservation Access
State Library of New South Wales,
Macquarie St
Sydney NSW 2000
Phone: (02) 9230 1676
Fax: (02) 9233 3192
Specialists in the treatment of books, photographs, documents and works of art on paper.
International Conservation Services,
53 Victoria Avenue
Chatswood NSW 2067
Phone: (02) 9417 3311
Fax: (02) 9417 3102
Specialists in the treatment of furniture, textiles, metals, paper, paintings and mixed media.
Keith Adkins Bookbinding and Conservation of Books
66 Cameron St
Launceston TAS 7250
Phone: (03) 6327 3549
Specialist in the treatment of books.
Queen Victoria Museum and Art Gallery Commercial Preservation Service
Wellington St
Launceston TAS 7250
Phone: (03) 6371 1296
Specialists in treatment of books, photographs, documents, works of art on paper, paintings, textiles and objects.
Freeze-drying services
Fischers Steamatic
PO Box 709
Braeside VIC 3195
Phone: (03) 9587 6945
24-hour hotline: (03) 9587 6333
Fischers have a mobile freeze-drying chamber, so offering services Australia-wide. Also known as BMS Catastrophe.
Moisture Control Services
PO Box 2
Pinkenba QLD 4008
Phone: (07) 3868 2442
Fax: (07) 3868 1033
24-hour Australia-wide service: Free call: 1800 800 675
Queen Victoria Museum and Art Gallery
Rocherlea Annex Wellington St
Launceston TAS 7250 Phone: (03) 6371 1296
Drying services
Ayline Cleaning and Restoration System Unit 22/28 Vore Street
Silverwater NSW 2142
Phone: (02) 9748 4507
Fax: (02) 9748 4639
Moisture Control Services
PO Box 2
Pinkenba QLD 4008
Phone: (07) 3868 2442
Fax: (07) 3868 1033
24-hour Australia-wide service: Free call: 1800 800 675
Munters Moisture Control Services:
Albury Head Office
21 Union Road
North Albury NSW 2640
Phone: (02) 6025 6422
Fax: (02) 6025 8266
Munters offers Australia and New Zealand-wide services in structural drying, document restoration, humidity control, disaster planning, and consulting.
Restoration: office furnishings and equipment
Fischers Steamatic
PO Box 709
Braeside VIC 3195
Phone: (03) 9587 6945
24-hour hotline: (03) 9587 6333 Fischers offers services Australia-wide.
Ayline Cleaning and Restoration System
Unit 22/28 Vore Street Silverwater NSW 2142 Phone: (02) 9748 4507 Fax: (02) 9748 4639
76 Counter-Disaster Planning
Restoration: computer systems
First State Computing
Level 7, Underwood House 37–49 Pitt Street
Sydney NSW 2000
Phone: (02) 9256 9999 Fax: (02) 9256 9910
Freezing
Freezing has been used after many disasters to minimise damage to books, documents and other items such as textiles and leather, before rehabilitation can take place. If freezing space is limited, priority should be given to materials in the following order:
materials which have already developed mould;
materials printed on coated paper;
artefacts with water-soluble components, inks, watercolour, tempera, various dyes; and
leather and vellum-bound books.
Books should be packed spine down, in a single layer, in plastic crates or boxes. If there is time, every second book should be wrapped loosely in waxed paper or freezer paper to prevent the books sticking, and to stop colours running from one item to the next.
Flat items should be supported between boards, or inside a container. Heavy weights should not be placed on top of frozen flat items. If putting more than one flat item between a set of boards, interleave them with a material to allow them to be easily separated: Reemay or freezer paper, for example.
The materials should be frozen in the containers in which they are packed. Blast-freezing is preferred, because the speed of this process minimises the chance of ice crystals forming. The freezer should be maintained at minus 10°C or below. This stabilises the materials in the condition in which they were found, preventing further deterioration. Freezing is not a drying method; nor will it kill mould. Freezing provides time for priorities, treatment methods and disposal and replacement programs to be established.
Once the frozen material is to be treated, there are several drying techniques to choose from. These include freeze-drying, vacuum-drying and air-drying.
CAUTION
Freezing unique and original materials is a last resort, and should be used in only the worst possible circumstances. Some materials should not be frozen, including photographs of any type, and electronic media. For advice on materials not covered here, contact a recovery specialist.
Drying wet objects
Air-drying
Air-drying is the most common drying method in Australia suitable for most materials, because there are few facilities which can undertake vacuum- or freeze-drying for large quantities of materials.
Air-drying requires an area with good air circulation.
Open windows and pedestal fans can assist air circulation.
Drying surfaces should be covered with blotting paper or other absorbent paper. This paper, and any interleaving, is changed regularly to improve drying.
Prompt removal of damp rubbish, such as replaced paper towel, wet mounts and boxes, can help keep the humidity down.
Shape three-dimensional objects such as historic costume and leather objects correctly while they dry, to minimise distortion. Nylon netting can be used to pad out three-dimensional objects.
Dehumidifiers can be installed to assist the drying process. These are electrical machines that reduce humidity in the atmosphere. Some models have a chamber where the condensed water collects. This needs to be emptied regularly, often twice a day, morning and afternoon. If not emptied, the machine has a fail-safe mechanism to stop it operating when the chamber is full, thus preventing overflow. But the humidity increases when the machine is idle. Different models of dehumidifiers have different capacities; you may need to check how many units are needed for the room area. For example, two units would be needed if using a portable refrigerant model like the Oasis 2700 in a room of 50 square metres.
Freeze-drying
Freeze-drying is a process in which pre-frozen materials are dried without the ice melting. This is called sublimation. The frozen items are placed in a freeze-dry chamber. Then the air is removed from the chamber, creating a vacuum. Mild heat is introduced to speed up the drying process; and the ice crystals sublimate to water-vapour, which is pumped out of the chamber. This has the advantage that books and coated paper do not stick together as a result of drying, and water- soluble media like inks do not feather any more than they have already.
It should be noted that if inks have already bled, the stain will be set, and pages which have started to block or stick together will not release as a result of the drying process. Items will dry in the shape they were in, which means that a book may dry with a distorted or warped cover and cockled or wrinkled paper.
Vacuum-drying
Vacuum-drying is used to dry wet—not frozen— material, by evaporation. Wet materials are placed in a vacuum chamber, and the air is removed to create a vacuum. Heat can be used to speed up the drying.
Freeze-drying and vacuum-drying are good options when a large number of items is involved. Staining and smoke odour are reduced. Coated paper has been successfully salvaged using both these methods.
CAUTION
Frozen material can be dried in a vacuum chamber but the material will thaw, carrying the risk of bleeding inks and blocking of coated paper.
Photographic materials should not be dried by either of these methods.
Procedures for the recovery of particular types of materials
The following information can be used as a basic guide to the recovery of different types of materials; however, it is not advisable to rely solely on this information. Disaster training will greatly improve skills in this area. Handling wet objects is very different from handling dry objects—they are heavier, and behave differently.
Aboriginal and Torres Strait Island collections
These collections can include a wide range of materials, such as bark paintings, wooden implements, masks and ceremonial adornment made from wood, grasses, shells and feathers, and stone implements.
The first thing to establish is whether the collection contains any secret sacred material. If so, the relevant community must be contacted to undertake the recovery, or to give permission and instructions regarding recovery operations.
Most items can be air-dried carefully, although special attention is needed to prevent wood and bark from splitting, and to ensure that grasses and decorative elements retain their shape.
Bark paintings
Do not put any weight on the bark at this stage to try to flatten it.
Air-dry on blotting paper with the painted surface face-up.
Masks
Use rolls of tissue paper under grass elements to assist it to dry in shape.
Air-dry on blotting paper with the face up.
Wooden implements
Air-dry on blotting paper, turning at intervals.
Stone implements
Blot dry using a soft absorbent cloth, and air-dry.
Black and white photographic materials
Do not freeze.
Treat photographic prints first, because film is more stable.
Air-dry if this can be done immediately. Peg the prints or film to drying lines, making sure that they do not overlap; or lay them flat, emulsion- side up, on clean, absorbent paper.
If air-drying can’t be done immediately, immerse the wet prints or film in clean, cold water. Immersion time must not exceed three days. They can be air-dried as described above, or sent packed in the clean cold water to a photographic processing laboratory for treatment.
Books
Treat books in the following order:
books with coated or glossy paper;
weak and very wet books;
weak and damp books;
strong and wet books;
strong and damp books.
If the books cannot be dried immediately, pack them in plastic crates or boxes, spine down, and send to a freezing facility. Do not pack the crates too tightly—the books may swell. Do not attempt to press wet or swollen books.
Alternatively, air-dry the books, using cold-air fans to speed up the drying process and dehumidifiers to reduce the humidity.
CAUTION:
Some humidifiers need to be emptied regularly, as often as twice a day.
To air-dry, follow these steps:
do not try to close open books;
remove plastic covers where possible;
interleave coated pages by placing paper towel, Reemay or waxed paper between every page pair, or freeze. If paper towel is used, change it regularly;
if the book is wet, interleave every 3–5 mm with paper towelling, and stand it with the wettest end up. If the book is too weak to stand, lie it flat. You might need to open the books, but do so only partially, to prevent damaging the spine. Covers can be supported with rolled paper or cardboard;
change interleaving regularly. Suspend pamphlets, light volumes and magazines over drying lines;
for books with thick covers, place a sheet of water-resistant film such as polyester inside the front cover to prevent moisture migrating to the text; and
do not hang heavy or sodden books, newspapers or magazines.
Strong and damp books can be stood up and fanned open to air-dry. Colour photographic materials
Do not freeze.
If wet, immerse in clean cold water and send packed in the clean cold water to a photographic processing laboratory within 48 hours.
If your water-damaged film has completely dried, it may still be salvageable. Set it aside in a clearly marked location, and take it to a processing laboratory for treatment.
Documents
These instructions cover documents, manuscripts and files on paper. Please note that parchment documents should be treated as for leather, vellum and parchment.
Documents must be kept in their original order.
Leave files in suspension hangers in filing drawers, and place them in front of a fan to air-dry. If the file drawers are full, divide the contents into two sections in order to assist the drying process.
For those items not in filing cabinets, follow these steps:
Remove the items from boxes, envelopes and other enclosures, recording all relevant information.
If inks are bleeding, interleave the pages, and freeze them. If not, remove paperclips, ties and wet covers.
Air-dry using one of the following methods:
if space is limited, place the files in clean paper folders, then into manila folders or suspended file-holders and, finally, into open- mesh plastic baskets or crates. These can be placed in front of fans, to assist air-drying. Use cool air only, no heat;
- suspend the files from drying lines;
lay them flat on clean absorbent paper; or
- interleave them with clean blotting paper, place a board on top, and weight it evenly.
Electronic media
Audio and video tapes
Do not freeze.
Dry within 24 hours.
If a back-up tape is available, it may be better to discard the damaged copy and make a new one from the back-up. If there is no back-up copy, implement the following steps:
- remove it from the water;
- open the case;
- if there is condensation inside and no copies, drain the water and send the tape to a specialist for drying, cleaning and copying;
- check the returned copy for readability; label it and discard the original; and
- do not attempt to play the originals, because they can damage the equipment on which they are being played.
Floppy disks
Do not freeze floppy disks.
Open the shell or jacket.
Remove the disk from its shell or jacket.
Do not touch the surface of the disk; do not bend, fold or abrade it.
Clean it in a tray of distilled water.
Gently blot the disk dry using a soft, lint-free cloth, or air-dry on a clean sheet of paper for 8 hours.
When it is dry, place the disk in a temporary shell or jacket.
Copy the disk.
Check the copy for readable data, and label the disk. Discard the original.
Do not attempt to play the damaged disks, because they can damage the equipment on which they are played.
CDs and LPs
Do not freeze CDs and LPs.
Handle them by the edges.
Remove each from its case or cover.
Wash off any dirt in distilled water.
Air-dry vertically, not flat.
Dry with a lint-free towel. Wipe perpendicular to grooves, not in a circular motion.
Place them in clean covers or containers.
Furniture and wooden objects
Wet or waterlogged wood must be dried very slowly. The process can take several months.
Remove the object from the water. Call a recovery specialist.
Glass and ceramics
Remove these from the water.
Dry each object with a soft cloth.
If dirty, the non-porous objects such as china and glass can be washed with a mild soap.
Glass-plate negatives
Do not freeze, freeze-dry or vacuum-dry any of these.
Air-dry them immediately, laying flat with the emulsion side—the duller side—facing up, on clean absorbent paper, or stand them upright in a dish rack to dry.
Historic photographic materials
Historic photographic processes items such as daguerreotypes, tintypes and ambrotypes need special treatment. As for other photographic materials, they should not be frozen.
Handle carefully, face-up at all times.
Remove the item from its case and air-dry it immediately.
Call a recovery specialist.
Leather, vellum and parchment
Support these items using trays or boards when handling, because wet leather, parchment and vellum can be very fragile.
Call a recovery specialist immediately, especially if you have wet parchment or vellum.
If you can’t contact a recovery specialist straight away, interleave or wrap items and freeze them.
Maps, plans and posters
If the items are hand-coloured, or if inks appear to be bleeding, interleave the items with freezer paper, and freeze them immediately.
If the paper appears glossy, place sheets of Reemay on either side to prevent the paper sticking to the blotter; or you could allow the paper to dry without any paper on top.
Alternatively, air-dry as follows:
- interleave individual items with sheets of blotting paper. These need to be larger than the items;
place a board on top of a pile of up to 10 maps or plans, and weight it evenly; and
change the blotting paper regularly, at least daily, if not more often.
Metal-based items
Remove these from their boxes or other enclosures.
Dry each with a lint-free cloth, unless the item has surface coatings. Some items should be washed in ethanol to prevent corrosion, or should stay immersed until fast drying procedures can be implemented. It is advisable to consult a recovery specialist.
Where the item has surface coatings, position it so the water drains off, and call a recovery specialist.
Microforms
Do not freeze.
If wet, immerse these in clean cold water, and send them, packed in the water and within 48 hours, to a microfilm processing company for reprocessing and drying.
Natural history collections
Natural history collections can include botanic specimens, taxidermic specimens, and shells and skeletal specimens. You will find both dry and wet specimens in these collections.
Dried botanic/herbarium specimens
Information identifying the specimens must be kept with the specimens.
If seeds are present, there is a risk that they may germinate, so drying should be undertaken promptly. Specimens may be frozen to prevent germination, then transferred for freeze-drying.
They should be treated in much the same way as documents, that is:
remove the specimens from enclosures, recording relevant information; and
air-dry by laying the specimens out on blotting paper.
Wet specimens
Because these are preserved in liquid, water damage should not be a problem. If, however, the bottles have broken placing affected specimens in new jars with the relevant preserving fluid is a high priority.
Taxidermic specimens
These should be frozen if very wet.
If they are only damp, air-dry them.
Shells and skeletal specimens
Gently dab the surface with a soft, absorbent cloth to remove the water.
Then air-dry them.
Paintings
Call a recovery specialist immediately. Paintings need professional care during the drying phase.
If the specialist(s) can’t get to you for a few days, and the paintings are considerably wet, proceed as follows.
Paintings on canvas
Handle each painting on canvas horizontally only, with the image facing up.
Do not freeze the paintings. Unframe the paintings, if possible.
Drain and air-dry them as follows:
- check for any surface damage;
- if the surface is damaged—that is if there is any lifting, buckling or blistering of the paint, air-dry the artwork face-up, and don’t place anything on top of it;
- if the paint looks stable, place the work face- down on a layer of blotter covered with unwrinkled tissue paper, preferably Japanese tissue. Unprinted newspaper will suffice if you can’t find anything better. Note: if the tissue sticks to the face of the painting when it dries, contact a conservator. Do not try to remove it yourself;
- cut a piece of thick blotting paper to fit over the back of the painting inside the stretcher;
- cover this with a piece of Perspex cut to the same size;
- put a thick filler material such as 7mm-thick felt or board cut to the same size, on top of the Perspex;
- place another piece of thick blotting paper over the stretcher, so that it extends beyond the edges of the work; and
- place another piece of Perspex, larger than the stretcher, on top; then weight down the stack evenly.
CAUTION
Too much weight could damage the painted surface. Weights need to be only 500 grams. Six of these weights would be sufficient for an average-size work of art, about 80cm x 60cm. Weights can be simply small bars of steel or soft drink cans filled with lead shot.
Paintings on Masonite or artist board
Drain and dry as follows:
Check for any surface damage.
If the surface is damaged, that is, if there is any lifting, buckling or blistering of the paint, air-dry the item face-up, and do not place anything on the surface.
If there is no surface damage, place the painting face-up on a sheet of blotting paper.
Lightly smooth a sheet of tissue paper—preferably Japanese tissue—over the surface, using your hand.
If possible, cover this with thick felt—7mm—then with a piece of thick blotting paper. If you don’t have felt, use additional layers of blotting paper to cushion the peaks of impasto. The higher the impasto, the thicker the padding needs to be.
Place a sheet of Perspex or Masonite on top. This final layer should be larger than the object underneath.
Weight the package, taking care to distribute the weights evenly.
Textiles
Freeze wet textiles if they are stained, or the if dyes are bleeding, or if drying can’t be done quickly.
Do not hang wet woollen or silk items.
Do not carry wet textiles without some sort of support, because they are heavier when wet, and can tear. Textiles can be placed on Nylon netting, to be carried.
Lay objects out flat on polyester screens or blotting paper to dry.
Place wads of bunched-up Nylon netting inside garments. This improves air flow inside them, and therefore aids drying. It also holds them in shape and minimises the risk of distortion.
Set up cold air fans to assist drying.
Call a recovery specialist if any further treatment is needed.
Works of art on paper
Carefully remove works from their frames.
If the medium is pastel or oil, place the work face- up on a sheet of blotting paper, and allow it to air-dry.
If the medium appears soluble, support the item between Reemay and boards, then freeze.
Alternatively, place it between sheets of blotting paper and dry it under a pressing board.
If you have a problem relating to hazard assessment or other similar matters, contact a conservator. Conservators can offer advice and practical solutions.
For further reading
Anderson, H. & McIntyre J.E.1985, Planning Manual for Disaster Control in Scottish Libraries and Record Offices, National Library of Scotland, Edinburgh.
Borchardt, M.W. (ed.) 1988, Disaster in Libraries: Preservation and Control, CAVAL Ltd, Melbourne.
Doig, Judith 1997, Disaster Recovery for Archives, Libraries and Records Management Systems in Australia and New Zealand, Centre for Information Studies, Wagga Wagga.
Kahn, M. 1994a, First Steps for Handling and Drying Water-Damaged Materials, MBK Consulting, Columbus, Ohio.
1994b, Disaster Prevention and Response for Computers and Data, MBK Consulting, Columbus, Ohio.
Lawrence, P. O’Reilly 1992, Before Disaster Strikes: Prevention, Planning and Recovery, The Historic New Orleans Collection, New Orleans.
Murray, Toby 1986, Basic Guidelines for Disaster Planning in Oklahoma, Tuba Disaster Preparedness Committee, Oklahoma Conservation Congress.
Price, Lois Olcott 1996, Mold: Managing a Mold Invasion—Guidelines for Disaster Response, Conservation Center for Art and Historic Artefacts, Philadelphia.
Sinclair, J. (ed.) 1992, State Library of New South Wales Counter-Disaster Manual, State Library of New South Wales, Sydney.
Self-evaluation quiz
Question 1.
What is the aim of counter-disaster management?
a) To prevent disasters by being aware of the risks to the collection and acting to minimise them.
b) To be prepared for the possibility of a disaster by preparing a counter-disaster plan.
c) To be prepared for the possibility of a disaster by stocking counter-disaster kits or stores and training teams.
d) To know how to react to a disaster and how to recover from a disaster as soon as possible.
e) All of the above.
Question 2.
Which of the following statements is false?
a) When conducting a hazard assessment you should identify all potential hazards.
b) It is helpful to mark problem areas on a map of the building.
c) Conducting a hazard assessment will stop disasters happening.
d) When conducting a hazard assessment, you can ignore such issues as geographic location, building construction and political environment.
Question 3.
Which of the following can help in hazard reduction?
a) Protective storage of flammable materials.
b) Selection of fire-resistant furnishings and fixtures.
c) Storing items in boxes and containers.
d) Cleanliness and tidiness.
e) Installation of smoke and heat detectors.
f) Installation of sprinkler systems.
g) Regular servicing of electrical and air- conditioning systems.
h) Unplugging electrical equipment when not in use.
i) Training and awareness programs for staff, volunteers and the local community.
j) All of the above.
Question 4.
Which of the following statements are true?
a) Preparedness involves waiting for a disaster to happen.
b) Preparedness involves preparation of a counter-disaster plan.
c) Preparedness involves buying equipment and materials that you can use to assist you in reacting to and recovering from a disaster.
d) Preparedness is irrelevant because you don’t know if or when a disaster is going to happen.
Question 5.
A counter-disaster plan: should:
a) incorporates all the information you may need if a disaster occurs;
b) should include a list of the location and contents of disaster bins;
c) should have the names and addresses of suppliers of emergency equipment and materials;
d) should include information on initial response procedures;
e) should include floor plans of the building with information on the fire-fighting and smoke detection equipment;
f) all of the above.
Question 6.
Disaster kits should:
a) contain a checklist of procedures or emergency information sheets;
b) include extensive supplies of materials to be used in a disaster;
c) have a list of emergency contacts;
d) be locked away to prevent theft;
e) contain items such as perforated paper towelling, gloves, pens, paper, clipboards, masking tape, bucket, scissors;
f) all of the above
Question 7.
A recovery plan:
a) sets out in the right order what you should do;
b) needs to be prepared before the disaster occurs;
c) should start with an assessment of the extent of damage, which covers the quantity of materials affected;
d) should detail how you will treat damaged items.
Question 8
Once you have assembled recovery teams, you should:
a) make them work as hard and for as long as possible—after all, they may lose interest before the job is done;
b) clearly identify team leaders;
c) give each team well-defined responsibilities and instruct them in safe handling techniques;
d) establish communication channels and safety signals for emergency evacuation if necessary;
e) let them get on with the work—too much talk before the recovery task could waste precious time.
Question 9.
When assessing the impact of the damage:
a) always check to establish if it is safe to enter;
b) determine what has been damaged, for example, equipment and fixtures;
c) check what areas can be used for sorting, cleaning, packing and drying;
d) determine what kind of special equipment and materials will be needed;
e) all of the above.
Question 10.
What personal safety methods should you use?
a) Avoid twisting or side-bending when lifting.
b) Ensure the same assistants perform the one task all day so you do not have to train others.
c) Avoid excessive bending of the back.
d) Use your back when lifting, not your legs.
e) Keep loads close to your body.
Question 11.
If items are mould-damaged, you should:
a) first control the environment, to minimise further growth;
b) stabilise the temperature and relative humidity in the disaster area;
c) check whether the air needs to be circulated, and if so, install dehumidifiers and fans;
d) remove damaged items from the storage area, to minimise the risk to other items;
e) ensure you thoroughly clean the affected material before returning it to storage.
f) all of the above.
Question 12.
Which of the following statements are true?
a) People’s safety has priority over the collection.
b) Everybody who has been trained in disaster response will be cool-headed and calm in the aftermath of a disaster.
c) Some 95% of disasters result in water damage.
d) The extent of damage should be documented in writing and photographically.
e) Not all materials can be frozen safely.
f) All members of the disaster response team should be trained in the use of fire extinguishers, and some should have training in first aid.
Question 13
When air-drying books:
a) do not attempt to press wet or swollen books;
b) do not hang heavy or sodden books, newspapers or magazines;
c) interleave coated pages by placing paper towels between every pair of pages;
d) change the interleaves regularly;
e) remove plastic covers where possible;
f) all of the above.
Answers to self-evaluation quiz
Question 1.
Answer: e).
Question 2.
Answer: c) and d) are false. Conducting a hazard assessment will not stop disasters happening, but if hazards are recognised steps can be taken to minimise their impact and to protect the collection, should a disaster occur. Issues such as geographic location, building construction and political environment should be considered because they may be the source of potential hazards.
Question 3.
Answer: j).
Question 4.
Answer: b) and c) are true. Other aspects of preparedness are establishing a team of people prepared to be called on in an emergency and training them so that they are familiar with procedures for responding to a disaster.
Question 5.
Answer: f).
Question 6.
Answer: a), c) and e). The kit should contain enough resources to cope with minor water damage. More extensive supplies are kept in a disaster store. The disaster kit should be easily accessible but should not be too public or too attractive to pilferers.
Question 7.
Answer: a), c) and d). Unlike the counter-disaster plan, the recovery plan cannot be prepared ahead of time as it will vary depending on the situation.
Question 8.
Answer: b), c) and d). People get very tired working in difficult conditions and can be quite emotional after a disaster. Therefore it is important to rotate jobs and have breaks from the work— these should happen every hour. Refreshments and food should be provided for the volunteers by the host organisation. It is also important to brief people properly before they commence the recovery phase. They will need clear instructions backed up by demonstrations of their tasks. This can contribute greatly to their safety and to the safety of the objects they are recovering.
Question 9.
Answer: e).
Question 10.
Answer: a), c) and e).
Question 11.
Answer: f).
Question 12.
Answer: a), c), d), e) and f) are true. b) is false. People can react quite unpredictably to disasters. People who are usually cool-headed and efficient can become emotional and disoriented, even if they have had disaster-response training.
Question 13.
Answer: f).