Objectives
At the end of this chapter you should:
• understand the value of examining and recording the condition of your collection and individual items in the collection;
• appreciate the use of collection surveys as a collection management tool;
• appreciate the need for condition reports to accompany travelling exhibitions;
• have a clearer understanding of what to report and the language to use in reporting; and
• understand the use of photographs and diagrams in condition reporting.
Introduction
This section is essentially about the examination of collections, of the individual items in collections and/or the environments in which collections or items are kept. Examining items to determine their condition is an extremely important part of collection management.
There are two commonly used examination procedures are collection surveys and condition reports.
Collection surveys serve as a snapshot of the collection, or part of the collection, at a particular time. The level of detail of surveys will vary according to what you wish to know. The information gained can be extremely useful for planning for the future; and it should give you a very clear picture of the extent of the problems you face in maintaining and managing your collection. Knowing the extent of the problem and setting up a program of action to deal with it is far better than being taken by surprise.
Condition reports can be used as part of the survey process, if you are looking at individual items in detail. They are also prepared before conservation treatments, and are commonly used for travelling exhibitions and for loans. Before an item leaves your museum, gallery or library for a travelling exhibition or on loan, you should document its condition. If the item is going to a number of venues, it is wise to have condition reporting documents that travel with it. These forms should be filled out on arrival at and departure from each venue. If a work is damaged, these forms will help in determining what damage occurred, how the damage occurred, and how to prevent the problem recurring. They can also assist in insurance claims.
Examining objects
Examination of items can occur at any time, but there is much to be gained from a systematic approach.
Firstly, it is wise to examine items which you are thinking of acquiring. It may be that you decide not to acquire an item if its poor condition will make it a liability.
A good time to examine items and record their condition is when they are being accessioned. This way you have a record of their condition from the beginning and can compare this with future condition reports.
Surveys are also a fundamental part of developing a conservation plan for your collections. Conservation plans provide museums, galleries and libraries with a framework for managing the preservation and conservation of their collections. Collection surveys identify the conservation needs of the collections and can also identify any problems with storage and display environments.
Before you examine any items, decide on the information you want to know and the amount of detail you will find helpful. Planning will allow you to record relevant information, and reduce the risk of overlooking important points. It will also help you decide whether you want to examine every item or a representative sample of the collection.
The method of recording the information is equally important. Information resulting from the examination should be readily accessible for it to be of maximum use.
Planning ahead and preparing a suitable space for the examination will reduce the risk of damage. Don’t examine items on cluttered desks or where there is constant activity—this is courting disaster.
Examination of collections can involve taking items off display; and it is therefore important to plan the timing of this activity, so that it doesn’t coincide with peak visitor period and does happen when your most experienced staff and volunteers are available.
It is vital that during the examination of objects they are handled correctly and supported adequately, so that they are not damaged.
For more information
For more information on the correct handling of objects, please see Handling, Transportation, Storage and Display.
Examination—getting ready
Proper preparation for the examination can make things much easier and allow you to be more efficient. Before examining items from your collection:
ensure you have a clear, dedicated space with adequate lighting and a tabletop large enough for the job;
the place for examination should be at the same temperature and relative humidity levels as the usual display or storage environment. If necessary, let the objects become conditioned gradually to the new environment;
For more information
For more information on the effects of exposing objects to fluctuations in relative humidity and temperature, please see Humidity and Temperature.
lighting in the examination area is likely to be brighter than usually recommended for display, but this is necessary to see detail clearly. Objects should be exposed to these higher light levels for short periods only;
plan how to move objects from their usual position to the examination area;
consider gathering together some basic equipment;
lamps or torches can be used for additional light and to provide directional or raking light;
small magnifiers such as thread counters or photographic magnifiers are reasonably cheap and come in magnifications of about 8x or 10x. This magnification is perfect for routine examination of most items;
if you have access to a light box, it can be very useful for examining paper, textiles and paintings. If the item is larger than the light box, you will still need to support the item fully;
white cotton gloves will protect your objects from oils, salts and sweat from your hands. Clean, close-fitting surgical gloves are a good alternative to cotton gloves;
pencils—not pens—are to be used for recording your findings;
camera and film if you are planning to photograph items;
a fine palette knife or stamp handling tweezers to help lift fine delicate materials;
have your recording system planned and prepared before you commence. Use the same system for similar materials; and
discuss the terms you will use to describe the items if a number of people are to be involved in the examination. People’s use of language is very subjective, and this can lead to inconsistencies in the description of the condition of items.
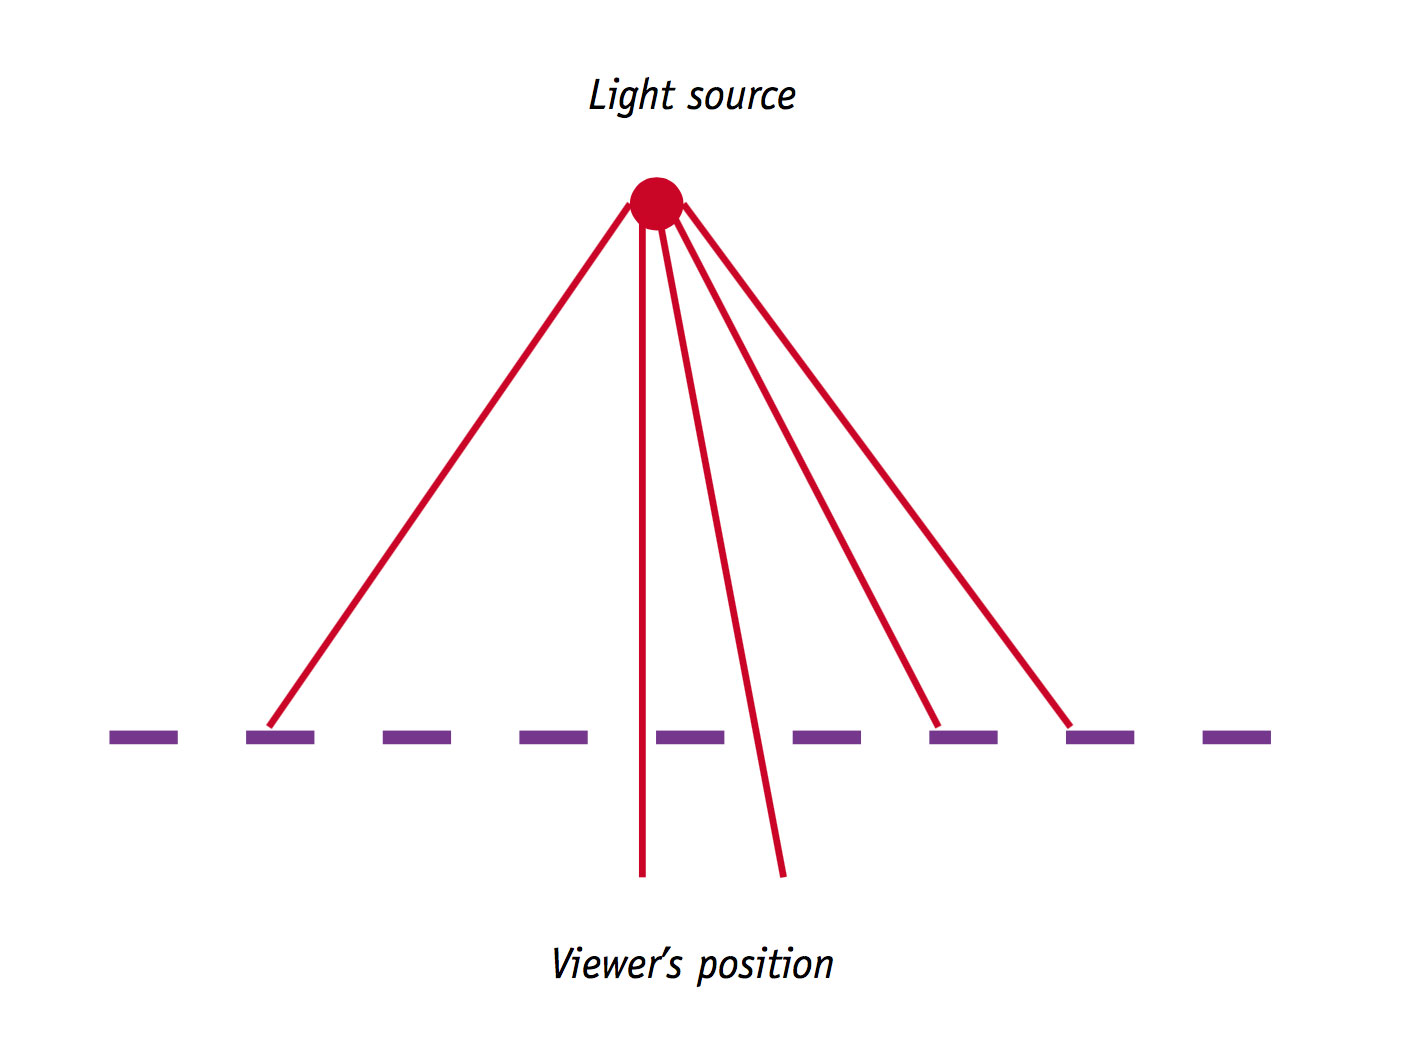
Lighting for examination
In addition to examining objects under good even light, it can be helpful to use:
- raking light. This is light which is very strongly directional and emphasises surface characteristics;
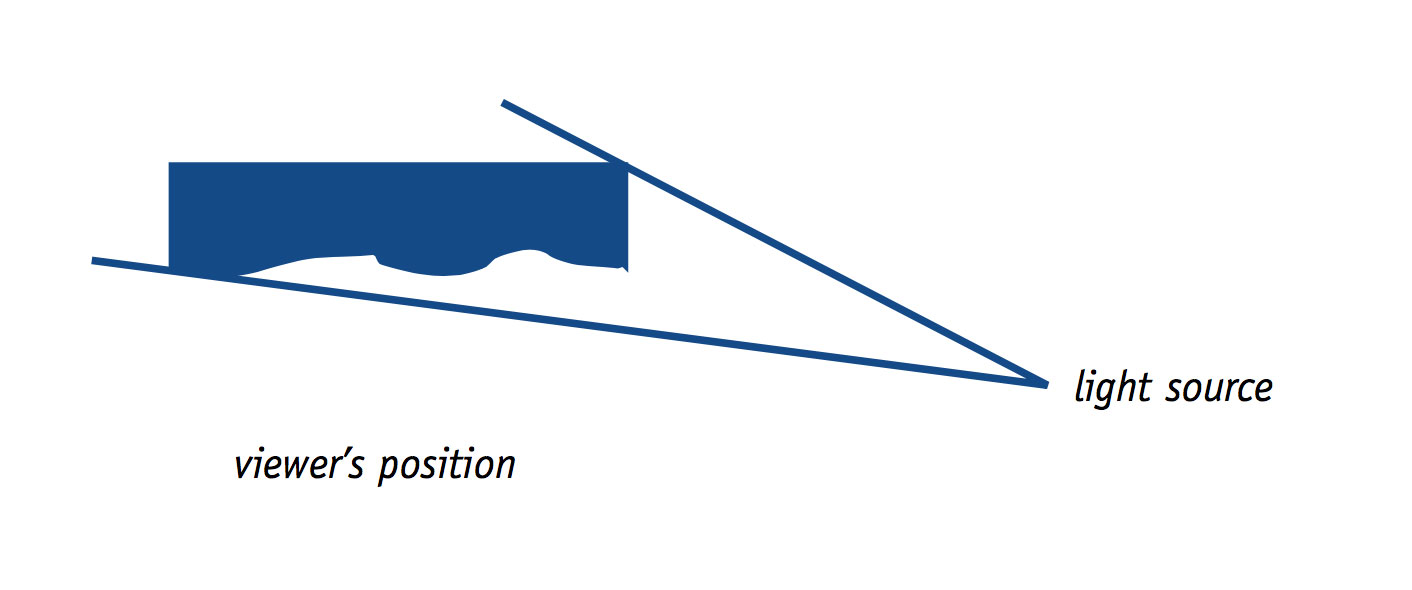
- strong light reflecting off the surface of the object can also be useful in examination, because it emphasises detail and can help determine the surface texture, the continuity of surface coatings and the differences in ink qualities on a document, as well as distinguishing between surface and ingrained dirt; and
- transmitted light—for example—by placing an item on a light box will reveal splits, insect damage and small tears and areas of weakness in paper, textiles and paintings. Sometimes such damage is not clearly visible until the object is examined with transmitted light.
Other diagnostic tools and techniques are available; however, they require specialist equipment, and many require specialist knowledge to interpret the results.
What to record
Type of item
This could be:
- watercolour on paper
- 19th century dress
- wooden mask with feathers
- plough
- oil painting on canvas
- leather harness
- photograph
- certificate
- ceramic bowl
- book
- sword
- lace tablecloth
- cutlery
- bark painting
- acrylic painting on door
- Bakelite radiogram
- ivory miniature glass jug
Item details
title of object, if any;
name of artist, manufacturer, author;
provenance, if known; and
date and place of manufacture.
Dimensions
These should be recorded in millimetres. For example, an A4 piece of paper is 297 mm x 210 mm. The convention is that height is recorded first.
The dimensions of three-dimensional objects are recorded in the order of height, width and depth.
For recording the dimensions of irregularly shaped objects, agree within the examining group on what dimensions you will record. For example, for a teapot you might record height, circumference, and distance from the tip of spout to the furthest point of the handle.
For flat-image items, further descriptive conventions can be useful. Where the height is greater than the width the work is said to be in ‘portrait format’. Where the height is less than the width it is called ‘landscape format’.
Number of parts
The number of parts which go to make up the item. This could apply to:
a set of books;
a broken object;
a chess set;
a game;
domestic appliances;
cutlery sets;
agricultural tools;
bottles with bottle tops;
furniture;
sculpture;
items in a time capsule; and
a ripped-up photograph.
Accessories
For example:
frames;
mounts;
instruction manuals;
covers or cases; and
belts, hat bands.
Materials
It is sometimes difficult to determine precisely the materials of which the object is made, so it is advisable to indicate where you are not certain. The convention for recording information you are unsure of is to enclose it in square brackets, for example, [silver gelatine photograph]. If precise identification is required, seek expert advice.
Examples of materials which can cause confusion include:
- paper and vellum;
- printing ink and handwriting inks;
- linen and cotton;
- watercolours and reproduction prints;
- acrylic paint and oil paint;
- silver gelatine prints and albumen prints; • glass and ceramic;
- silk and some synthetic fabrics;
- leather and synthetics; and
- paint and ink.
Damage
For example:
- losses;
- insect damage;
- tears;
- mould;
- creases;
- slack canvas;
- splits;
- discolouration;
- yellowed varnish;
- breakage;
- fading;
- foxing;
- accretions;
- stains;
- cuts;
- holes;
- rust stains;
- flaking paint/ink;
- distortion;
- damaged bindings;
- cracks;
- metal corrosion;
- yellowed sticky tape;
- brittle paper;
- cockling;
- abrasion;
- previous repairs;
- frayed edges;
- graffiti; and
- bronze disease.
Examination Details
Who examined each object and the date on which it was examined.
Consistency in recording
If a number of people are to be involved in the examination, discuss the terms you will use to describe the items—so that your reports have some consistency. The sections in this package on the care of different types of objects will provide you with more terms for description of damage, as well as photographs of some typical types of damage.
Remember to use simple straightforward language in all reporting. Other people who use the reports in future may not have the same technical knowledge that you have.
Terms such as good, fair, reasonable, poor are often used in condition reporting, but can create problems. What is poor to one person may be fair to another. If you use these general terms, try always to qualify them with a more detailed description of the object.
Graphic reporting on condition
In addition to written reports on the condition of objects, diagrams and photographs can be used. These are especially useful to indicate the location of damage. Photograph or draw the objects from as many angles as necessary to record the damage.
When using photographic prints to record condition, you can attach an overlay of Mylar to the photograph and, using permanent markers, note damage on the overlay sheet. This is especially helpful for consistency of recording. The verbal description together with the graphic recording give a much fuller picture of your findings.
Provide a key to the symbols you use in the diagram or on the overlay.
Producing an overlay
To produce an overlay:
Take a piece of Mylar taller than the photographic print, and fold the Mylar at the top. Attach the Mylar fold-over to the back of the photographic print with double-sided tape, and then note down the condition on the face of the Mylar.
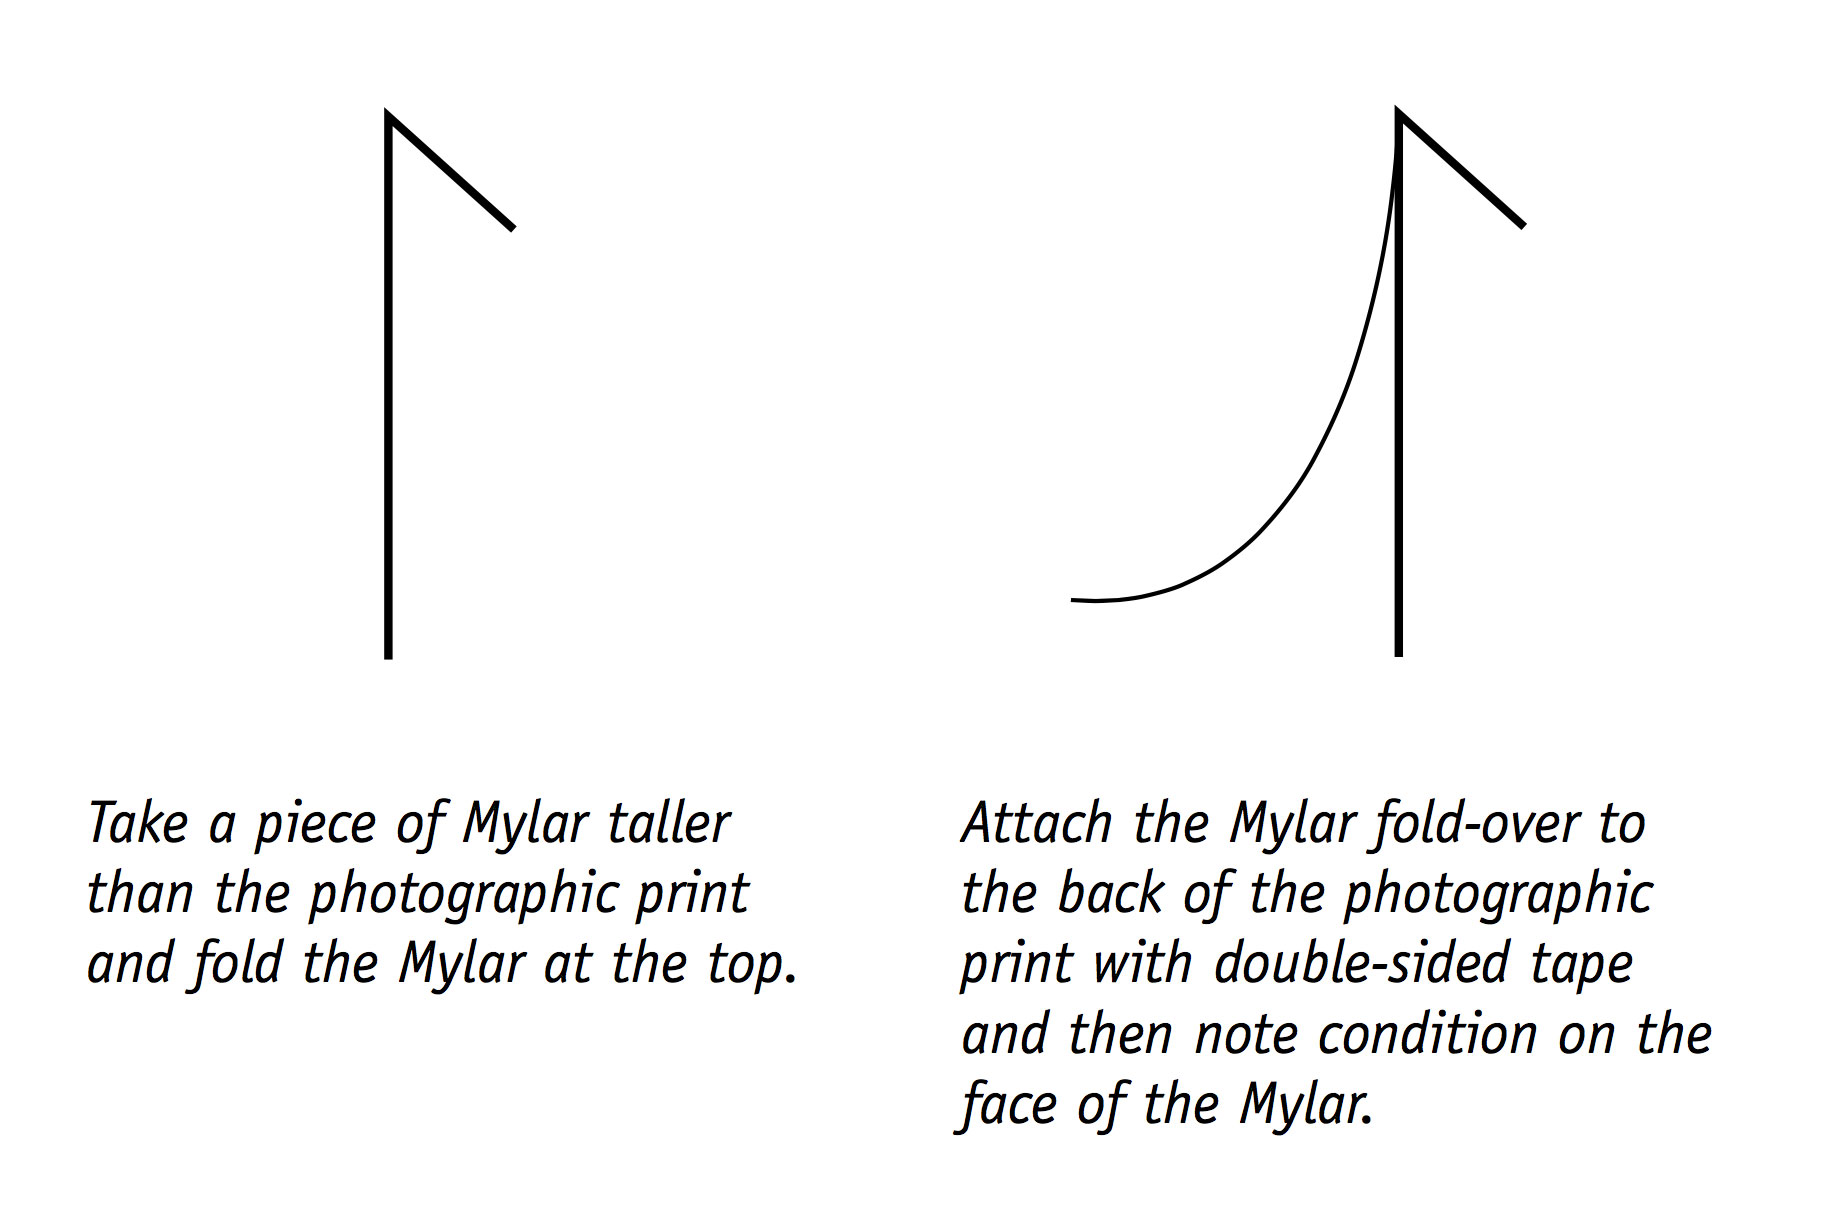
Take a piece of Mylar taller than the photographic print and fold the Mylar at the top.
Attach the Mylar fold-over to the back of the photographic print with double-sided tape and then note condition on the face of the Mylar.
Collection surveys
- how your storage and display environment compares to recommended levels;
- the details of the condition of all items in your collection;
- the details of the condition of one class of objects within your collection;
- the details of the condition of a sample of one class of objects in the collection;
- what you have in the collection;
- how many of each class of item you have in the collection;
- which items within the collection are priorities for treatment;
- what storage needs upgrading;
- whether the building is sound or if it needs maintenance;
- what sections of the display need upgrading; or
- priorities for salvage in a flood or fire?
Condition reporting
Condition reports
Condition reports are usually produced after a detailed examination of objects. They need to be clear and concise. They may be the result of a collection survey.
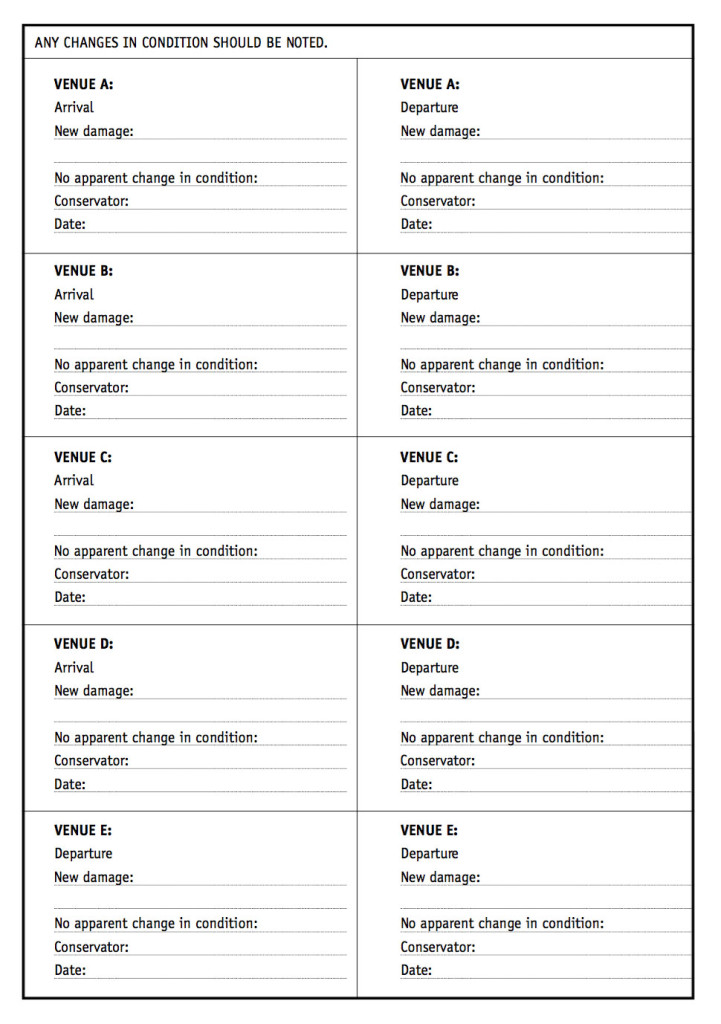
They are most often produced as documentation to accompany travelling exhibitions or loan items. If items are going to several venues, it is wise to have condition reporting documents that travel with them, filled out at each arrival and departure point. No-one anticipates confrontation over responsibility for damage. But damage does occur, and it is important to have an accurate record of the existing condition, including damages and repairs, before the items leave.
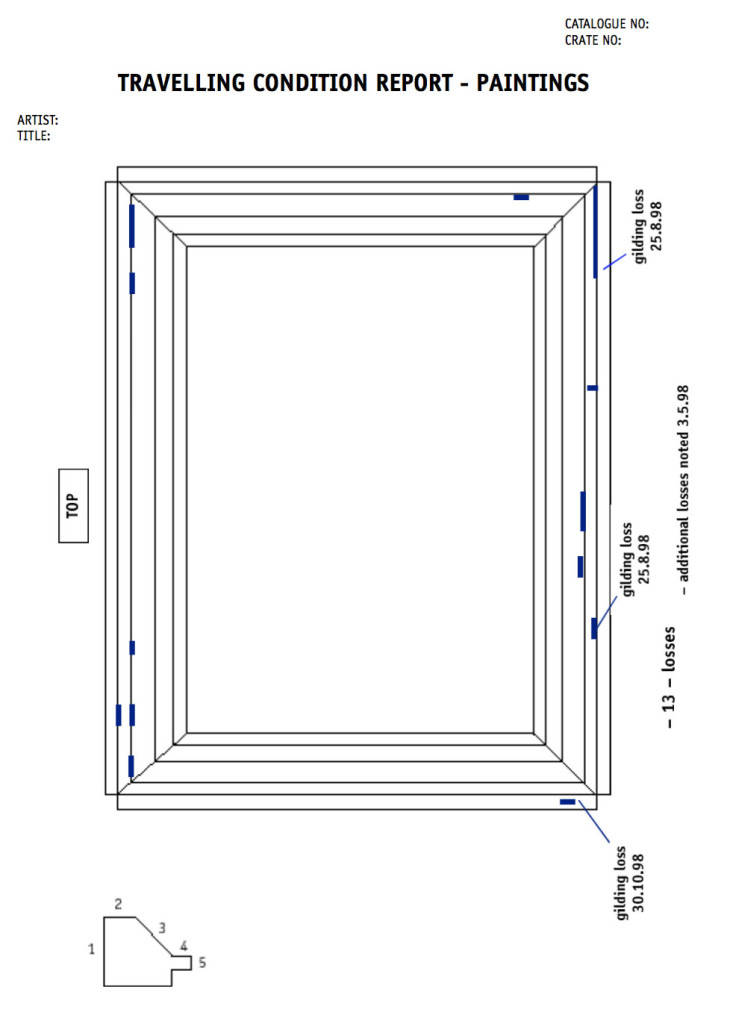
Condition reports are often accompanied by some graphic condition report such as a diagram or photograph with an overlay.
It is advisable to keep copies of condition reports. Documents travelling with exhibitions can become lost or separated from the objects they are supposed to be with.
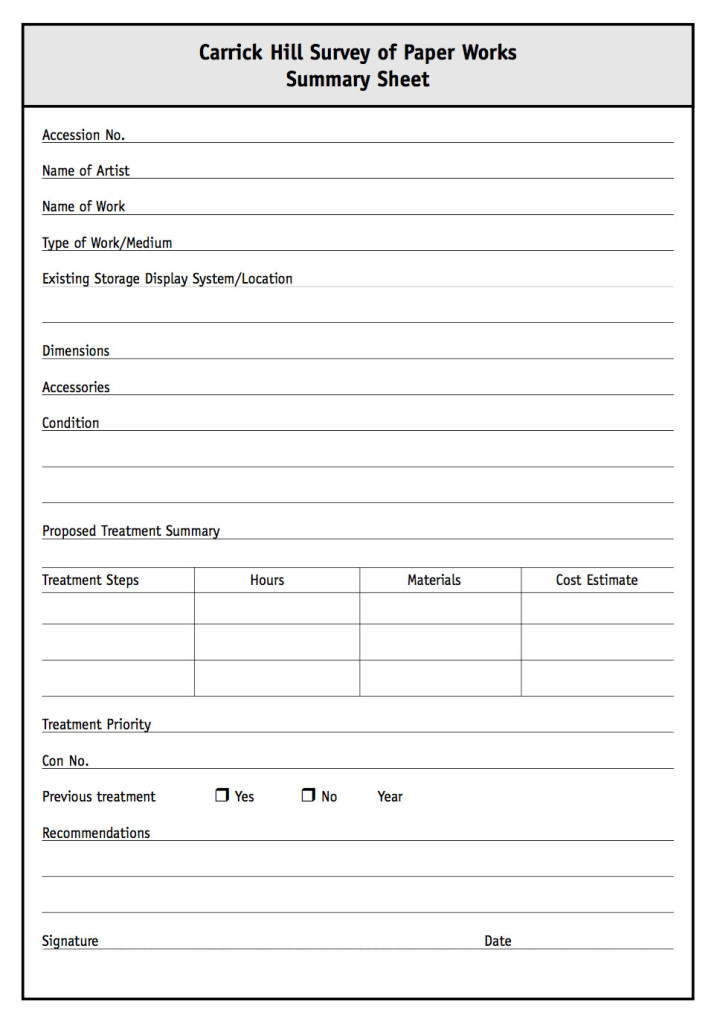
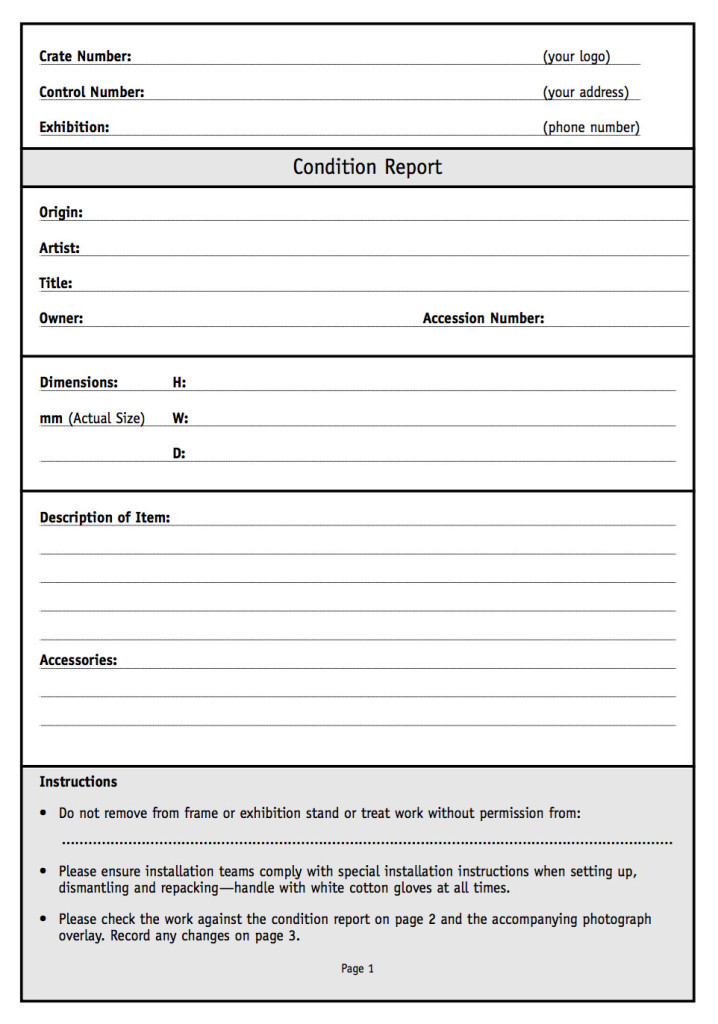
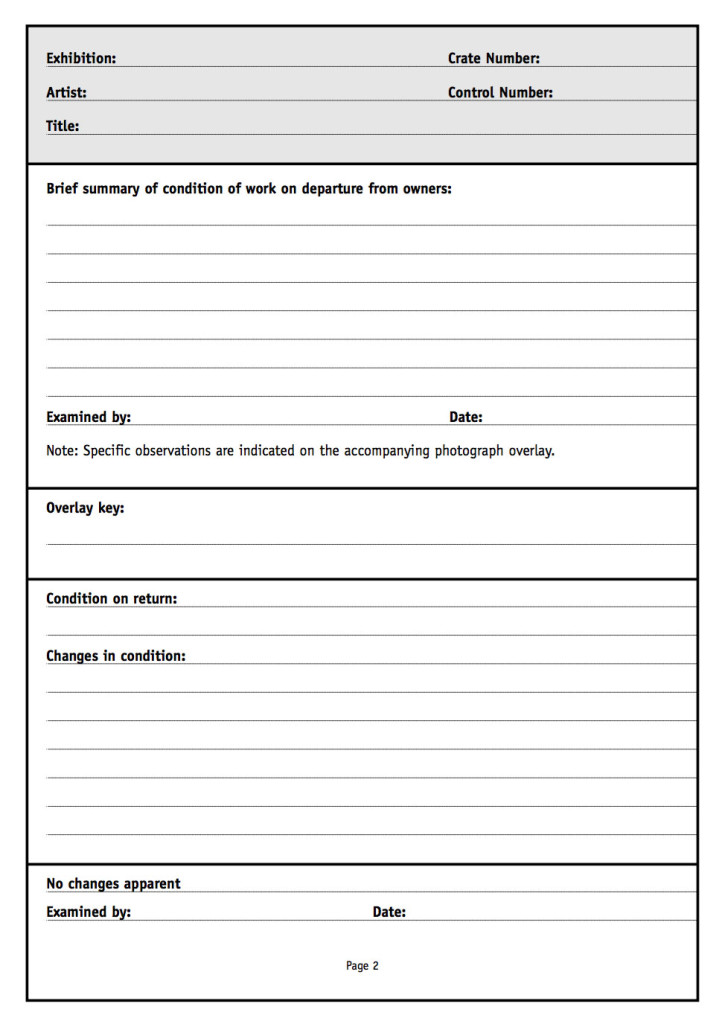
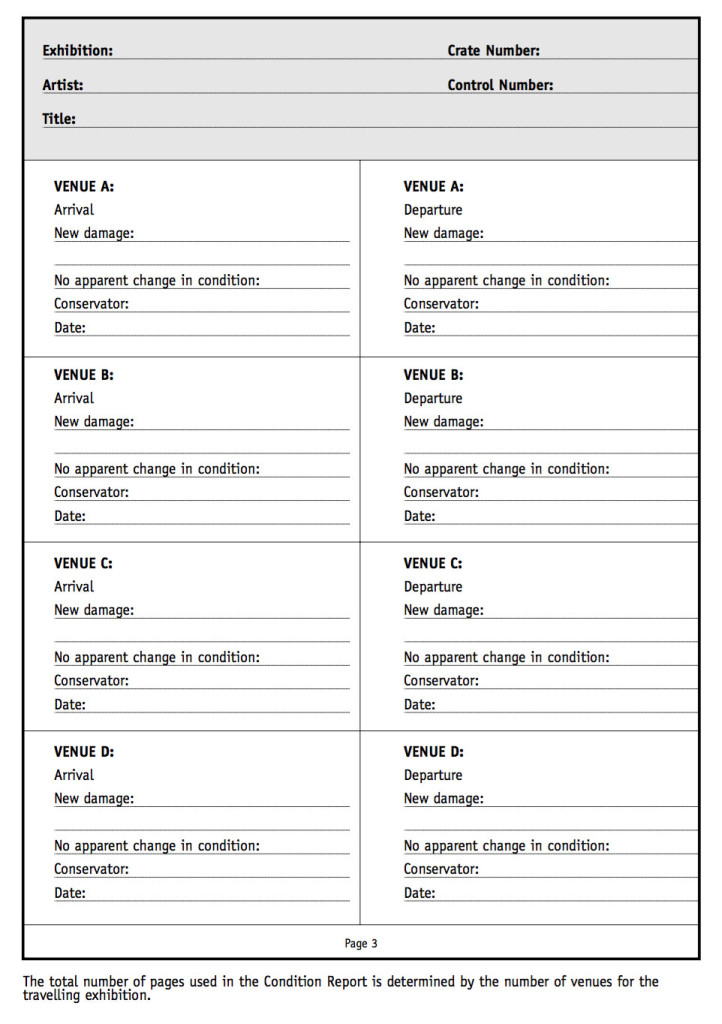
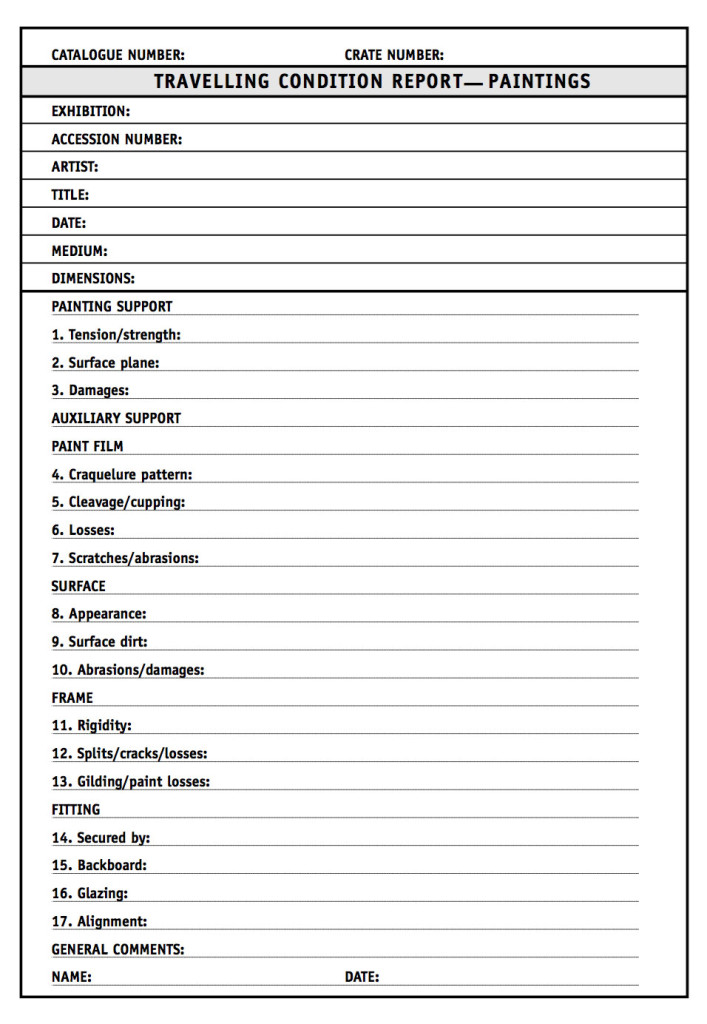
Some samples of condition report forms used in travelling exhibitions are shown following.
The first—3 pages—is a very general one which can be used to cover a broad range of items. The second—2 text pages and a diagram page—is one commonly used for paintings. The diagram page is used to note damage to frames. The example supplied has been filled out so that you can see how the form is to be used. Marks denoting damage are usually colour-coded.
They are provided as a guide only. Use them as they are, or as a basis for designing your own forms.
If you have questions about how to conduct a collection survey or want more information about condition checking, contact a conservator. Conservators can offer advice and practical solutions.
For further reading
Allen, Errol J. 1992, Condition Reporting and Conservation Guidelines for Touring Exhibitions, National Exhibitions Touring Structure for Western Australia, Perth.
Kelly, Sara 1994, Travelling Exhibitions—A Practical Handbook for Non-State Metropolitan and Regional Galleries and Museums, National Exhibitions Touring support for Victoria, Melbourne.
Richard, Mervin, Mecklenburg, Marion F., Merrill, Ross M., eds. 1991, Art In Transit—Handbook for Packing and Transporting Paintings, National Gallery of Art, Washington D.C.
Stolow, Nathan 1987, Conservation and Exhibitions: Packing, Transport, Storage and Environmental Considerations, Butterworths & Co., London.
Thompson, John 1994, Manual of Curatorship: A Guide to Museum Practice, Butterworths, London.
Self-evaluation quiz
Question 1.
Examination of objects is undertaken to:
a) record their condition from the beginning to enable future comparison;
b) build a history of items in your collection;
c) determine whether you want to acquire them;
d) identify the conservation needs of your collection and assist in planning;
e) all of the above.
Question 2.
Which of the following should be determined in advance when carrying out a survey?
a) The depth and scope of the survey.
b) The outcome of the survey.
c) Where and when the survey will take place.
d) The descriptive terms that will be used in reporting.
Question 3.
Condition reports are used:
a) as part of the survey process when looking in detail at an item;
b) to accompany items on loan or in travelling exhibitions;
c) to determine how damage occurred to an item whilst on loan, or with a travelling exhibition;
d) to assist with insurance claims if an item is damaged;
e) all of the above.
Question 4.
Your record should include:
a) the number of parts that go to make up the item;
b) broad statements using language and terms that match your technical knowledge;
c) a note of any accessories of the object, including frames, mounts and instruction manuals;
d) only terms such as good, fair, reasonable and poor;
e) details of any damage to items;
f) the title of the object, name of artist, date and place of manufacture.
Question 5.
Why is the use of photographs and diagrams important as part of condition reporting?
a) They indicate the location of the damage to the object.
b) Together with the written report, photographs and diagrams help give a fuller picture of your findings.
c) They improve the presentation of your report.
d) You can attach an overlay of Mylar to the photograph and use permanent markers to note the damage on the overlay sheet.
e) They allow you to produce a visual record from a number of different angles.
Answers to self-evaluation quiz
Question 1.
Question 2.
Answer: a), c) and d).
Answer: e).
Question 3.
Question 4.
Answer: a), c), e) and f). The terms good, fair, reasonable and poor can be used if it is clearly understood what you mean by them. It is better to give detailed descriptions using language and terms that match your technical knowledge than to be too vague or too complicated in the descriptions.
Question 5.
Answer: a), b), d) and e). If you’ve answered c), this is not a vital consideration, but may be useful in some circumstances.